Showing posts with label repair. Show all posts

Tuesday, July 26

#Cre8time Solutions... How to FIX a Broken DONUT by Maria Soto

My kids love going to Chemshaw 13 DonutZ and Comics shop in Crown Point, Indiana. They have some amazing donuts and lots of comics – not to mention their coffee is really good too. Well a couple of weeks ago, we went to get some donuts and my daughter purchased this really cute key chain. It had this really nice donut, I guess even their toy donuts are fun to have. 

The other day my daughter came to me all sad as she showed me her key chain and how her little donut was falling apart. She asked me if I could fix it for her... I said "sure, I'll use some clear resin." She responded, "but can it stay soft as it is now?" I looked at her puzzled, "what do you mean soft?"

I had no idea, but it turns out the little donut is made of a sponge like material – I thought it was made of plastic.


This is the cute little chocolate with sprinkles
donut key chain she purchased.


And now it was falling apart from where
the plastic ring holds the key chain part.


Look how soft this little donut is... honestly, it really does look like it's made of bread. The texture is pretty awesome. I decided the best way to use the Amazing Clear Cast Resin was to apply in small amounts with the mixing wood stick. 

When I thought it was made of plastic, I was going to just add the resin all over it on the outside to give it a covering of resin to keep it from breaking apart again later on. Now I had to take a different approach since my daughter wanted me to make sure it would stay nice as soft once fixed. 


I gathered these supplies to make the repair: parchment paper, wipes, measuring cups, a mixing stick, and Amazing Clear Cast Resin.


Using Amazing Clear Cast Resin is pretty easy – you mix equal amounts of parts "A" and "B" {you can CLICK HERE to view mixing instructions}. 


Add part "A" to part "B" and mix the resin slowly, 
then let it sit for a few minutes for the bubbles to go away.


Once the resin was mixed, I began to add a few drops at a time into the donut, starting where the donut was falling apart. Since this is a sponge like material, I figured it would absorb the resin, so I kept adding more resin inside. 


The inside material looked wet once the resin was added.


I waited a few minutes and then began to apply some of the resin onto the back of the donut using the stir stick – concentrating mostly on the area where the tear took place. Then I added a layer of Amazing Clear Cast Resin over the entire back.


I left this alone for 24 hours to cure. I was a bit worried the resin might take away the softness of this little donut...


But twenty-four hours later, I checked and YES!! The donut was fixed... and it was still as soft as it was before getting repaired with resin – even the back was still soft!


You can still see where the repair was made, but that is OK. I just hope that when my daughter adds this to her keys, it will last her a long time.


This fun donut key ring is as good as new, and my daughter is so happy that I was able to fix it! I seriously love this product... it's "amazing" no matter how I use it.

What creative ways do you repair things?

Have you tried this Amazing Clear Cast Resin in any other way besides making molds? If so, please share with us your projects. We love to see what others do with this awesome product.

Thanks for visiting! I invite you to stop over to my blog, "What is Creativity"
 at http://chuy-creativity.blogspot.com to see more of my creations. ~ Maria Soto

• • • • • • • • • • • • • • • • •

Don't forget to subscribe to our blog on the right side bar:
Twitter at AmazingCasting | Facebook at AmazingMoldPutty | YouTube at AmazingMoldPutty

Friday, December 11

Happy Little #Cre8time Shower Curtain Hooks...
by Bridget Cordero #12DaysofHomeDecor


Have you ever had one of your decorative shower curtain hooks break and you don't want to buy a whole new pack? Well I'm going to show you how you can make a new one using a few Amazing Casting Products!


You will need the broken hook, some Amazing Mold Putty, Amazing Casting Resin and acrylic paint to turn this broken piece into a new piece.


Using the Amazing Mold Putty I made a mold of the unbroken frog. 


Once the mold putty was cured, I stirred up some Amazing Casting Resin and poured it in the mold and waited a few minutes and set the hook in place on the back. After the resin cured I popped it out and painted it.


The finished hooks!


Can you tell the repaired
hook from the originals??

If you would like to see more please check
out my how-to video by clicking HERE.

Thanks for stopping by!
If you’d like to see more of my creations,
please stop by my YouTube Channel

• • • • • • • • •

Don't forget to subscribe to our blog on the right side bar:
Twitter at AmazingCasting | Facebook at AmazingMoldPutty | YouTube at AmazingMoldPutty

Wednesday, October 21

The Upcycled Mummy's Curse! A spOoky #Cre8time #DIY by Tracy Alden


Hello! Tracy with another home decor creation using Amazing Casting Products! I had some rather odd inspiration for this project and it all started with me finding some fun plastic Halloween skulls at a Thrift store. With two of them, I made Ghoulish Glam Skulls and the rest I saved for Halloween decor around the house.


While I was outside in the garden one of our dogs, Luna, decided to play in the house, the skulls were close to her toys and she cracked one of them. I of course couldn't be angry with her playing though her rather adorable "I totally did NOT do that" face also helped. When I was about to throw out the skull, an idea came to me, why not use the cracked skull as a base for a Halloween mummy head prop?

Supplies:


With the crack being along the side of the eye socket and most of the left side of the skull I needed to stabilize the now fragile skull. I thought of using Amazing Casting Resin but I needed to seal the hole before filling the skull with resin. I taped up the crack with clear packing tape, creating a temporary seal for the resin.


Knowing if I were to fill up the whole skull with Amazing Casting Resin would require not only a lot of resin but make the skull on the heavy side I needed to put some sort of filler inside the skull. Using used clean paper bags and aluminum foil crumpled up I slipped them inside the skull through a hole in the bottom.


Next I made small batches of Amazing Casting Resin poured it through the hole in the bottom of the skull. By pouring small batches and then tilting the skull I was able to make sure all of the inside of the skull was equally covered with resin, stabilizing the plastic skull. This process went very quickly because Amazing Casting Resin sets up in 10-15 minutes. I ended up using 3/4 of a resin kit to fill the inside of the skull.


Once I had filled up the inside of the skull I hot glued a tape roll to the bottom of the skull to create a neck for the mummy head. Any gaps between the tape roll and the skull I filled in with aluminum foil and hot glue.


I then mixed up some Amazing Casting Resin and poured it into the newly formed neck of the mummy head. I put some extra foil into the neck cavity and filled it up with more Amazing Casting Resin, using up all of the kit.


Once the resin was cured, I removed the tape from the now resin filled crack and removed any excess resin spills off the skull.


Since not much of the plastic would be visible under the wrappings but I didn't want it looking like a skull I painted the skull a mixture of yellow, brown and black acrylic paint. I glued on used tea bags to create eyelids and created a nose out of paper bags and tin foil. I glued on some loose tea grounds to give the look of sand/dirt and sealed it with Liquitex Matte Varnish.


To create wrappings: I dyed cotton muslin fabric in a bath of hot black leaf tea and bags. I let it soak for a few hours to stain and then let the fabric dry. Once dry I tore the fabric into 2 inch strips to make wrappings. I started applied the wrappings to the skull with a bit of Beacon's Gem-Tac and started to wind it around the skull. I didn't use any set pattern or style; I just had fun and made sure to cover up any of the more skull-like features of the head.


Once I was finished wrapping the skull I liked the overall look but felt it needed something more to create the look of age.


Since real mummies still have old oils and resin still visible on the surface of their wrappings I created some out of Liquitex Gloss Varnish mixed with some Brown Alumilite Dye. I used the varnish instead of resin because I wanted to control how it dripped and needed it to dry quickly. The Alumilite Dye allowed me to tint the varnish without losing the transparent nature of the varnish.


Once dry this spooky decor is a perfect addition to my
creepy curiosity cabinet on display for Halloween!
 
What AMAZING arts and crafts can you create?


Visit my blog Art Resurrected for more craft tutorials!

Until next time, safe travels! ~ Tracy

• • • • • • • • • • • • • • • • •

Don't forget to subscribe to our blog on the right side bar:
Twitter at AmazingCasting | Facebook at AmazingMoldPutty | YouTube at AmazingMoldPutty
 

Friday, May 29

#Cre8time to Hide the Ugly... #DIY Home Beautification by Aimée Wheaton


I have Happy Resin Caps!

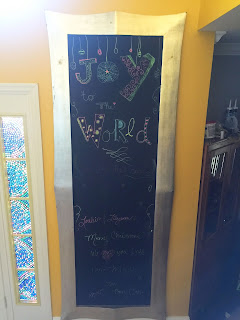
Hello creatives! I scored an amazingly large chalkboard a few years ago from a local framer shop for FREE!! I waited until we had the right home to hang it up. I lovingly repainted it at Christmas time and wrote a Christmas blessing to my girls on it in what I thought was chalk markers, well they stained the board and I now have to repaint it. So for this project excuse the message on the board, I couldn't find a roller brush to repaint it for photos but you will get the idea.


This chalkboard had to mounted by drilling through the wood sides for a secure mount. Because of that we had to fill the holes in with wood putty. It didn't look the best so I decided to make some resin covers or caps to cover the wood putty and make it look pretty. I used vintage buttons, Amazing Mold Putty, Alumidust and Amazing Casting Resin.


Vintage buttons...


Mold making with Amazing Mold Putty.


Cast resin buttons to match covering up the ugly!
All you need is a bit of glue...


to go from blah to beautiful!


All Finished! :)

I love how it turned out! I may end up making more just to make it a little bit funky but will keep it this way for awhile to see how I feel :)

To see how all of our AMAZING products can enhance your art,
please check out these AMAZING products!

Let's see what you can create

Feel free to stop by my FB page to see the latest with me. 
To see more of my work please visit my blog "Creative Flutters"
and also at the Aimée Wheaton Art and Design website.

Till next time! Xoxo Aimée

 • • • • • • • • • • • • • •

Don't forget to subscribe to our blog on the right side bar:
Twitter at AmazingCrafting | Facebook at AmazingMoldPutty | YouTube at AmazingMoldPutty

Saturday, December 6

A CLEARLY Amazing Keepsake Repair...
by Heather Kindt


Greetings Amazing Crafters! Since last weekend was Thanksgiving holiday, all about family gatherings and tradition we saved this special post for a week. Today our Featured Artist for November, Heather Kindt joins us with one last project – one that is a lasting keepsake that has been repaired and preserved with Amazing Clear Cast ResinCLICK HERE to see more of Heather's art adventures on her Facebook page, Heather Marie Kindt.

• • • • • • • • • • • • 

Keepsake Shadow Box Repair

What is resin anyway? Basically, it's a plastic. It's a special plastic that is very hard and clear when it has cured. Resin is fun because it becomes very glass-like. More specific abilities of resin depends on the brand you are using. If you have tried it in the past and been frustrated, it's worth going back to. 

Diamond Glaze, Glossy Accents, and a few others have some great shiny effects for paper crafting. They are ready straight out of the bottle and air dry. So why use a two part product that requires mixing and curing time? Resin has the ability to cover a large surface very quickly and much more economically. I have never seen Tim Holtz (who one cannot help but adore) filling up his shadow boxes with Glossy Accents.


I do not share this today to imply anything against Tim Holtz or the Glossy Accents product. I bring it up because I did coat a tray with Glossy Accents. Actually two keepsake trays – for two beloved family members. I share this in an effort to show visually why in the future, I will go the route of layering and sealing with resin. The compartments turned uneven and warped. I can hardly stand to look at it now – it's such a mess. 

This is the keepsake tray I made in honor of my father-in-law. He passed away, and I had this tray on display at his memorial service. I wanted to repair this. Since the items were already sealed with a coating of the Glossy Accents, and thoroughly dried, I figured I could repair by pouring over a layering of Amazing Clear Cast Resin


A Note: I did not prep the Glossy Accent surfaces with anything and I didn't sand it. I poured enough Amazing Clear Cast Resin to cover the photos and other items, maybe 1/4 inch thick.


At the time of my tray disaster, I did not know about self-leveling, doming, or the role of surface tension. The paper crafting products I used had high surface tension (the characteristic that causes water to form in droplets), and so it did not even out (or level). Resin will level out as far as it can when you have first mixed it before curing starts. This is why you can easily get a smooth, glassy surface in those jewelry settings (usually bezels).


Here is the tray after I fixed the lumpy areas with Amazing Clear Cast Resin. I wasted time and money trying to get Glossy Accents to work. Now the surfaces are smooth like glass and beautiful. It's hard to photograph something that has become clear, but I think it is obvious that the former lumps are gone – and I am pleased with the results.


• • • • • • • • • • • • 


Thanks so much for dropping by! We hope you have enjoyed our Featured Artist Heather Kindt. We want to say THANKS to Heather for joining us and sharing her amazing mixed media creations using Amazing Crafting ProductsCLICK HERE to head on over to Heather's Facebook Page, or HERE to visit her blog Color Me Heather to see more of her fabulous work.

Related Posts Plugin for WordPress, Blogger...