Showing posts with label cabochon. Show all posts

Friday, August 12

An AMAZING #Cre8time Reveal... the Hidden Beauty of Petoskey Stones


Beauty in nature is found most everywhere... even in hidden places. This is true of Petoskey stones, which are found in Michigan and the upper Great Lakes region. This fossilized coral has a unique geometric pattern that is revealed when wet.

While these stones can be polished to bring out it's beautiful designs – we've found an easier way! By coating stones with a thin layer of Amazing Clear Cast Resin, you can achieve a wet-stone look that reveals each stones unique pattern.

Watch to see more of this amazing process...


If you have trouble viewing video, please CLICK HERE.


**A few TIPS** After applying resin, you'll want to cover stones while curing to prevent dust from settling on the surface. After curing you may have a small puddle of cured resin on the backside of the stones. This can be repaired by sanding that part down, then applying a thin coat of Amazing Clear Cast Resin over the sanded area and allow to cure again overnight. The resin can also be applied using a foam brush or cosmetic sponges.


Enjoy your beautiful coated stones! The Petoskey stones reveal their inner beauty with this easy faux-polishing technique... ready to use in handmade jewelry and other handmade creations.


This technique can be used with other stones to bring out their hidden beauty... like this pendant featuring a triangular stone created by Rachel Whetzel.

What would you embellish with resin?

Thanks for visiting! CLICK HERE to view more videos on how you
can utilize Amazing Casting Products in your creations.

• • • • • • • • • • • • • • • • •

Don't forget to subscribe to our blog on the right side bar:
Twitter at AmazingCasting | Facebook at AmazingMoldPutty | YouTube at AmazingMoldPutty

Thursday, May 12

#Cre8time Practice Makes Perfect... Amazing Clear Cast Tips and Tricks by Tracy Alden


Hello! Tracy here with another Amazing Casting Products inspiration post! I spend a lot of time working out ideas and testing out craft supplies to see what might be possible with future projects. Some don't work out, some are happy accidents and others a success. Here is a few of my tests using Amazing Clear Cast Resin!


Often I have to work through resin mishaps thanks to my impatience. I love working with Alumilite Dyes, but when I first started working with them sometimes I would add too much dye into my Amazing Clear Cast Resin. I learned quickly a little dye goes a long way! 

Another lesson in patience was to remember to let each layer of resin to cure at least to a tacky set before adding in embellishments. In my resin pieces above not only is the dye-to-resin ratio a bit off but the glitter floated around in unpredictable manners because I was in a rush. 


Now I when I mix up a small portion of Amazing Clear Cast Resin to be used for pouring into molds, I make sure to slowly stir to reduce air bubbles and let it sit for 10-20 minutes. By letting the resin rest before pouring, the resin will be thicker, holding embellishments in place. To create really dynamic effects – I will add some Alumilite Metallic Powder to a separate batch of Amazing Clear Cast to drop by toothpick and swirl carefully in untinted resin to create lovely organic movement.


If I pour a thin clear layer of Amazing Clear Cast Resin, let it cure to a tacky set, then add glitter, flowers and/or paper I can carefully trap them in place with a second layer of clear resin. The final layer of resin can be tinted with different Alumilite Dyes and/or Alumilite Metallic Powders to create dynamic eye popping contrast or subtle glows.


One of my most recent tests was using old eye shadow added to Amazing Clear Cast Resin and gently stirred with a toothpick. Dull old eye shadow was given a second life when it soaked up the resin and gave the resin a soft yet sparkling shimmer. If you use mica powders and artist pigments you can create a similar look. Just remember after adding and stirring the powders some air bubbles can form and use a craft heat gun to gently pop any air bubbles before the resin cures.


Amazing Clear Cast Resin can also be used to duplicate the look of enamel and antiquing on jewelry. The pendant on the left I felt the shape and general layout was nice it didn't highlight the details. I removed the small flower oval and rubbed on Clear Cast tinted with blue Alumilite Dye with my finger. I removed any excess with a baby wipe and added little pools of resin in the deeper recesses of the pendant and more rhinestones. My end result was the pendant on the right, looking like it came straight out of an exotic bazaar! 


With your imagination, craft supplies and a little help from Amazing Clear Cast Resin a wild assortment of jewels and baubles can be made!
What AMAZING arts and crafts can you create?

Please share them on the user GALLERY on the Amazing Crafting Products Website!

Visit my blog Art Resurrected for more craft tutorials!

Until next time, safe travels! ~ Tracy

• • • • • • • • • • • • • • • • •

Don't forget to subscribe to our blog on the right side bar:
Twitter at AmazingCasting | Facebook at AmazingMoldPutty | YouTube at AmazingMoldPutty

Monday, February 8

#Cre8time Jewel Tools... #DIY Cabochon Molds by Tracy Alden


Hello! Tracy here for another Mold Rubber Monday! This Mold Rubber project was born out of necessity. I have a collection of polyurethane Cabochon molds my mother had bought and used 45+ years ago. I now use them regularly to create many of my cabochon pieces. However to remove any resin castings I have to flex the molds back and forth for the cabochons to pop out.


However when the molds get old and used a lot they can slowly become brittle. Well, brittle molds don't take too well to being flexed and I shattered two of my best cabochon molds! I needed to make replacement molds that could flex and be moved easily without the worry of them breaking on me. This is where Amazing Mold Rubber came to the rescue!

Supplies:


I collected samples of resin cabochons that I had already cast, making sure to pick the best ones with nice shine and smooth surfaces. I realized the small plastic trays that pre-prepared sushi and wraps found at supermarkets would be the perfect size and depth to be a mold box for the cabochons. I applied some Aleene's Tacky Glue to the back of each cabochon and placed them in the trays.


I was careful to make sure the now glued on cabochons
were equally spaced and left to dry on a level surface.


Carefully following the instructions, I mixed up one kit of Amazing Mold Rubber and slowly poured it into the mold boxes. CLICK HERE to view mixing/preparation. I used one Amazing Mold Rubber kit and found it filled the trays halfway.


I mixed up a second kit of Amazing Mold Rubber to fill up the rest of the trays and with the extra mold rubber filled up another plastic box with small crystals.

**Quick tip!** I always have one or two molds set up for Amazing Mold Rubber whenever I mix up a batch, just in case I made too much and I can use the extra for more molds!


Once the  Amazing Mold Rubber was completely cured I removed the molds from the plastic trays. I found that while the glue holding the cabochons held the pieces in place, the glue had not completely set in the middle of each cabochon. With enough pressure each cabochon and mold pulled right out of the trays, allowing me to easily clean up each piece and mold with a baby wipe. When I gently removed the cabochons from the mold rubber they came out rather cleanly, requiring very little trimming of the mold rubber with craft scissors.


I was so excited to try out my new molds I mixed up some Amazing Clear Cast Resin with Alumidust and made several cabochon castings in each new mold.


Each new cabochon came out smooth, shiny and super easy
to remove from my new Amazing Mold Rubber molds!

What AMAZING arts and crafts can you create?

Please share them on the user GALLERY on the Amazing Crafting Products Website!

Visit my blog Art Resurrected for more craft tutorials!

Until next time, safe travels! ~ Tracy

• • • • • • • • • • • • • • • • •

Don't forget to subscribe to our blog on the right side bar:
Twitter at AmazingCasting | Facebook at AmazingMoldPutty | YouTube at AmazingMoldPutty

Tuesday, November 10

Painted Posies and #Cre8time Page Marking for #ArtJournaling by Melissa Johnson


Hello everyone! Today I'm sharing a simple technique that I used to add some color in the margin of my Bible. This technique could be used in an art journal as well. I just happened to be working through a Bible study at the moment. I've also created some fun paperclips that could be used in any journal or planner. I chose to use one of these in my Bible to hold my place. I like to use paperclips also to attach extra notes and notecards inside.


To create the artwork in the margin, I started by embossing some flowers using Versamark® ink and some embossing powder. Versamark is a clear watermark ink used for stamping, heat embossing and other mixed media effects.


Next, I used more Versamark® to stamp and then poured on Alumidust to add color. The Alumidust sticks to the wet ink, and the rest is tapped away to go back into the container.


I also used a combination of Versamark®, Alumidust, and watercolor to color in the embossed flowers. I also used some acrylic paint to add some color all around.


To create the paperclips I used Amazing Mold Putty and Amazing Casting Resin to cast some cabochons that I had in my stash.


I added some acrylic paints in fun colors
and adhered them to some jumbo paperclips.

And the final result:


How will you embellish your art journaling
with Amazing Casting Products?

Make something that makes you happy :) ~ Melissa Johnson
For more of my mixed media projects, please visit my blog.

• • • • • • • • • • • • • •

Don't forget to subscribe to our blog on the right side bar:
Twitter at AmazingCasting | Facebook at AmazingMoldPutty | YouTube at AmazingMoldPutty

Tuesday, October 14

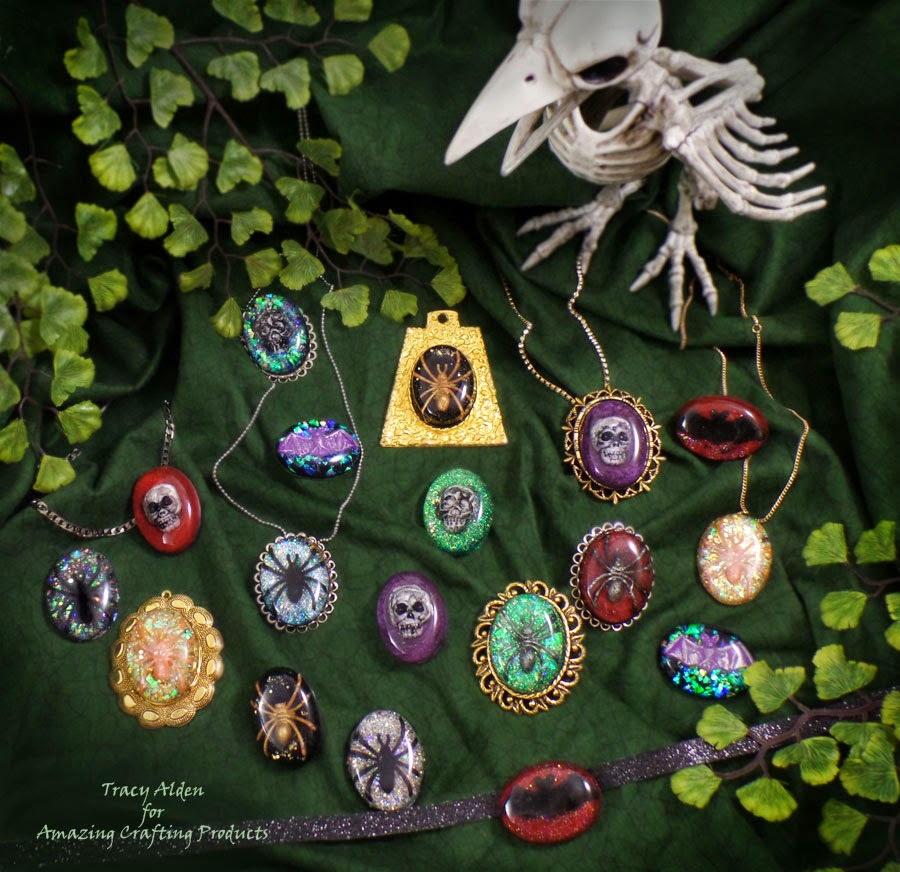
Halloween Party Favors take a #Cre8time TWIST... GLAM Halloween Cabochons by Tracy Alden


Hello! Tracy here with another Amazing Crafting Products inspiration post! As it nears Halloween my family has a tradition of watching all kinds of Halloween movies for fun and inspiration for decorations, costumes and jewelry. This October is no exception! A common theme of a lot of the family and humor related Halloween movies is Hollywood Glam but with a ghoulish twist. It got me to thinking how could I make some fun little glam Halloween jewelry with the help of Amazing Crafting Products!


Supplies: 


While for this project I used vintage 40+ year old cabochon molds, you can find newer versions of these molds at your local craft store. Even better however would be to make your own molds using Amazing Mold Putty to cast cabochons or shapes you like to make your own jewelry forms!


Using wire cutters (or sharp crafting scissors), I clipped off
the adjustable ring portion of the Halloween shapes. 


I then realized while some of the little plastic shapes were great as is – though some pieces, like the spiders, were too big for the cabochon molds. So I carefully clipped off the excess plastic until each piece fit inside the mold shapes.


I mixed black acrylic paint with some water to make a color wash and applied it with a paint brush to the plastic skull pieces to highlight their detail. I painted on some Liquitex Gloss Varnish and applied metallic powders – Alumilite Metallic Powders - Copper, Gold, and Pearlescent and Stampendous glitters to the plastic pieces. I let these completely dry before the next step.


I mixed up a batch of Amazing Clear Cast Resin following the easy to follow instructions and using a cabochon mold, I started with pouring a thin layer of the resin that filled only the bottom of each mold. I carefully placed the plastic pieces in this layer of resin, making sure the resin pooled around the pieces, "catching" them in place. I let that cure until reaching a tacky set – about a few hours in warm weather.


Next I poured a second thicker layer of Amazing Clear Cast Resin making sure to coat the plastic pieces completely. At this point I added a small amount of glitter to give a little bit of shimmer about each plastic piece. I let that cure to tacky firm.


I poured a third layer of Amazing Clear Cast Resin and added Alumidust in Red and Orange to a few of the cabs and glitter to some of the others. This is where being a bit heavy handed with glitter application isn't a bad thing, it just adds more color and sparkle to the cabochons!


The final layer is a thin layer of Amazing Clear Cast Resin tinted with Black Alumilite Dye, and carefully applied it to the back of each cab and let cure completely. This final dark layer of resin helps the glitter and shapes "pop" more visually.


Using a small hand drill (or craft knife), I removed any uneven edges of the resin pieces. The finished cabochons can easily be placed in a jewelry frame or can be glued onto ribbon to make necklaces and bracelets. 


By trying different Halloween charms, glitters and powders, you can
create any number of frightfully fun Halloween GLAM jewelry!

What AMAZING arts and crafts can you create?


Please share them on the user GALLERY on the Amazing Mold Putty Website!

Visit my blog Art Resurrected for more craft tutorials!
Until next time, safe travels! ~ Tracy

 • • • • • • • • • • • • • •

Don't forget to subscribe to our blog on the right side bar:
Twitter at AmazingCrafting | Facebook at AmazingMoldPutty | YouTube at AmazingMoldPutty

Tuesday, April 29

Two for TANGO?? AMAZING Mixed Media Canvas Inspiration by Tracy Alden


Hello! Tracy here with a inspiration post using the wonderful supplies from Amazing Crafting Products and our "Partners in Crafting," FrogDogStudio.com

Inspiration is a strange creature – this time it snuck up on me while sorting what I call my resin "save for later" bin. This bin is populated with all kinds of resin pieces, some finished, uneven pourings or even pieces I just didn't know what to do with. Often when pouring resin if I have extra, I pour it into cabacion molds, this way no resin is wasted and they end up in the bin for later use.


I had some cabachon pieces in the bin, some clear some tinted. I had poured some Amazing Clear Cast Resin tinted with Alumilite Dyes but I had been a bit eager with putting one too many drops of dye in, leaving me with some rather intense dark purple pieces. Theses little ovals made me think of carved stones so it got me thinking of trying out a mixed media piece.


From the Frog Dog Studio April Mixed Media Kit I used the Alumidust Powder - Red Plum; StazOn Midi Ink pad - Claret; iZink Pigment Ink bottle - Gold; Stampendous Mica Fragments Jar, Pearlized. I had already used the Dusty Attic Chipboard Bird set in another project, but kept the chipboard frame of the birds.


Digging around for some paints, inks and some stamps I started to layout the project on a old canvas, figuring out which direction to go.


After applying several layers of acrylic paint, I stippled on alcohol ink and the Gold iZink Pigment Ink. After they dried I applied a water based sealer and sprinkled on the Mica fragments and glued on the purple resin cabachons. The chipboard bird frame became my focal piece on the canvas.


With some wonderful supplies and some saved pieces,
 I was able to create a summer wall decor piece!

What wonderful Mixed Media project
would you create with these supplies?

Visit my blog Art Resurrected for more craft tutorials!
Until next time, safe travels! ~ Tracy

• • • • • • • • • •

Don't miss a single post!
Please subscribe to our blog on the right side bar:
Twitter at @AmazingCrafting | Facebook at AmazingMoldPutty | YouTube at AmazingMoldPutty
Related Posts Plugin for WordPress, Blogger...