Showing posts with label Frame. Show all posts

Monday, October 9

Resin Painting with Dried Orchids... #Cre8time Explorations by Tracy Alden


Hello! Tracy here with another Amazing Casting Products inspiration post! I will let you in on a secret: sometimes I have no clue what direction some of my art projects will end up going. I can collect supplies, start working on something, maybe even get a basic idea of what I would like to do... then end up making something completely different – this project was one of those. 

I have a small collection of orchid blooms that I had dried and wanted to try to preserve in Amazing Clear Cast Resin. I had never worked with dried orchid blooms as they are very delicate, and can easily crumble if mishandled. I decided a frame was the best choice to display the dried orchids and also be able to hold the resin in place... so I got to work.


I found that with the first layer of Amazing Clear Cast Resin the orchid blooms had a tendency to shift in the resin. So the first layer of resin had to be a thin pour and I let that cure to a tacky set. I added a second clear layer of resin to cover and protect the orchids. After this cured, I followed with two more layers of resin mixed with Alumidust or Alumilite Dye in different spots, using a toothpick to drag the colors through each other. This created a lovely ebb and flow of color to the resin.

I honestly lost track of time doing this and found it rather relaxing and meditative in nature. I let this layer of resin cure. The frame looks complicated but it is just four layers of resin poured. No waste of resin – just a few stir sticks, toothpicks and clean up with babywipes.


Please CLICK HERE to see the full tutorial on how I created this mixed media resin frame on my blog Art Resurrected.

What AMAZING arts and crafts can you create?

Visit my blog Art Resurrected for more craft tutorials!

Until next time, safe travels! ~ Tracy

• • • • • • • • • • • • • • • • •

Don't forget to subscribe to our blog on the right side bar:
Twitter at AmazingCasting | Facebook at AmazingMoldPutty | YouTube at AmazingMoldPutty

Monday, August 14

#Cre8time Transformations... Fabulous FAUX Stained Glass by Lara Hjorthoy

Hello Fellow Artists! It's Lara here with a project I've been dreaming to make for some time – too long in fact! But finally I have managed to make it all work... and am so thrilled to share it with you all!

Who wants to make some stained glass?! 

I have actually completed a version of this a while ago, but was mighty unsuccessful in the end. So I needed to rethink my strategy for the second round and apparently, the time to think paid off! We have amazing faux Stained Glass!


To start this project off... and in my usual fashion these days, I wanted to find a way to reuse a frame that I had acquired. So I cleaned the frame and got some plexiglass for the "glass".  I glued this into the frame itself so that I could call it a "window" of sorts!


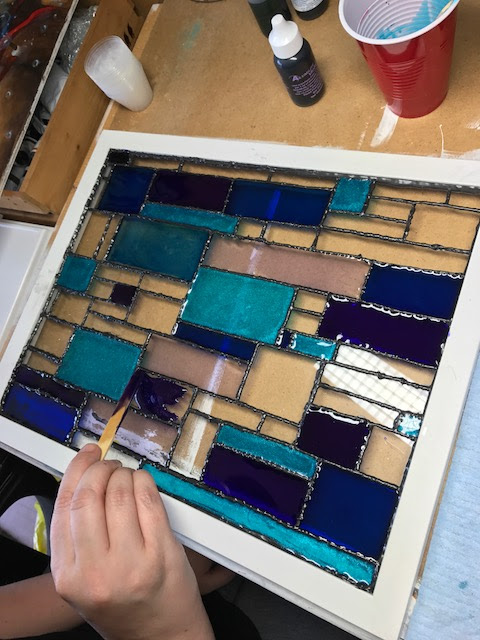
I used a relief paint by Pebeo that was the colour of lead, so it looked just like I had leaded it myself. I actually did a couple of layers of it, so I used a lot. My first go round, I had all the resin colours bleed together – so this time I made sure I was slow and deliberate and that there would be no holes whatsoever. To make this pattern, I printed a picture of a brick wall with a pattern I liked, placed behind the glass, and just followed it with the lead!

I left this to dry, well truthfully... for a long time! But I would no matter what, for at least a week, just to be safe.  

Next up! The resin!  


I mixed up he first batch of Amazing Clear Cast Resin using Alumilite dyes, different shades of blue and purple and even added some sparkle to the resin with Alumilite Pearlescent Powder.


Using a popscicle stick, I slowly added resin to each of the squares, focusing on one colour at a time. 


You can use the stick to push the resin up to the edges
of each square, which helps prevent overpouring.


And I took my time. Which in the end produced a great piece, though it meant that my resin started to cure in the cups I mixed them in. I was able to get the pour done, but next time, I would only mix and apply one colour at a time. 


Which is exactly what I did for the Alumilite Silver Metallic Powder and the clear pearlescent resin I added later to complete the piece. I covered it up and let it cure overnight.


Add hanging hardware and ribbon and it now hangs lovely in our window!
I couldn't be happier with it! Can't wait to add different colours to the collection!

What type of stained glass would you make?

Hope you enjoyed this project, I have another big one coming up soon!

Stay Inspired!
~ Lara

Check out my website at www.larahjorthoy.com and YourToyCreations.etsy.com. You can follow my day to day creations on Facebook and Instagram, look for YourToy Creations!

• • • • • • • • • • • • • •

Don't forget to subscribe to our blog on the right side bar:
Twitter at AmazingCasting | Facebook at AmazingMoldPutty | YouTube at AmazingMoldPutty

Tuesday, June 28

#Cre8time Fun Rolled up with Color... DIY Resined-Jeweled Frame by Maria Soto


Hi there, today I want to share a fun summer project. The other day I was watching a video from Mark Montano for DecoArt entitled "Bejeweled Boho Mirror". This project gave me an idea to create something similar with a white photo mat art board I got in a mystery box I purchased on-line. I decided instead of using acrylic jewels I would use Amazing Clear Cast Resin and some of the dyes.

Here is what I used for this project:
  • Amazing Clear Cast Resin
  • Mixing cups and Popsicle sticks
  • Alumilite's Dyes in green, red and purple
  • photo mat art board
  • white paper flowers
  • recycled cardboard box lid
  • mixed media paper
  • Westcott's paper trimmer
  • Mod Podge dimensional magic glitter silver
  • Beacon's 3-IN-1 craft glue
  • Acrylic paint in orange and yellow
  • Paint brush
  • One large bead
  • ribbon


First things first, let's cut up all the strips needed
to make the circles that will be filled with colored resin.


I used the lid from a cardboard box, as I do like to recycle as much as I can. I used Beacon's 3-in-1 glue – it works pretty fast, but I thought using paper clips to hold the circles in place was a good idea, it worked great. Here you can also see the beginnings of the project – I noticed the cardboard was too hard to roll to get a nice solid look, even using really thin strips. I decided not to use these so they went into the recycling bin.


So I decided to use a page from my mixed media sketch pad and I cut it all into strips using my paper trimmer... it was a lot faster then using scissors. I used a marker to create my circles, I rolled them and then released them, allowing me to glue them into different sizes without having to used different size pens to create different sizes.


Seriously, this part took the longest – sometimes the glue would set right away, sometimes I had to use a paper clip. Either way, I spent an entire day just cutting and gluing circles. 


Once I was done, it was time to move on to the photo mat which would be the base of this frame. It took me a while to find the right placing for these circles and the paper flowers – finally I decided to just start gluing things up, because I was ready to move on to something else.

I first colored the inside edge of the picture frame opening. I didn't care for the color or the look of the ink so I decided to use acrylic paints. I took a nice bright orange and painted the entire photo mat.


First thing I did was glue the paper flowers, then I began
to glue the circles until the entire photo mat was covered. 


I made some tiny circles and some solid circles to serve as fillers. I didn't want to completely cover the photo mat, I wanted for some of the orange background to be visible, and figured it would add more color once the resin was added inside the circles. I used the Mod Podge dimensional magic to glue the circles and the flowers to the photo mat. I spread out the dimensional magic with my fingers. This would leave a nice sparkle on the areas not covered with the circles.


Once I was done gluing down everything, and the glue was dried it was time to paint. I painted everything the same color as the photo mat. Once dried, I took a little bit of yellow acrylic paint and brushed it on top of the circles and the paper flowers too.


Here you can see, everything is glued in place and painted, all ready for the next AMAZING step... adding the colored resin inside all the circles. The Amazing Clear Cast Resin mixed with the color dyes will cure and look like glass giving the illusion of glass jewels. 


I used used Amazing Clear Cast Resin and three Alumilite Dyes for this project, working one color at a time filling the circles {CLICK HERE to view mixing/preparation}.


I added a few drops of the Fluorescent "FLO" Red dye to part "A" of the clear cast resin. Be sure to mix it really good, then in a separate cup, pour part "B" and make sure is the same amount as part "A" with color {otherwise your resin may not cure properly}.


Combine both parts and mix thoroughly. Let resin set
to let bubbles escape and it's ready for pouring.


I used the stir stick to add the resin – a little bit at a time to make sure I didn't have any spills on the frame. You just have to take your time doing this step.


Next color, mixed the same as the previous color, and pour!
This color makes me think of lemon ice cream. 


A few close-ups of the resin added into the cardboard circles.


I had a little bit of the red resin left, so I added a drop of white to make a milky pink... why not?! For sure it will look pretty mixed in with the other colors. This red actually looked more like orange, so I decided to mixed more resin and add a lot more of the "FLO" Red dye. 


Here you go! This looks more like a red... now to fill
out all the circles, even the very tiny ones.


I had a few circles left to fill and finish this piece. I would just mix a little bit more resin, and leave it clear to accent the orange paint below. Here are all the circles filled with Amazing Clear Cast Resin. Now it's time to let the resin set and cure. I will leave it alone for 24 hours, before I add a hanger and a photo to finish this piece. 


Here is the finished piece, I really loved how this turned out! Do you like the background I added for the photo? It's a piece of mixed media paper that was covered with the left over resin colored with the "Flo" red dye... see no resin goes to waste here. I can change photos whenever I want on this frame. 

How would you use resin on a frame? 

What do you think? Should I have used acrylic jewels or do you like my resined jewels effect? Share your ideas with us, we'd love to see how creative you are with Amazing Clear Cast Resin.

Thanks for visiting! I invite you to stop over to my blog, "What is Creativity"
 at http://chuy-creativity.blogspot.com to see more of my creations. ~ Maria Soto

• • • • • • • • • • • • • • • • •

Don't forget to subscribe to our blog on the right side bar:
Twitter at AmazingCasting | Facebook at AmazingMoldPutty | YouTube at AmazingMoldPutty

Wednesday, March 30

#Cre8time Storage Solutions... Vintage Faux Leather Book Box by Lyn Gill


Hi everyone! Lyn here again with another bit of inspiration... a Book Box! I created this book box out of recycled card board with faux leather texture created from a brown paper sack and some resin details.

To see how I created the book box I have a video on my YouTube channel. CLICK HERE if you are interested in how I created this piece.


I created the molds using some Amazing Mold Putty and Amazing Mold Rubber then I molded the frame and book corners using Amazing Casting Resin. These are the perfect blanks to work some creative magic on. A little paint, patina and they're ready to use on what ever project you've got in mind.


A vintage printed image under a little bit of tinted 
Amazing Clear Cast Resin completes the look! Wow so fun!

What will you use your
blanks to create?
Make it Amazing!

Thanks for joining me today here at Amazing Casting Products...
 Till Next Time! ~ Lyn

You can also find more of my work on my Blog at LynzCraftz,
on my Facebook Page LynCraftz or on my YouTube channel LynCraftz!

• • • • • • • • • • • • • • • • •

Don't forget to subscribe to our blog on the right side bar:
Twitter at AmazingCasting | Facebook at AmazingMoldPutty | YouTube at AmazingMoldPutty

Monday, February 15

#Cre8time Globe Trekking... DIY Altered Travel Collage Frame by Tanya Ruffin


Going through some old things I came across a frame that I thought I would try to re-purpose... so today I'm going to show you how to re-purpose a frame into a travel collage frame with Amazing Mold Rubber and some other Amazing Casting Products.


I just returned from a trip to Italy, so I decided to make a frame commemorating that experience. The biggest task was making a mold of part of Michelangelo's Pieta. I had a small statue to use. The tricky part was just casting the top. Between Christ's body and that of the Virgin, there is an open space and there would be no way to pull the statue from the mold, so best to avoid that all together. I would even need to omit the hand of the Virgin since it was too low.

Michelangelo's Pieta 

I found a storage container that the statue would fit in and used duct tape to block off half of the container. The area where Christ's body is will be completely open and I will have to use some creative devices to seal that up before I pour resin. 


I filled the area with Amazing Mold Rubber. This took 2 full containers!


After removing the statue from the rubber, you can see that one completely open side (which is in the top of the photo). I taped up the side with some real sticky flashing tape (any real sticky tape will work). FYI – Flashing tape can be purchased at your hardware store and I use it a lot!

Tape doesn't stick well to the rubber so you need to have enough tape so that you can tape it to itself. Put about two layers of tape. As you can see from the photo above, I wrapped tape around the bottom too. I placed the mold inside another container in case it leaked.

IT LEAKED, but not too bad. You can clean up the edges with a craft knife and a fingernail file. 


I mixed some Alumilite Pearlescent Metallic Powder to the Amazing Casting Resin and poured into my new mold. I LOVE this!!! The rough spot in the front is where the taped edge was. That is OK... I have an embellishment to place over that area.

OTHER EMBELLISHMENTS

I made a mold of the Leaning Tower of Pisa. 


Mold of some Euros that had Italian symbols.


Mold of the plastic letters I, T, A, L and Y.
These came from an alphabet set from Dollar Tree. 


To cover the lion head on the frame I glued a book page that I had coated with purple marbled resin.


I also had a lot of miscellaneous pieces I had cast before that include skeleton keys (papal keys), a Coliseum cast, a frame with a photo of Santa Croce (where Michelangelo is buried in Florence), a cast of the head of Botticelli's Venus, a cast of the San Damiano Cross (St. Francis of Assisi), sacred heart cast (a previous project), a title frame with the towns recently visited, and metal key and key hole. All these would embellish my frame.


Tada!
Out of Africa into Italy!


Now, take a look of some of your crazy, unregiftable
frames and see what you can make!

How would you transform travel trinkets?

Craft Your Own Way!

Tanya


Please visit my site to see more of my inspiring creations at www.tanyaRuffin.com

• • • • • • • • • • • • • • • • •

Don't forget to subscribe to our blog on the right side bar:
Twitter at AmazingCasting | Facebook at AmazingMoldPutty | YouTube at AmazingMoldPutty
Related Posts Plugin for WordPress, Blogger...