Showing posts with label fairy. Show all posts

Thursday, April 6

#Cre8time by the Sea... DIY Seaside Miniatures by Tracy Alden


Hello! Tracy here to share another tutorial with you! My continued obsession with miniatures is often a driving force behind my polymer clay projects and today's project is no exception. While the process of finding new miniatures to add to scenes or settings is fun, sometimes one can only find only a few pieces, not enough to complete a diorama. I wanted to have a wide variety of sea-side elements to use without damaging my originals, and this is were Amazing Mold Putty came to the rescue! 

Supplies: 
  • Amazing Mold Putty
  • Small shells, sea life charms or any small enough object to pass for a miniature 
  • Small pieces of colored polymer clay 
  • Stylus, small 
  • Ceramic Tile 
  • Craft Knife 
  • Paint Brush 
  • Acrylic Paint 


I collected as many vintage small metal charms, shells and even a tiny pair of antique sand dollar earrings to mold. Since the metal pieces had sentimental value I didn't want to use them in my miniature scene but they could make wonderful molds to create miniatures out of polymer clay!


I mixed up some Amazing Mold Putty{CLICK HERE to view mixing/preparation}, and molded it around the pieces. I was careful not to press the mold putty too much into the tiny crevices of the shells to make it easier to remove them later.


Once the Amazing Mold Putty cured I removed the original pieces. To close up any molded loops created by the metal charms I mixed up and pressed tiny little wads of Mold Putty into the open portion of the mold as seen in the above photo.


I conditioned the polymer clay, making sure the clay was soft and warm enough to be pushed into the molds. I pushed little wads of clay into each mold and made sure the clay was filling the molds by pushing down the clay with a small stylus. I then put the molds filled with clay on a ceramic tile into a toaster oven, per manufacturer instructions, to bake. Amazing Mold Putty can easily tolerate the oven temperatures required to cure polymer clay.


Once the polymer pieces were cured and cool to the touch, I popped them out of the molds and trimmed any uneven edges on the miniatures with a craft knife. I applied acrylic paint to detailed portions of the clay, rubbing off excess paint with a paper towel. 


With so many charms and small objects perfect to mold and use for miniature art, the creative possibilities are endless!

What AMAZING arts and crafts can you create?

Visit my blog Art Resurrected for more craft tutorials!

Until next time, safe travels! ~ Tracy

• • • • • • • • • • • • • • • • •

Don't forget to subscribe to our blog on the right side bar:
Twitter at AmazingCasting | Facebook at AmazingMoldPutty | YouTube at AmazingMoldPutty

Saturday, May 28

#Cre8time Garden Play... Teeny Tiny Fairy Doors by Maria Soto


Hi there! I want to share a cute little project I made... it reminded me how much I love getting my hands dirty as I create fun crafty items.

I joined a swap group a few years ago, we always do jewelry, but this time I was asked if I wanted to take part of the fairy garden swap and I accepted the invitation. CLICK HERE to jump over to see my owl charms, and HERE for the Star Wars themed charms I made for previous swaps.


We had to make tiny doors and a window. I decided to make the door with a window, just didn't know how. After a lot of thinking and a few craft fails, I went to the craft store and I found a section of tiny miniatures for fairy gardens. I had no idea they had these available, so I purchased a door. I decided to use Creative Paperclay® to make an impression of the door only – and then I added the remaining details by hand.

The door I purchased had a tiny butterfly on it, it was cute but I decided to add a window in it's place. Once the doors were done with their new windows it was time to let the clay dry over night. Next I hand painted each with acrylic paints. To finish them up, I added some sparkle and a bit of flowers to decorate each tiny door.

I also had to make these safe for outdoor use, so I used Amazing Clear Cast Resin to seal the paper clay... and at the same time used it as glue to add all the glitter, beads and tiny plants/flowers. Just a little bit of resin was enough to finish up these tiny houses – I love how glossy they look thanks to the resin.


Here you can see one of the tiny doors all painted,
ready for the final embellishments.


I applied the resin all over the piece and then added beads
to serve as tiny rocks around the plant and flowers.


Here are the finished doors, all ready to go to their new homes.
It's great when you have a product that you can use in so many different ways.


I really like these tiny little doors – adding the trim on the doors, and the tiny windows to make each door different and unique. I loved how the Amazing Clear Cast Resin not only allowed me to make these outdoor safe, but I think the glossy finish makes the texture, the color, and the little details really POP.

What would you create for your fairy garden?

I hope I have inspired you to find new ways to use this amazing resin, the more I play with it the more creative fun I have. These little doors are ready to welcome some fun fairies. Share your ideas with us, we'd love to see how creative you are with Amazing Casting Products.

Thanks for visiting! I invite you to stop over to my blog, "What is Creativity"
 at http://chuy-creativity.blogspot.com to see more of my creations. ~ Maria Soto

• • • • • • • • • • • • • • • • •

Don't forget to subscribe to our blog on the right side bar:
Twitter at AmazingCasting | Facebook at AmazingMoldPutty | YouTube at AmazingMoldPutty

Monday, May 26

#Cre8time Magic... Making a Fairy Garden Birdhouse using Amazing Mold Rubber


Hello Amazing Crafters! Susan here for another Mold Rubber Monday. Today I am sharing another project using Amazing Mold Rubber... one that is a bit whimsical and magical – and perfect to adorn a fairy garden.


Amazing Mold Rubber comes in 2 parts – a Rubber Base and the Catalyst. I have prepared several items to mold so I am mixing up the entire container. I find it easier always mix the entire container and pour several items to mold simultaneously – then nothing goes to waste and cleanup is a breeze. Amazing Mold Rubber will completely fuse to itself, so if you run out mid-pour, you can let it cure and fill the rest with another batch later.


For today's project – I have an assortment of acorns and caps in varying sizes and some other findings to mold in Amazing Mold Rubber.


Using hot glue, I mounted the items into a metal tin lid. The larger caps I placed craft foam in the center then adered so I could mold all the way to the edge of each.


Then I added a cylinder of cardstock and taped to the tin lid to form the mold box walls. I will need to fully cover the items in Amazing Mold Rubber about a 1/4" over the height of the items.


I secured the paper wall of mold box to tin with scotch tape.


To mix the entire container of Amazing Mold Rubber is simple. Peel back the protective seal on the Rubber Base and then pour the entire bottle of Catalyst into the rubber base. Stir gently and completely until there is no swirling and the catalyst is completely incorporated into the rubber base. The color will be a light bubble gum pink. I use a plastic knife from take out to stir – as the back edge is flat which can be used to scrape the edges completely when mixing.


When completely mixed, pour the Amazing Mold Rubber into the mold – gently letting the liquid silicone flow around and fill in around the objects.


I filled the mold box about 1/4" over the items with the AMR, leaving the longer stems a bit visable - but this is OK as they are fairly long and it won't affect the outcome when I cast in resin later on. I poured the remaining Amazing Mold Rubber into other prepared mold boxes. I set the molds aside to cure for a few hours. I generally pour molds in the AM before I head out to work and they are ready when I come home later in the day.


I tore away the paper edging and gently peeled the acorns, caps and other findings from the mold. Now I have many new items ready to customize and cast in Amazing Casting Resin.


Now the fun part... coloring and casting! With a paintbrush I applied a variety of Alumidust colors directly into the mold, then filled with a prepared batch of Amazing Casting Resin {CLICK HERE to view preparation}. In about 10 minutes, my acorn base and cap are cured and ready for embellishment.


I added a section of fiber around the cap and adhered to the acorn base. I drilled a small hole in the top and the base of the acorn to accept wire wrapped stem and coils to stand in a planter – held in place with a dot of adhesive. The finishing touch is a hole painted on with an enamel paint pen to bring this fairy garden birdhouse to life.


What items would you mold to create
items for your fairy garden?

If you would like to see more of my creations, please visit my blog
sbartist : painting in the dark by clicking here. ~ Susan

I hope you have a creative day - thanks for visiting!
See you tomorrow with more Amazing Crafting Products inspiration.

• • • • • • • • • • • • • •

Don't forget to subscribe to our blog on the right side bar:
Twitter at AmazingCrafting | Facebook at AmazingMoldPutty | YouTube at AmazingMoldPutty

Friday, July 5

Seeing Potential in Found Objects...
AMAZING Inspiration from Susan M. Brown

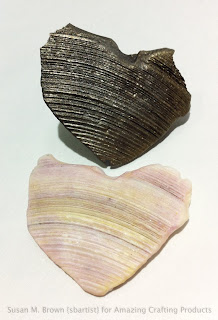
Welcome to the long holiday weekend! Susan here with some AMAZING inspiration today. What are your favorite found objects??? For me it has to be shells, and other weathered, rusty and flattened objects I find on my daily travels... and I'm ALWAYS on the lookout. For this particular project, I have a lovely piece of shell I found on one of my trips to someplace tropical and I love it because this weathered piece of shell is in a heart shape... such potential, right?


I have every intention on using the original shell for a wire-wrapped and beaded necklace {that I've yet to make}, but meanwhile... Amazing Mold Putty to the rescue!!! I've made a mold of it to use for my artsy-crafty projects. Today it's in the STEAMPUNK genre. I've used the mold dusted with Gunmetal and Bronze Alumilite Metallic Powders and Amazing Casting Resin to make a shield for my Steampunk Flying Pig Button Fairy. I've also molded the layered, assembled buttons and gears – as many of these are one-off creations depending on the leftovers and goodies in my found object stash.


I think the shell piece gives a nice textural beastplate to my flying pig... and it came in handy that this particular casting was a bit of a mishap, as the top section had an air bubble that I couldn't see when I poured the Amazing Casting Resin. No worries! My layered geared nestled right in like it was meant  to be there... no altering necessary. For more information on how I created this button fairy... please click here.


I hope you are inspired to see found objects a little bit differently, perhaps in the shape, or utilizing it as part of a larger collection of items to form something entirely new.

What found objects do you treasure that you
could mold and cast into a new reality?

If you would like to see more of my creations,
please visit my blog sbartist : painting in the dark by clicking here.

Thanks for stopping by and have a fantastic day!

...........................................

Don't forget to subscribe to our blog on the right side bar:
Twitter at AmazingCrafting | Facebook at AmazingMoldPutty | YouTube at AmazingMoldPutty

Saturday, April 27

Faerie Garden Bird Bath - AMAZING Inspiration from Michelle Frae Cummings


Hi Everyone! Do you believe in Faeries? I do!

Michelle here to show you something I created as a spin-off from some Sea Shell Magnets I made last year. You can see that tutorial here. This should inspire you to use your molds in new and inventive ways!


I Love Faerie gardens. Everything about them brings out the "kid" in me!

To make this little bird bath, I used one clean sea shell, Amazing Mold Putty, Amazing Casting Resin, Tear Drops, glitter, E-6000 adhesive and a golf tee.

I made the sea shell bird bath the same way I made the magnet, only before it had a chance to fully set, I quickly added the tear drops and glitter. Then while still soft, I trimmed off any rough edges.


I turned the sea shell over and glued the golf tee in place.


So there you have it!


Now you can make your own little faerie garden bird bath!

~ Michelle Frae Cummings

Saturday, February 16

Resin Faerie Windows

 I have this fascination for smaller than life items, loving the mystery of what dwells beyond little doors.
I have been wanting my own faerie door for sometime, so I made one, just the way I envisioned, like something from The Hobbit. But then I realized my door needed windows, to make the bottom of our stairs look like some secret home.
 I crafted the frame of my windows from paper clay. It was a bit flimsy to work with so I recommend you do make yours from some other air dry or oven baked clay.
Mix equal amounts of yellow and white Amazing Mold Putty until one solid color of yellow.
Make a oval/window shape of the putty and carefully push the clay piece in, making sure to bring the sides of the putty up. Let set, about 15 minutes until putty id firm.

Then measure equal amounts of "A" and "B" of Amazing Casting Resin using the cups provided. Pour into a small paper cup and mix thoroughly until resin is clear. Fill your window mold carefully. Have extra molds nearby in case you have leftover resin.  The above photo shows the clay window in the lower left and the resin window in the lower right.
Let resin set about 15 minutes, then carefully push out of the mold.
Trim off any abnormalities with small nonstick scissors. Do this before your pieces fully cures and is still soft and pliable. Then with a dauber, ink up your windows a bit with some brown color. Next spread some clear dimensional glaze over every nook and cranny of your window.
Tap a little bit of Copper Alumilite into it's lid then using a old small paintbrush, spread the copper powder onto the window frame. You will be picking up some of the glaze to the point of painting the window frame with a 'copper glaze'. This is a good thing. Touch up the frames with some Gold Alumilite as well.
By combining the Alumilite powder with the glaze, you have a built in finish.
 Cut to shape and glue 2 layers of iridescent cellophane to the backs of the windows.

 Adhere double stick tape to the windows and place them in a 'low' secretive place for your faerie folk to enjoy!
Happy Crafting!

Wednesday, August 8

A Fairy Frozen Charlotte Born from a Bar of Soap and Amazing Mold Putty....

Happy Wednesday and today is the day!!! Susan back and as promised, I'm here to share my "Fairy" project that is featured in a special bloghop today. CLICK HERE to go there. Don't forget...there's a special coupon for Amazing Crafting Products at the end of this post, too!


This project began with a little goodie that was included from an Etsy team-member I purchased some holiday soap molds from. She included this sweet fairy bar of molded goat's milk soap. So I have been saving this for a special Amazing Mold Putty adventure....turns out it's evolved into a whole fairyland altered shadowbox project.


I mixed up a good amount of Amazing Mold Putty to cover the front and all sides of the soap. It's about the size of a trading card and the square part of the soap below the relief is about 1/2" thick. I made the mold around the bar and I can use it for just the relief of the fairy - or as more of a sculptural piece.

A little note about the results...as it turns out goat's milk soap is very soft and delicate {but smells lovely}. It wasn't harmed by the mold putty - but the heat of the curing process of the mold putty sort of melted the soap into the edges of it. I had to put it in the freezer for about an hour {because this particular mold is so thick} to help accelerate cooling and release from mold putty. I had to pull a little to get it started, but it worked! My bar of soap has a slight tint of yellow now, but it's a success!


Then I filled the relief part of the mold with Creative Paperclay™ and let dry. I also put this into the freezer for about 15 minutes so that I could get it out of the mold to dry faster by placing it in the toaster oven at the very lowest toast cycle a couple of times. I let it cool completely between cycles because the paperclay likes to puff up like a donut when it gets too hot. 

My little fairy frozen charlotte is born!


The lovely detail of my Fairy Frozen Charlotte is painted, worn and weathered.
Please CLICK HERE to see my finished piece.

•••••••••••••


Use coupon code AMP20 to receive 20% off your order.
Coupon expires - Sept 30, 2012

I hope you enjoyed today's project. I encourage you to stroll around through the many AMAZING projects from the other Amazing Mold Putty Design Team members for some great tips and ideas! If you have any questions, please leave a comment, select receive e-mail follow ups on comments and I will respond. If you would like to see more of my creations, please visit my blog sbartist : painting in the dark by clicking here.

Have a fabulously creative day! Sb : ) 
Related Posts Plugin for WordPress, Blogger...