Showing posts with label whimsy. Show all posts

Tuesday, January 10

#Cre8time Laughing out LOUD... by Kristie Taylor #CHAshow Sneak Peek


Say WHAT??! You can see this project at CHA Creativation in Phoenix!


Hello crafty friends! My name is Kristie Taylor and I am super excited to be one of the newest designers here with Amazing Casting Products... using some of my favorite things – LOL!!

Today I want to show you a little something I made using a Prima telephone, a Relics and Artifacts craft blank and lots of Amazing Mold Putty and Amazing Casting Resin! I had so much fun making this project... maybe he will make you "laugh out loud"!

So let's talk about how I achieved this 3 dimensional little fella.
Let start with some of my faves... 


OK... let's get started!


First of all, we need to make some molds, so I used a piece of molded plastic. I think it may have come from an old bathroom fixture – I'm really not sure... but it has been in my stash for a while. It's a cool shape, but I needed two. Of course you see this is going to be his eyebrows.


I mixed equal amounts of Parts "A" and "B" until the Amazing Mold Putty became one consistent color {please CLICK HERE to view mixing and preparation}. I place the "eyebrow" finding on a flat surface and pressed themold putty around it, making sure to create a good lip so when I add the Amazing Casting Resin, it won't seep out.


I wait for just a few minutes for the putty to cure, and I now
have the shape molded so I can duplicate it easily.


I repeated this process for some other pieces –
these will be used for his eyeballs :)


Next, I mixed equal parts of Amazing Casting Resin, then poured into the mixing cup and stirred slowly until one consistent color. CLICK HERE to view mixing/preparation. Then I quickly poured it into the molds... this resin cures very fast – in about 10 minutes. Once cured, I could start assembly.


I needed something to hold the eyebrows on... and after much trial and error, I finally decided that Apoxie Sculpt was the answer.


And the same for the eyeballs!


He's starting to come to life!!!


Now I needed to make a tongue, so again, I used apoxie sculpt. I mixed the two parts together, used a brayed to roll it out flat, and then used my fingers to shape it. Then placed in over several bottles to allow it to dry.


I also used a Relics and Artifacts piece to be
his "uvula" before giving him a paint job!


Here is my finished piece – in all his awesomeness!
I call him "Laughing Out Loud"


He makes me smile, he really does!!


Now go mold all the things
and make something awesome!

Thank you so much for stopping by today! Kristie

To see more of my work, please visit my blog, "The Scrapinater", 
over on my YouTube Channel or on Instagram.

• • • • • • • • • • • • • • • • •


Visit us at Booth #2813 Alumilite Corporation
{a.k.a. Amazing Casting Products}

See all five flagship products in action, try them out, and learn something totally fun and AMAZING! Stay tuned here at Amazing Casting Products for more details and sneak peeks as we approach Creativation at CHA 2017!

• • • • • • • • • • • • • • • • •

Don't forget to subscribe to our blog on the right side bar:
Twitter at AmazingCasting | Facebook at AmazingMoldPutty | YouTube at AmazingMoldPutty

Saturday, May 28

#Cre8time Garden Play... Teeny Tiny Fairy Doors by Maria Soto


Hi there! I want to share a cute little project I made... it reminded me how much I love getting my hands dirty as I create fun crafty items.

I joined a swap group a few years ago, we always do jewelry, but this time I was asked if I wanted to take part of the fairy garden swap and I accepted the invitation. CLICK HERE to jump over to see my owl charms, and HERE for the Star Wars themed charms I made for previous swaps.


We had to make tiny doors and a window. I decided to make the door with a window, just didn't know how. After a lot of thinking and a few craft fails, I went to the craft store and I found a section of tiny miniatures for fairy gardens. I had no idea they had these available, so I purchased a door. I decided to use Creative Paperclay® to make an impression of the door only – and then I added the remaining details by hand.

The door I purchased had a tiny butterfly on it, it was cute but I decided to add a window in it's place. Once the doors were done with their new windows it was time to let the clay dry over night. Next I hand painted each with acrylic paints. To finish them up, I added some sparkle and a bit of flowers to decorate each tiny door.

I also had to make these safe for outdoor use, so I used Amazing Clear Cast Resin to seal the paper clay... and at the same time used it as glue to add all the glitter, beads and tiny plants/flowers. Just a little bit of resin was enough to finish up these tiny houses – I love how glossy they look thanks to the resin.


Here you can see one of the tiny doors all painted,
ready for the final embellishments.


I applied the resin all over the piece and then added beads
to serve as tiny rocks around the plant and flowers.


Here are the finished doors, all ready to go to their new homes.
It's great when you have a product that you can use in so many different ways.


I really like these tiny little doors – adding the trim on the doors, and the tiny windows to make each door different and unique. I loved how the Amazing Clear Cast Resin not only allowed me to make these outdoor safe, but I think the glossy finish makes the texture, the color, and the little details really POP.

What would you create for your fairy garden?

I hope I have inspired you to find new ways to use this amazing resin, the more I play with it the more creative fun I have. These little doors are ready to welcome some fun fairies. Share your ideas with us, we'd love to see how creative you are with Amazing Casting Products.

Thanks for visiting! I invite you to stop over to my blog, "What is Creativity"
 at http://chuy-creativity.blogspot.com to see more of my creations. ~ Maria Soto

• • • • • • • • • • • • • • • • •

Don't forget to subscribe to our blog on the right side bar:
Twitter at AmazingCasting | Facebook at AmazingMoldPutty | YouTube at AmazingMoldPutty

Wednesday, July 29

#Cre8time Transformations... Boho Chic Dream Catcher by Melissa Johnson

Hello everyone! Today I would like to share with you how I made this fabulously fun dreamcatcher for my teenage daughter's bedroom. 


To start out, I gathered my materials. You will need a metal hoop, some yarn, feathers, trims and lace--vintage or new (I just happen to love vintage so I went that route), vintage scarves or other silky material (I used a vintage sari, but you could use silk scarves, silk shirts from Goodwill – it all gets cut into strips), Amazing Mold PuttyAlumilite dyes, gold AlumidustAmazing Casting Resin, Golden GAC 900 Fabric Medium, and any other findings, flowers, or special pieces you would like to attach.


I started out by wrapping the wire hoop with a multicolored yarn. My daughter's room is kind of a boho style so I wanted to keep the colors bright and fun. 


Next, I tore the vintage sari into strips and began tying them around the bottom and top. Short pieces on top, longer ones on the bottom. 


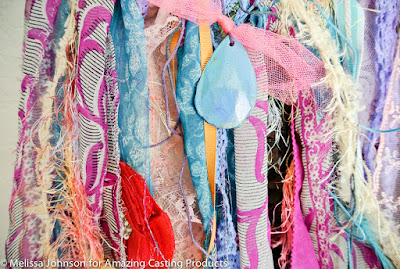
The next step is to dye the lace and trims using the Alumilite dyes. I chose Violet, Red, and Blue to fit into my color scheme, but there are many other colors available! I put a few drops of dye on a paper plate, then I added Golden GAC 900 Fabric Medium. This is typically used to make acrylic paints useable on fabrics, but I wanted to try it out with the dye just to see what happened. I swirled the lace and trims around in the dye mixture, then put my heat gun on it to help it "set". I got a little impatient when I noticed that it was taking a long time to dry, so after heating them with my heat gun I rinsed out the pieces with warm water to make sure all of the extra dye came out, then put them all in the dryer for about 10 minutes. I like how they turned out, the color is still definitely there and it has a vintage look to it that I like.


While the trims were drying, I prepared a mold of a vintage crystal using the Amazing Mold Putty. I poured Amazing Casting Resin into the mold and allowed it to dry. It takes about 5 minutes here in Texas! 


I also mixed up some Alumidust (gold) -- has anyone noticed this stuff is on practically every project of mine? I love it!!--and dusted the feathers with it, just to add a little shimmer :) 


At this point, I popped the resin pieces from the mold and painted them with Golden acrylic paints in Cobalt Blue and Teal. When they dried I added a coat of gold glitter clear paint. Then I began to assemble the rest of the dreamcatcher. I added the dyed trims and lace, and several pieces of just random ribbon and fibers that I had in my stash. I just worked around the circle, tying all of the pieces in knots. I used hemp cord (colored) to tie on the feathers and add the resin pieces. I found the cute laser cut tree at Hobby Lobby in a package of 3. 


And here is the final finished product! 


Make something that makes you happy :) ~ Melissa Johnson
Please visit my BLOG to see more of my mixed media creations.

• • • • • • • • • • • • • •

Don't forget to subscribe to our blog on the right side bar:
Twitter at AmazingCrafting | Facebook at AmazingMoldPutty | YouTube at AmazingMoldPutty

Monday, January 12

Take a #Cr8time Road Trip on Mold Rubber Monday with Aimée Wheaton


Road trips, you either love them or hate them. I used to love them as a kid because as the oldest I always had my trusty yellow walkman (yes I'm dating myself now) and I could tune out my brothers and just look out the windows waiting to get to our destination. I have so many fond memories of piling in the car and seeing new places. To this day I LOVE road trips (for the most part). I am hoping to do a few this year as a family and being able to make new memories in 2015. This takes me to my latest project - My Road Trippin bird family!

I love going out and hunting for treasures, I usually have to pay for them which is OK but sometimes I get super lucky and find things I can use in my art, this happened with this project. We went on a play date to a park one day and I found this amazing wooden decorative piece that someone used as a toy and it broke. It was a primitive sheep standing on a checkerboard base with wheels and a pull string. The sheep was broken off the top, I promptly scooped it up and took it home as a treasure, I wasn't sure what I as going to do with it but knew I could make something fun!

I purchased two ceramic birds at a local flea market just for fun and then the wheels started turning, somehow these birds were going to go on a road trip ..... I didn't want to use the original birds in the piece so I decided to mold the one that wasn't cracked in Amazing Mold Rubber - I am hooked on this product, it's super easy to use and it it turned out amazing!! OK enough reading let's get to some photos!


Here's the cute little guy in a mold box that was originally a paper punch package. I hot glued him down so he wouldn't move and also sealed the hole on the bottom of the bird with packing tape.


Next I prepared the entire container of Amazing Mold Rubber
{CLICK HERE to view mixing/preparation}.


Thankfully it's humid where I live, the Amazing Mold Rubber cured very quickly and I was able to demold in a few hours after I poured it. You can see the shape of the paper punch now! LOL


OK now that the bird was demolded, I can now prepare my resin and pour it in. I decided to use Amazing Casting Resin because of how quick it sets and I knew I would be collaging the birds.


The resin setting, this mold got super hot! For larger volumes of resin mixed, more is heat generated in curing process.


Look at this amazing casting!!!! Which is the original? ;) I'm envisioning making a mixed media series of birds, it has nice weight to it too. I was thrilled with how it turned out! You guys the opportunities are endless with this product!


Next I decided to collage using mod podge and vintage paper and tissue paper.


Decided to do 2 birds! The butterfly was an embellishment I made awhile back and had been holding onto it to use somewhere.


Next gesso the crap out of all of the items making sure you can still see some of the stuff underneath it. I wanted to tone it down a bit.


Here is the cool base I found! :) I painted the entire thing.


Next I added back in some color using some chalk stamps in various colors.


While the birds were drying I found some vintage watch parts and used them to cover the screws on the wheels using some E6000 adhesive.


Adds a bit more dimension and interest.


I wanted to add some height to the base and remembered I had a large piece of cork in my mixed media junk box, painted it with gesso.


One cool thing about working with resin is the overflow that you have. Apparently I've reached for the same mold I made from Amazing Mold Putty when I have mixed too much resin, these 3 flower pieces I had in a box waiting to be used and they were molded from the bottom of a depression green glass plate, it's a sunflower motif.


I glued all of it down to the base.


Next I went out to my garage for the messy process of spraying the base. I used some metallic sprays that I had in green's and blues. I also used some white spray paint for extra contrast.


I sprayed and wiped too to get variation.


While out there I found a nest I had glued some lapis beads into last year. OMG it was perfect for the theme! This thing just kind of built itself once the nest was found. I spray painted the nest part while I was out there with the white paint.


I placed everything on the base for positioning purposes.


I added some glitter to the "eggs" with a light glue.


Next I dug through my button stash. Buttons are awesome to add extra oomph!


Then I glued on the nest with E6000.


I glued on the butterfly with hot glue.


Hot glued on the "headlights" made from buttons.


Glued on the paper hearts I punched out of some gelli print paper I made.


Edged the hearts using a charcoal pencil for extra pop.
Went back over it with mod podge to seal it.


Added on alphabet stickers to the front with mod podge.


Glued the birds on facing opposite directions with E6000. Added some gesso on the buttons too to make them pop more from the base.

I REALLY like how this project turned out! Mold rubber has become my favorite! So where do you think the birds are going?


Would love to hear your thoughts on this! :) Thank you for reading!

Let's see what you can create
with your stash of junk box items
and Amazing Mold Rubber!

Feel free to stop by my FB page to see the latest with me. 
To see more of my work please visit my blog "Creative Flutters"
and also at the Aimée Wheaton Art and Design website.

Till next time! Xoxo Aimée

 • • • • • • • • • • • • • •

Don't forget to subscribe to our blog on the right side bar:
Twitter at AmazingCrafting | Facebook at AmazingMoldPutty | YouTube at AmazingMoldPutty
Related Posts Plugin for WordPress, Blogger...