Showing posts with label Bee. Show all posts

Wednesday, February 14

Like Honey to a #Cre8time Bee... DIY Valentine's Crown by Lyn Gill


Hi everyone! Lyn here again and this time I've got a really cute project to share using Amazing Casting Products just in time for Valentine's Day! 


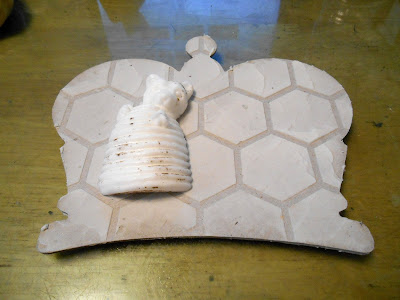
It started out with this 5" x 6" crown shaped chipboard
"canvas" for lack of a better term.


Now first I started off with this vintage Chalkware Salt Shaker that I picked up at a thrift store a few years ago – cute isn't he? Well I needed him to be flat on the back and light enough to use on the project... so out came the Amazing Mold Putty

I quickly molded him making sure the Amazing Mold Putty covered him at least half way up the sides, then layed him down on the table to flatten the back of the putty so I could pour him "level" when filling with resin. 


Once cured, I removed the salt shaker from the mold and then mixed some Amazing Casting Resin and also made a couple of bees using another mold from a previous project. These resin castings are ready to use in about 10 minutes.


Using a honeycomb stencil and some modeling paste, I added some texture to the background. Then I decided on the placement of the handmade elements for my design.


I glued down the elements then added some graphite texture paste around them and around the edges and let it all dry.


Then I covered the entire piece with some Gesso
to give a uniform surface to paint on.


Now the fun begins! I painted the entire piece with some yellow acrylic paint, followed by some orange acrylic paint, and then spritzed the entire piece with some water and let it run down the "canvas". I finished it off with a little spray with some pearl shimmer and some Silver Spark Metallic Luster.


Now for the finishing touch! I mixed up some Amazing Clear Cast Resin with a bit of Alumilite Dye (yellow with the tiniest touch of orange), and let it set in the mixing cup for roughly an hour to thicken up – I needed it to to be thick and not runny for this step. 


I placed "drips" of this "honey" in some strategic places and the tilted the "canvas" at an angle so the "honey" would "drip". You need the resin to be thick in order for it not to run off your piece and not level out.


Cute isn't it?! I think so...

what will you make for your Valentine?

Hope you have a sweet Valentine's Day!
Till Next Time! Lyn

You can find more of my work on my blog LynzCraftz
or on YouTube LynzCraftz, or my Facebook page LynzCraftz.

• • • • • • • • • • • • • • • • •

Don't forget to subscribe to our blog on the right side bar:
Twitter at AmazingCasting | Facebook at AmazingMoldPutty | YouTube at AmazingMoldPutty

Tuesday, June 14

Just BEE-lieve... #Cre8time Embellishments are just that Easy


Hello Amazing Crafters! Today we are sharing a find from the Arnold Grummer™ Paper Making blog... a little mixed-media canvas by artist Michele Emerson-Roberts.


Michele created this small canvas as a gift and she used Amazing Mold Putty to mold a bee from a piece of jewelry to make a perfect dimensional embellishment to complement the embossed handmade paper and die-cut sentiment. Amazing Mold Putty works great with handmade paper pulp, though for this project, Michele chose an air-dry polymer clay for casting this golden bee. It's really that easy and makes the perfect finishing touch!

What would you mold
to make your own custom
embellishments for arting?

Please leave a comment with your ideas. We would love to see what you make in your Cre8time using Amazing Casting Products. Happy moldmaking! :)

• • • • • • • • • • • • • • • • •

Don't forget to subscribe to our blog on the right side bar:
Twitter at AmazingCasting | Facebook at AmazingMoldPutty | YouTube at AmazingMoldPutty

Wednesday, April 24

"Nouveau Bee Necklace" with Guest Designer Jess B.


Hello Everyone! Jess B. here today. I'm so excited to be a Special Guest Designer. The designers on the Amazing Crafting Products creative team are from all over the spectrum ready to wow your eyes and think outside the box.

This is such an eclectic group! I know we will learn something new from each designer.

Now getting down to business... I have found my new love Amazing Mold Putty and Amazing Casting Resin. It's fun and easy to work with! A must have product in you creating closet.

Nouveau Bee Necklace


Today I am going to show how you can create molds from images cut from your Cricut Cartridges -or- other electronic die cut shapes... you could use your punches even.


I cut out the bee image five times from light cardboard using the Provocraft Cricut Cartridge Art Nouveau. 


After cutting images, I glued and layered the images in a stack to create one thick bee.

Using Amazing Mold Putty, I mixed equal parts "A" and parts "B" thoroughly according to the instructions, then pressed my layered paper bee into the mold putty. For HOW-TO of mixing Amazing Mold Putty, please CLICK HERE.


Next, I prepared and mixed Amazing Casting Resin according to the easy to follow instructions. I poured the resin into the molds to cast my bees. For full instructions on mixing Amazing Casting Resin, please CLICK HERE.


The resin cures in about 15 minutes...
and my bees were ready to be released from the molds.


I added Martha Stewart gold micro beads in the middle and hemp cord for the necklace.
The white on white really looks pretty and it's perfect for Springtime! 

Don't forget to subscribe to our blog on the right side bar:
Twitter at AmazingCrafting | Facebook at AmazingMoldPutty | YouTube at AmazingMoldPutty


Thanks for stopping by! To see more of my work, please CLICK HERE.


Related Posts Plugin for WordPress, Blogger...