Showing posts with label Prima Marketing. Show all posts

Saturday, July 18

I'll Have Some EGGS {shells} with that #MixedMedia ... by Guest Designer Kimberly N.


Greetings! Today we are excited to welcome back our Amazing Guest Creative... Kimberly N. – a mixed-media artist who loves vintage, Steampunkery and all things distressed. Today she has a canvas tutorial to share that is full of texture, dimension and some surprising dimensional accents using Amazing Casting Products and supplies from her scrapbook stash!


• • • • • • • • • • • • 

This is a super fun mixed media project I'm sharing with you today... there is no right or wrong way to do this – just have fun and be creative! 

Supplies:


First I begin by preparing a mold to create some dimensional accents. I mix some Amazing Mold Putty and press a Spellbinder die into mold putty to make a mold {CLICK HERE to view mixing/preparation}. From this mold I cast two pieces using Amazing Casting Resin. Please CLICK HERE to view mixing/preparation of resin. These diamond pieces will be the feature of my canvas.


Using a 12" x 12" canvas prepared with gesso, I arranged the Amazing Casting Resin embellishments to my liking. I glue down the pieces using Prima Art Basics Soft Gloss Gel.


Now to add some more texture with some recycled crushed egg shells.


I randomly layer eggshells onto canvas.


I prepare a small batch of Amazing Casting Resin and pour over the eggshells. This is a brief video capturing the process. This not only fuses the eggshells in place, but also fills in and flows around the pieces creating some interesting and exciting texture. 


I wait for the Amazing Casting Resin to cure – it takes about ten minutes. Now I can paint this any way I like... with powders, paints, sprays, etc.   

How I painted my canvas: I started with some clear gel medium and carefully tapped it over the top of egg shells. Then I took mica teal powder and blended it into the medium. I continued with rust mica power randomly the same way; then copper medium – randomly layering onto my canvas. After it dried I randomly painted down some clear gel medium and followed over the top with some Alumilite Gold Metallic Powder. I continued the repeating until I got look I wanted.


The texture and dimension of these shimmery jewel tones is gorgeous!


How do you add amazing texture
and dimension to your mixed media?

Please comment below and give our AMAZING Guest Creative Kimberly N. some love. Be sure to stop back for a visit next Friday for more Cre8time inspiration from Kimberly. Please visit "Scraps of Inspired Art" to see more of Kimberly's work or on her blog HERE

 • • • • • • • • • • • • 


Hi my name is Kimberly N. – I am married to my junior high school sweetheart and I have three amazing boys, two beautiful daughters in-laws, one grandson and two granddaughters. I started crafting about 9 years ago... I started out with a Cricut then expanded from there. I enjoy altering the unexpected and I LOVE playing with mixed-media art. My creative style can best be described as being vintage-distress, as I love combining vintage and Steampunk.

 • • • • • • • • • • • • • •

Don't forget to subscribe to our blog on the right side bar:
Twitter at AmazingCrafting | Facebook at AmazingMoldPutty | YouTube at AmazingMoldPutty

Friday, September 12

AMAZING Casting Resin Lion Head... HOWTO by DeeDee Catron

hi hi HI!! :)

I'm excited to be back on the Amazing Crafting Products blog. Though my small break was needed, I'm ready to be back and start inspiring again.


You may have seen this tag around recently by me. It was made for a blog hop a week or so ago, and the lion head is Amazing Casting Resin! WELL >>> there happened to be a little bit of buzz about him, and I took the opportunity to share a how-to with everyone :) .

For the tutorial and a new tag, I opted to make my lion a bit of a grungy metal dude and am super excited to share my video with you, BUT first let me show you the tag:


Now onto the video and then some details :) :

If you have trouble viewing the video please CLICK HERE to view.


The top is made of some UmWowStudio gears distressed with ink, moss, Prima Marketing flowers, goggles, nest, leaves and wings, and my Lion Casting. It's all been layered up and adhered down with a heavy thick glue.


The tag base is paper from 7 Dots Studio cut with a Sizzix #8 die. It's been colored with Lindy's Stamp Gang magicals and stamped with a VLVS! rubber stamp. Two final pieces of embellishment consist of a miniature door handle and my message which reads "We All Stem From Nature." It's sort of a stab at the Steampunk genre and reminding ourselves that regardless of how many gears, how much metal, how many rivets... we're all just animals :)

Thanks for visiting me here today.
. . . . . . . . . . . . . . . .

Don't miss a single post!
Please subscribe to our blog on the right side bar:
Twitter at @AmazingCrafting | Facebook at AmazingMoldPutty | YouTube at AmazingMoldPutty

Wednesday, August 27

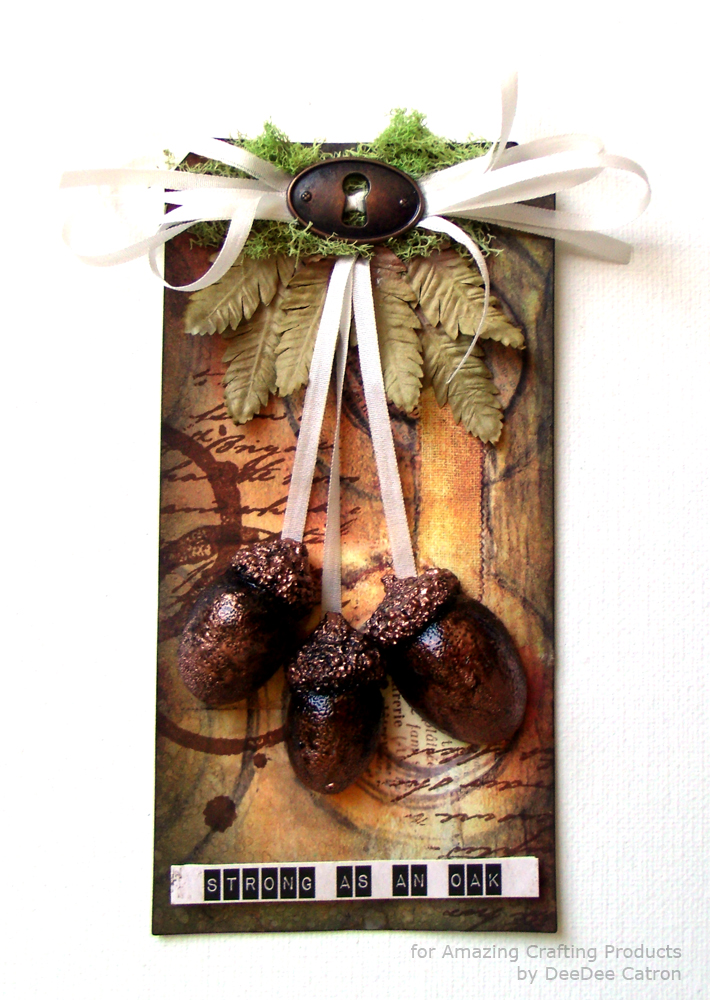
A #Cre8time Gathering for an AMAZING Fall Harvest {How To by DeeDee Catron}

Hi hi hi friends! DeeDee here today, it's been a while but I'm excited to be back on the Amazing Crafting Products blog sharing some of my works with you. 


Today I'm doing a start to finish photo tutorial in a super FALL HARVEST theme. I'm so pumped for September right around the corner, and can't wait for the weather here in Vegas to relax just a little bit more. Let's get started shall we? 


1) Start with a tag base. My tag is a sheet of 7 Dots Studio paper by 
Finnabair cut using a Sizzix / Tim Holtz die.


 2) Distress edges with Walnut Stain Distress Ink and water.


3) Mix equal parts of Amazing Mold Putty parts "A" and "B".


4) Form Amazing Mold Putty around acorns. 

TIP: I like to have a nice flat back of my resin pieces to secure to the paper
or project that I'm working on. SO I only mold half way around the piece.


5) Mix equal parts of Amazing Casting Resin and pour acorns.
Allow to cure, demold.


6) Build up base of tag with stamps, ribbons, 
flowers, and embellishments.


7) I felt like my acorns needed some texture and color, so I embossed
them with some WOW copper embossing powder.

I love altering the Amazing Casting Resin AFTER it's cured (as opposed to before),
because I don't need to worry about altering my mold or changing the original piece.


8) Distress with black acrylic paint.


9) Finish by layering the acorns up and adhering a sentiment.

There really are .. a TON of ways to finish your resin pieces;
glass beads, adhesives, powders, flocking, inks, mists, paints, more resin!
What have you always wanted to try? 


. . . . . . . . . . . . . . . .

Don't miss a single post!
Please subscribe to our blog on the right side bar:
Twitter at @AmazingCrafting | Facebook at AmazingMoldPutty | YouTube at AmazingMoldPutty
Related Posts Plugin for WordPress, Blogger...