Tuesday, July 22

Christmas #Cre8time and #MoldMaking in July!!! AMAZING Inspiration from Maria Soto

Hi there, this is Maria and today I bring you a post about crafting on the go. I like to craft when I get inspired – so I try to always carry a pocket size sketchbook, to doodle ideas that come to mind when I'm at work... or anywhere else. Sometimes I go a bit further and carry some crafty products with me, and Amazing Mold Putty is an easy product to use anywhere you go. 

I do like to recycle – sometimes not only using recycled items into my projects, but also for storage, too! For instance, when I open up a new stamp or stickers and they come in those little mylar bags... I keep them – just in case I need to store something else in them.

I've read some posts on Facebook about Christmas in July, and this has got me into the holiday spirit. I do have some holiday ornaments at work that I like to display during Christmas and Halloween – so I decided it was time to bring some Amazing Mold Putty with me to work. I have this cute Santa face I made many, many years ago out of polymer clay. I really liked how he came out – so I thought why not make a mold of him so later on I can start making some; and paint them all different to use them as family ornaments and give as gifts this Christmas.

So today's post is simple – just to show you how easy it is to carry small amounts of Amazing Mold Putty on the road with you... to make that one mold you just have to have when creativity strikes. 


I took two equal amounts of Amazing Mold Putty and placed them in this little recycled packing envelope. This just happened to have two separate sections which is perfect to carry the mold putty in. Once I got to the office and it was time for lunch, I brought out my little crafty package.


I took out the Amazing Mold Putty, and made balls out of the equal amounts of parts "A" and "B". Then I mixed the two parts completely until there is no visable swirls; making sure there is no white showing for it to work like it's supposed to. Once the putty was mixed, I took the polymer clay Santa head and pressed it into the Amazing Mold Putty. Please CLICK HERE to view mixing instructions.


I left to get my lunch. When I got back about 10 minutes later and I decided to just leave it alone and wait until my lunch was done. I knew it was all ready, and letting it sit longer would not cause any problems to the mold.

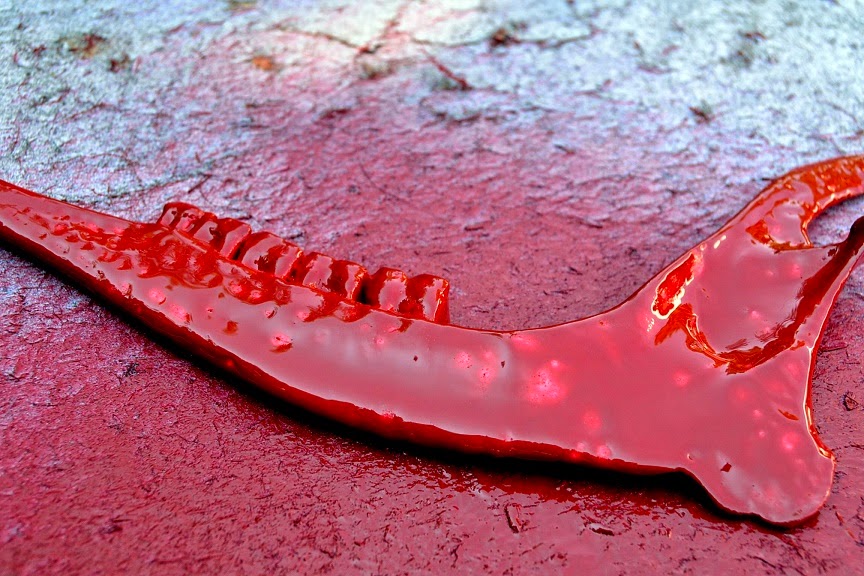
Once I finished my lunch, I removed my Santa head. There it was a perfect mold! Look at all the details captured by the mold putty... this is an amazing product, it really is. It really only took me about 5 minutes to mix the amazing mold putty; place the Santa head into the putty and wait about 10 more minutes for my mold was done. Now this is what I call fast crafting on the road! I don't get to go out much... but after this project I like to carry Amazing Mold Putty with me – because you just never know what you might find out there that might make a great mold.


Here is my mold all done... and it only took about 10 minutes.
Look at all the detail captured in the mold! 

Once we get a bit closer to Christmas, I will go ahead and make my new Santa ornaments to share with the family. So keep a look out for my post when these are done – I will share with you what I create with this fun mold.


I can't wait to get started making these
new Santa ornaments to give away! 

I hope I have inspired you to be ready for those moments when ideas come... and you won't have to wish you had your molding products with you – because you DO have them with you!

Please share what you make with Amazing Crafting ProductsWe are featuring our fan's photos right here on the Amazing Crafting Products Blog every Friday in July – so make sure to join us and have fun creating!!!!

Thanks for visiting! I invite you to stop over to my blog "What is Creativity"
at http://chuy-creativity.blogspot.com to see more of my creations. Maria Soto

• • • • • • • • • • • • • • • • •

Don't forget to subscribe to our blog on the right side bar:
Twitter at AmazingCrafting | Facebook at AmazingMoldPutty | YouTube at AmazingMoldPutty

Monday, July 21

AMAZINGLY Jaw Dropping with Rachel Whetzel and Amazing Mold Rubber

Hello, AMAZING peeps!! It's Rachel Whetzel... this month, I get the pleasure of sharing a project I made using Amazing Mold Rubber!! I have an art project that I'm working on for Gauche Alchemy, and I needed something especially unique and interesting. Naturally, I wanted my piece to be *Jaw Dropping* (heh heh) so I turned to Amazing Crafting Products, and got busy making something I'm pretty sure most people haven't thought of.


That's right! I created a jawbone!! A long time ago, I found a jaw bone left over from a deer that had been hit by a car on one of the country roads near my house. Being the morbid human that I am, I decided to pick it up and bring it home, because I thought it might look cool in a piece of art work. Bones are popular in art, and I have used them a few times myself.

Here's what you'll need to make
a jaw or bone replica of your own:
Here is my original jaw bone that I found on my walk.


I cut a box and used it's sides to make a smaller compartment to hold the jawbone, and keep Amazing Mold Rubber waste down.


Next, I sealed all the seams with duct tape. 

Then, to keep the jawbone in place while the Amazing Mold Rubber was curing,
I used duct tape rolled and cut to hold the piece in place.


Then I used a disposable container to mix my
Amazing Mold Rubber, and pour it into the mold.


The sides of my mold were a little flimsy once the Amazing Mold Rubber was in, so to keep things where I wanted them, I used a bit of ribbon to keep my sides in place during cure time. 


When I poured my Amazing Casting Resin, I wanted to make my piece red, but when I used my Alumilite Red Dye, I didn't use enough, and my piece turned out pink. I'm still getting the hang of dyes in the Amazing Clear Cast Resin. It wasn't too big of an issue though. I just used paint to make the piece the color I wanted. 

Here's a view of the backside of the piece,
with the duct tape spots and my seams untrimmed.


CLICK HERE for directions on mixing Amazing Casting Resin.

Once I pulled my piece, I cut off the excess from the pour,
and sanded edges, etc. to clean up the piece.


To get the Jawbone the color I REALLY wanted it, I used some spray paint I had on hand, and got busy layering it on. 


Then the spray paint was dry, I painted the teeth a different color, and then used stain to fill in the crevices of the piece and make it look aged. 


Last but not least, I used a toothpick to make flowers and dotted swirls all over the Jaw. I finished off the flowers with more stain when they were dry.


Be sure to hop over to Gauche Alchemy in August to see this Jawbone on it's final art piece! I can't wait to share with you!

Thank you for reading! Want to see more of what I'm up to?
Visit me on PINTEREST and INSTAGRAM, or like MY PAGE on Facebook!
Thanks for stopping by! ~ rachel

• • • • • • • • • • • • • •

Don't forget to subscribe to our blog on the right side bar:
Twitter at AmazingCrafting | Facebook at AmazingMoldPutty | YouTube at AmazingMoldPutty

Wednesday, July 16

#Cre8time Keeps You "Young at Heart"... Inspirational #MixedMedia from Aimée Wheaton!

Hi all! Aimée here today to share my first project with Amazing Crafting Products. I'm thrilled to be a new member on this AMAZING design team. I'm still learning the products and what works well together so my design is pretty basic. I've fallen back into my mixed media roots for this one and I hope it inspires you to create something fun!

I had a completely different idea in my head before this one popped up! While browsing a thrift shop I found this sweet glass heart container, I love browsing antique shops and stores for unique items to mold!! My new phrase is "OMG, I can mold that!!" The coolest part is that it was only $1.49! YAY!


I molded the top part of the glass because it seemed to have more details showing versus the bottom. The mold picked up even the mistakes in the glass. Amazing Mold Putty lives up to it's name! CLICK HERE to view mixing/preparation.


Now that I have my mold created  I brushed on some Alumidust powders to give it a shimmery effect. I then mixed Amazing Casting Resin and let it sit and do it's thing {CLICK HERE to view mixing and preparation}. When it was finished I demolded the heart and the colors weren't as vibrant as I had hoped it would be (sorry forgot to take a photo of it)... so I decided to paint it with some of my favorite acrylic colors instead.


I left some of the shimmery blues and purples showing through in some areas so it still has a bit of that original look I wanted. I love my little heart so far! I had a piece of thin MDF board that was used in another piece of art and I decided to use that as the background and paint something simple using the same colors I used in the heart.


On this background I placed where I wanted my heart to be and traced around it in the wet paint for placement. The black marks I created using some handmade stamps of mine and StazOn Jet Black ink.


The heart needed some contrast so I rubbed the ink pad onto the top and sides so it would bring out the edges and make it POP! Next up my drill press!!


I drilled 4 holes around the heart where I wanted the wires to go. This is 20 gauge copper wire. I took the wires out and put a dab of E6000® glue to keep the heart in place and then put the wires back in and twisted them in the back.


Next up – some sticker embellishments and ink.


I drilled more holes and added this fun embellishment, a painted piece of driftwood, more wire, chain and a handmade pendant by Jade Scott.

Here it is all together!


I hope I have inspired you with this creation! It combines a lot of different mixed media elements in one piece. I plan on making heart earrings from the same mold but much thinner! So much you can do with the right imagination! Hope you enjoyed it!

XOXO Aimée

To see more of my work please visit my blog "Creative Flutters"
and also at the Aimée Wheaton Art and Design website.

• • • • • • • • • • • • • •

Don't forget to subscribe to our blog on the right side bar:
Twitter at AmazingCrafting | Facebook at AmazingMoldPutty | YouTube at AmazingMoldPutty
Related Posts Plugin for WordPress, Blogger...