Monday, July 25

#Cre8time Furbaby Keepsakes... Making a Paw Print Rubber Stamp – Part 2 by Tanya Ruffin


Part 2: The Stamp

To read Part 1 – click here.

Now that you have your second mold you are going use the UMR mold release and spray several coats inside your silicone mold.

After they mold release dries, mix a small amount of Amazing Mold Rubber (follow the directions on the box for mixing small amounts). Pour into mold and allow to cure. 


Don't try to de-mold too soon. Let it cure overnight. 

The gently pull the rubber out of the mold. You may have some areas where the silicone mold sticks to the rubber. But if you used the mold release it shouldn't be too bad. 

THIS IS WHY WE DIDN'T USE OUR ORIGINAL MOLD!!!!

If you don't use a mold release or not enough mold release, the Amazing Mold Rubber will fuse to the Amazing Mold Putty making a solid rubber block.


Tape your rubber paw to an acrylic block.


Ink up with a permanent ink.


Make your print.
It may take a few tries to get a good print.


I scanned my print into the computer to make some background paper.


I also printed a laser print of my beloved Lily and mod podged it to a vase. 


I used the paw print paper to fill in some of the empty space
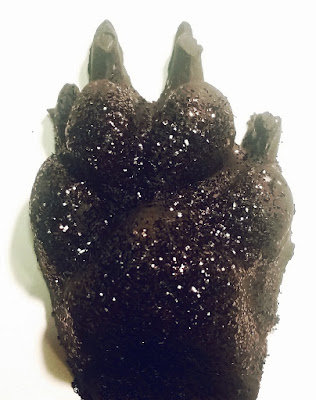
 and embellished with the black glittered resin paw. 


What rubber stamps can you make


Go Craft Your Own Way!
Tanya


Please visit my site to see more of my inspiring
creations at www.tanyaRuffin.com

• • • • • • • • • • • • • • • • •

Don't forget to subscribe to our blog on the right side bar:
Twitter at AmazingCasting | Facebook at AmazingMoldPutty | YouTube at AmazingMoldPutty

#Cre8time Furbaby Keepsakes... Making a Paw Print Rubber Stamp – Part 1 by Tanya Ruffin


In this project I want to make a rubber stamp of my dog's paw print. Yes, I could just ink up my dog's paw and make a paw print and scan it into the computer, but I wanted a little something different.

My Lily had become sick with kidney disease and I knew she wasn't going to be around much longer, sadly. So I made a mold of her paw before I had to go out of town. I am so glad I did because she died while I was in route home... she was only 7. I am brokenhearted, but that is another blog series.


I recommend any pet lover to make a paw mold while your pet is still happy and healthy. It will save you are a lot of heartache later.

Lily modeling for one of my earlier projects! 

This may seem like a lot of steps to get to the end results but you end up with multiple use pieces along the way. So I have made this in a two part series.

Part 1 – The molds

I first made a mold of her paw with Amazing Mold Putty {please CLICK HERE to view mixing/preparation}. I recommend that you write the date, "original" and pet's name on the back of the mold.

Mold #1 – the Original 

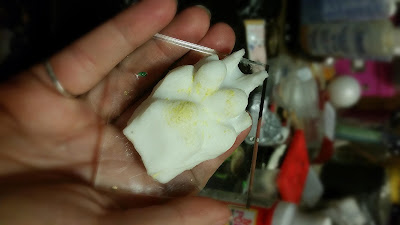
Then make a cast using resin. You will use the cast to make the rubber stamp. Make sure it comes out good, the next steps involve this first generation cast.

For the first cast I made – I used Amazing Casting Resin with black dye, and I put fine black glitter in the mold. Since my pup had black paws I thought this was adorable! I always tend to jump the gun and should have waited to make this cast until after I made my cast for the rubber stamp. It really doesn't matter except that my rubber stamp cast now has some black glitter in it.


Then I made the cast for the rubber stamp mold.
This is why you see some remnants of glitter in the cast piece. 


With this cast you will made a second mold with Amazing Mold Putty

With the resin casting made from first mold we are making a second mold – because the following steps are a bit tricky and you could ruin your mold. This way you always have your "original" saved somewhere that you can use to make another cast. 

Mold #2 

This is the mold we will use now. On to Part 2!

I'll be back later today with
another post and part 2.


Go Craft Your Own Way!

Please visit my site to see more of my inspiring
creations at www.tanyaRuffin.com

• • • • • • • • • • • • • • • • •

Don't forget to subscribe to our blog on the right side bar:
Twitter at AmazingCasting | Facebook at AmazingMoldPutty | YouTube at AmazingMoldPutty

#Cre8time from the heART... AMAZING Inspiration from Guest Designer Kristie Taylor

Greetings! We proudly welcome back our Guest Creative, Kristie Taylor who has joined us this month on the Amazing Casting Products blog... and today she's sharing some heartfelt AMAZING inspiration.

• • • • • • • • •

Did you ever think that we sometimes take our feelings for granted? I do, as a matter of fact, I think that feelings involving the heart are taken for granted most of all. 
That is why I created this piece – to remind me to keep all those "heart feelings" treasured.

For this project, I molded the heart with air dry clay, then cast in Amazing Mold Rubber so that I could use the shape again and again. The frame and the roses are items also captured in Amazing Mold Putty.

I used Amazing Casting Resin for casting the dimension embellishments: the heart, the frame, roses and in creating flourish pieces from Prima IOD molds. All of these items are brought together, layered with metal and chipboard pieces, and painted in my favorite colors.


I hope you like my project and that I have given you some inspiration for your next project! To see more about this special piece, please visit my blog HERE. ~ Kristie

• • • • • • • • •

What do you alter in your Cre8time?

Thanks so much for dropping by! Kristie will be with us again to wrap up the month on Friday with an amazing tutorial. Pop over and visit her blog, "The Scrapinaterto see more of her amazing work. You can also follow Kristie on her YouTube Channel and on Instagram.


If you have molded/cast your own creations using Amazing Casting Products, please share them on our website in the User Gallery or on social media with #AmazingCastingProducts.

Have a fabulous day! :) Sb

• • • • • • • • • • • • 

Don't forget to subscribe to our blog on the right side bar:
Twitter at AmazingCrafting | Facebook at AmazingMoldPutty | YouTube at AmazingMoldPutty
Related Posts Plugin for WordPress, Blogger...