Showing posts with label Embossing. Show all posts

Monday, July 10

It's all in the #Cre8time Layers... Make it Artsy Episode 202 - Party People

Hello Amazing Crafters!! Today you are in for a treat... this episode marks the debut of our Amazing Creative friend Cat Kerr and the magic she makes with Amazing Clear Cast Resin. Join us for a new episode of Make It Artsythe TV show for makers and crafters – featuring tips, techniques and projects for makers, crafters and artists! 

Ready for a new episode of Make It Artsy?!


CLICK HERE to view this week's episode

It's time to party. Artist Cat Kerr mixes things up with a pendant made in layers. Tool expert Joe Rotella melts glass in a microwave oven to create contemporary jewelry and accessories. Candie Cooper cranks out a one-of-a-kind artsy gift box with a treasure inside. Artist Jane Dunnewold has an art tip.

Bookmark or PIN the Make It Artsy Website
http://makeitartsy.com

Make It Artsy launched September 29, 2016 on Public Television stations across the country! Look for it on your local PBS channel – all new episodes from series 200 are now airing. If you can't find it on your local programming, you can view this episode online from July 7th to July 14th by clicking this link Series 200, Episode 202 - Party People.


Make It Artsy is a show dedicated to the crafter, maker and artist! A series celebrates that maker spirit and enthusiasm that extends to every part of life. It’s more than crafting, more than art or scrapbooking; this is an all-encompassing show for any one that loves to make “things”. From mixed-media to metalsmithing, using tools from saws to sewing machines, and materials from paper to wood; today’s most creative “makers” join host Julie Fei Fan Balzer and unleash a new look for crafting with a touch of industrial style.


Amazing Casting Products by Alumilite Corp. is proud to be one of these fabulous group of companies partnering with Make it Artsy. Stay tuned for upcoming Series 200 episodes with projects featuring some our amazing friends using Alumilite's AMAZING products! Don't worry... we'll be sharing each new episode right here as they become available so you can tune in.

• • • • • • • • • • • • • • • • •

Don't forget to subscribe to our blog on the right side bar:
Twitter at AmazingCasting | Facebook at AmazingMoldPutty | YouTube at AmazingMoldPutty

Friday, December 12

Make a Tag... or Three or TEN! AMAZING Remelted Tree Tags by Tracy Alden


Hello! Tracy here with another Amazing Crafting Products tutorial! I always love adding a hand crafted element to gifts given out each year for the holidays. It can be foods, cards, fabric decos or in this case gift tags that can be used as ornaments after gifts have been opened!

I needed to make quite a few tags and didn't have the time to stamp and cut all the tags out. So making a mold from Amazing Remelt that could be used for the holidays and remelted later for other projects was just perfect!

Supplies: 


I started by rolling out polymer clay to a thickness of a little less than half an inch. I attached an arrangement of clear stamps to the stamp block, sprayed the stamp with water to act a release agent so the stamps don't stick to the clay, and pressed the stamps firmly into the clay.

I used Stampendous Clear Stamps Winter Tree stamp set for this project because it is one of my favorite holiday tree stamp sets. Feel free to use your favorite stamps to create your own style of tags!


I carefully trimmed away the excess clay from the edges,
making simplistic gift tag shape. 


After stamping and cutting several tag shapes I placed them on a large ceramic tile and baked them in a designated toaster oven.


Once the polymer clay pieces cooled, I did NOT remove them from the tile. When baking polymer clay on a tile they often stick after cooking, often needing to be removed with a thin blade. With the pieces so neatly stuck to the tile I don't need adhesive to glue them to the tile to mold. I just left them in place and carefully taped on duct tape, smoothing the edges tight to the tile. I then sprayed the piece with a mold release before pouring Amazing Remelt.


As I noted in my Previous Post about Amazing Remelt – when heating up the Remelt I was careful to try heating it for 15 second intervals. Depending on how much Remelt you are trying to melt and how hot the microwave being used is, the time needed to melt can vary dramatically. 

From a 12 -15 inch distance I poured the Amazing Remelt in the duct Tape and tile mold box – the distance gives the Remelt a chance to release more bubbles before cooling. I used a paperclip to drag any bubble caught in the Amazing Remelt before it cooled to make sure to get a better casting. 


Once the Amazing Remelt was cooled, and no longer warm or sticky to the touch, I carefully removed the duct tape, tile and the originals from the Remelt. A little of the Remelt was uneven and I removed the excess with sharp crafting scissors and saved it for another mold.


I conditioned the polymer clay, making sure the clay was soft and warm enough to be pushed into the molds. I pushed the clay into the molds tight, and used a acrylic roller to push the clay further into the molds, making sure the clay got into the tiny embossed details.


I then carefully placed the mold, with the polymer clay still inside, face down on a ceramic tile. I then peeled back the mold and the polymer clay piece was then stuck to the tile. I then refilled the mold with more polymer clay and repeated this process several times so I had plenty of tags and then baked the polymer pieces.


I lightly sanded and trimmed the edges of the now baked polymer clay pieces with a craft knife and an emery board. I then used my finger and a paint brush to apply a black acrylic paint wash to the tags and let dry. They might look dark and dreary now but don't worry they will not be for long! 


Using an emery board, I sanded the raised surfaces of the tags. The embossed portions were now back to the original clay colors and the black in was left in the grooves to increase the visibility of the detail.


I painted on some Liquitex Gloss Varnish to the tags and while wet applied metallic powders – Alumilite Metallic Powders in Gold, Silver and Pearlescent.


I painted on some more Liquitex Gloss Varnish to the tags and while still wet I sprinkled on the Gold, Silver and Clear Glitter from the Stampendous Frantage Treasures Glitter 5-Jar Kit and let dry.


I threaded ribbon through each of the holes created in the tags, put names on the tags and attached them to presents and tree. 

With your favorite stamps, images
and Amazing Remelt, what handcrafted
Holiday tradition can you create?

Please share them on the user GALLERY on the
Amazing Crafting Products Website!

Visit my blog Art Resurrected for more craft tutorials!

Until next time, safe travels! ~ Tracy

• • • • • • • • • • • • • • • • •

Don't forget to subscribe to our blog on the right side bar:
Twitter at AmazingCrafting | Facebook at AmazingMoldPutty | YouTube at AmazingMoldPutty

Friday, May 30

When #Cre8time meets Willy Wonka...
AMAZING Inspiration by Cat Kerr


Greetings AMAZING Crafters! Today we welcome back our Featured Artist Cat Kerr who is sharing a some AMAZING Inspiration with us today – wrapping the Month of May up with a BOW! If you missed her How-To from last Friday... CLICK HERE to see it NOW!!!
Enjoy :) Sb

• • • • •

Using Amazing Casting Resin on embossing folders is an awesome way to add texture to all sorts of projects. Here's a small canvas with just a hint of casting texture, but I believe it speaks volumes. Inspired by movie night with my son, Willy Wonka offered inspiration.


This time I knew I would be painting over the Amazing Casting Resin texture sheet, so I didn’t mix it with any Alumilite Dye or add any Alumilite Metallic Powder. Once cured, the casting resin sheet easily came off the embossing folder.


I cut it in half, glued it onto the canvas along with telephone book text. Once the glue dried I covered the texture sheet and some of the canvas in gesso.


I added multiple layer of color...


...and rub-ons, and a vintage photo...


finished off with some antiquing, inka gold and hardware...


...and Pure Imagination was finished.


Happy Creating friends! ~ Cat


Cat Kerr is a mixed media artist/instructor that lives in Central Florida with her husband and two children. Her work has been featured in numerous publications such as Somerset Studio, Belle Armoire Jewelry, Cloth Paper Scissors, and many more. She currently teaches on-line and at national retreats around the country. To inquire about her workshops and teaching schedule, please visit her website at http://www.catkerr.com.

• • • • •

Thanks for stopping by today! We hope you enjoyed this inspiration from Cat Kerr. We want to say THANKS to Cat for joining us as our Featured Artist for May... and we hope that she'll come join us again in the future. To inquire about her workshops and teaching schedule, please visit her website at http://www.catkerr.com.

Saturday, May 24

Celebrating Birthday LOVE for the 5th Annual Operation Write Home Memorial Day Bloghop


Welcome to Amazing Crafting Products and our stop on the Annual Operation Write Home Memorial Day Bloghop! We would like to say "THANKS" to our men and women serving in the armed forces. Each one of us has a family member, friend or co-worker that has dedicated their life to protect our freedoms and to these brave folks we say "THANK YOU!" Also we would like to say "thanks" to all who support Operation Write Home in providing millions of handmade cards to our Military Men and Women abroad.


If you arrived here and would like to get back to see the rest of the blogs participating... CLICK HERE to head back to Operation Write Home!


BLOG CANDY...

As part of the event, Amazing Crafting Products is hosting a giveaway of AMAZING proportions. One winner will be chosen from those who leave a comment telling us "what is your favorite embossing folder technique" on this post. Winner will receive one box each of Amazing Mold Putty, Amazing Mold Rubber, Amazing Clear Cast Resin and Amazing Casting Resin!!!


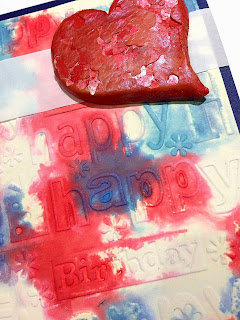
Cardmaking is quick and easy with embossing folders and we particularly love them for making our own embellishments with Amazing Crafting Products. In the Happy Birthday with Love card, designer Susan M. Brown applied Ranger Distress Stains into the Cuttlebug Happy Birthday collage embossing folder, placed in a natural cardstock and ran through the Cuttlebug to make a quick and easy background. To finish off the card she added a dimensional heart molded in Amazing Mold Putty; then cast with Amazing Casting Resin, Red Plum Alumidust and Stampendous Mica Flakes.


To make the heart coordinate with the card base, she rubbed the resin heart with Liquitex Pyrrole Red Acrylic Ink. It gives that pop of red, but lets the shimmer of the mica flakes shine though. Mounted on a navy blue card base, this card is colorful with texture and a little dimension, too!

For more AMAZING ideas creating embellishments with Amazing Casting Resin and embossing folders CLICK HERE or scroll down to yesterday's post by our Featured Artist for May, Cat Kerr. This is a MUST SEE and worth an extra minute before you hop along!!

. . . . . . . . . . . . . . . . . . . . . . . . . . . . . . . . . . . . . . . . . . . 

Now we have a little business to take care of... Last year we participated in the Annual Operation Write Home Memorial Day Bloghop and the OUR PRIZE was never claimed. If you missed out on it, CLICK HERE to see all the stops on the hop. Thanks so much to all the supporters of OWH and all the fantastic readers who dropped by to visit as part of this fabulous event. We drew a number via random.org from the 106 comments left and the winner is... DRUMROLL please....


Congratulations to April!!!!


Please email Susan Brown, Creative Team Coordinator your shipping info where you can receive FedEx Ground packages so we can send out your prize to the following email:


. . . . . . . . . . . . . . . . . . . . . . . . . . . . . . . . . . . . . . . . . . . 

Have a Safe and Happy Memorial Day Weekend!


Don't forget to subscribe to our blog on the right side bar:
Twitter at AmazingCrafting | Facebook at AmazingMoldPutty | YouTube at AmazingMoldPutty

Tuesday, August 13

Don't Throw Away Those Old Tools... Make AMAZING Customized Embossing Plates! Tutorial by Marilyn Weyman Kegg

Have you ever wished that your favorite rubber stamp was also an embossing plate?

Now it can be with the help of AMAZING Crafting Products! Here's how.

What you need:
  • Any embossing or cutting machine that uses pressure to work 
  • Two replacement plates for an embossing machine that will fit into your machine or extention plates for your machine (these are sold wherever the machines are sold) 
  • Cushioning such as is sold for embossing machines or use Fun Foam from the kids section of the craft supply store 
  • Amazing Mold Putty
  • Amazing Casting Resin
  • Any rubber stamp - clear, red, grey, mounted or unmounted 
  • A substrate - a smooth, flat base such as a piece of lucite, thick glass, or a clear mounting block for stamps or you can use a transparency or another piece of thick film to support the mold you are forming 
  • A piece of PVC pipe to use as a rolling pin 
  • Petroleum jelly 
  • Solvent based stamp cleaning solution 
  • Tissues and/or baby wipes 
  • Measuring and mixing cups for resin 
  • Popsicle sticks or wooden coffee stirrers 
Process:

Note about stamps: Choose a stamp that has good definition, where the images stand out clearly from the background in a deep cut as with the stamp I've chosen below, a text stamp.


1. With your finger, put a thin coating of petroleum jelly all over the working part of the stamp, including the edges. Work it down into the stamp's grooves and cut outs so that the mold material will not stick to it. Put the stamp off to the side. Don't skip this step or you could ruin your stamp (ask me how I know this!). Clean your hands well so the petroleum jelly will not affect the next step.

2.  Measure out enough of one part of Amazing Mold Putty to just cover the surface of the stamp with a small border. It doesn't have to be very thick, just about 1/16th of an inch or a little more. Roll it into a ball and make a ball of the other part to match. Together, they make twice as much as the one you measured or tried out with the stamp, so you will have enough depth. You don't want this to be any thicker than the depth of the cuts in the stamp plus about an eighth of an inch.


3.  Mix the two parts of the Amazing Mold Putty as usual. I like to flatten both balls out and put the white part on the bottom, then fold the top and bottom in to the center, squish it down, flatten it out, and then fold the two sides in. I keep doing this, alternating the top/bottom with the sides until the two parts are completely mixed with no swirls showing. It will be a light yellow color. It should not take more than two or three times for top/bottom/left/right folds to mix it thoroughly, about 1 minute.

4.  Quickly flatten the putty out onto the substrate, using the PVC pipe to roll it out smoothly into a flat surface. Immediately press the stamp into the Amazing Mold Putty and hold it there. You have about 30 seconds to 1 minute to do this. You might want to weight the stamp with something while you wait for the Amazing Mold Putty to set up because wiggling the stamp will make the mold less distinct. You can touch the edge of the mold with a fingernail lightly to see if it indents. Once a fingernail no longer leaves an impression, it is set. This takes about 15 minutes. Thicker and larger flat surfaces take a little longer so allow it plenty of time to set properly.


5.  Once it is set, remove the weight if you used one and pull the stamp away. It is a good idea to clean it off with a tissue and a solvent stamp cleaning solution right away before you forget. I use a brush-like scrubber to clean mine after each use. The black, sponge-like stamp scrubbers are excellent too but I like the brush ones to really get into the grooves and remove all of the petroleum jelly.


6.  Try embossing something with just the mold. If that is too soft of a look, you can mix and pour some Amazing Casting Resin into the mold and allow it time to cure, then use the harder resin piece as your embossing plate. Remember that you want the total depth of the plate to be about one eighth of an inch. (Look at a ruler to see how thick that is.)


An idea to try: Make an embossing plate with textures from more than one stamp. Because Amazing Mold Putty sticks to itself, you can easily add a section. So make one texture then after it is molded, add more Amazing Mold Putty and use another stamp. This is a great way to use one or several small stamps multiple times to make a large custom embossing plate!
Embossing with just the mold worked for me on a really soft text paper that came out of an old thrift store encyclopedia I had altered. (I save the paper I take out of these for later projects like this one.) This would have looked nice dry-brushed with some acrylic paint. But the embossing shows up really well on a plain, dark colored paper like the red paper shown. It could be highlighted even more with a dusting of some chalk or Gilder's Paste.

This was just an idea and an experiment to prove that it would work. I was really happy to have found a new use for my old Sissix cutting machine. Now I need to come up with a project to use it!

What AMAZING arts and crafts will you create

Please share them on the NEW user GALLERY on the Amazing Mold Putty Website!

Think of all the new ways you can combine embossing with your collection of rubber stamps!

Happy Crafting!


~ Marilyn Weyman Kegg for Amazing Crafting Products
.................................

Don't forget to subscribe to our blog on the right side bar:
Twitter at @AmazingCrafting | Facebook at AmazingMoldPutty | YouTube at AmazingMoldPutty

Wednesday, June 19

An AMAZING and Inspiring Chunky Bauble...
{A Charming Necklace by DeeDee Catron}

Hi everyone - DeeDee here today! Sharing an inspiration post with you! 


{Click photo to see larger!}

I really love this piece because it's chunky, it's heavy, it makes a statement, it uses old found objects (yay for recycling) and it's STURDY! I knew I wanted the delicate feel of a light bulb, but I was nervous about it being too dainty and breaking. So I molded my bulb and cast it in Amazing Clear Cast Resin being sure to leave it for 24 hours, the recommended cure time. After de-molding I had a nice thick resin bulb that needed a final touch... so I embossed the back half of the bulb with a high metallic embossing powder giving it the illusion of having a metal connection area. For the back of the necklace  – holding onto that found rusty old piece of metal for quite some time and was ready to let it go! I punched a few holes in it, set some eyelets, and wound a piece of wire around my light bulb through two of the holes. Before securing everything down I strung a couple of pearls for some color! Easy Peasy right?? 

Thanks for stopping by today! 
DeeDee

.................................
__________________________________________

Use this COUPON to shop at the Amazing Mold Putty
website HERE and receive 25% OFF your purchase.
Please use coupon code " summerhaus " {no quotations}.
Coupon expires June 30, 2013.
__________________________________________
.................................

Don't forget to subscribe to our blog via e-mail on the right side bar.
Twitter at AmazingCrafting | Facebook at AmazingMoldPutty | YouTube at AmazingMoldPutty

Friday, May 17

Making Rubber Stamps from Embossing Folders with Michelle Frae Cummings


Hello - Michelle here to share a fun project today using your cardmaking supplies. I belong to a card making group that usually meets at my home once a month. This month was my turn to host a demo. So I thought I would teach my friends (and you) how versatile Amazing Mold Putty is.

I demonstrated how to use embossing folders to make rubber stamps! It's fun to do after you have embossed your card or tag, then further accent it with a matching stamped image!


To get started you'll need to mix equal portions of the "A" and "B" Amazing Mold Putty until you no longer see any white swirls and you have one uniform color yellow.


Make a pancake of your putty, about 1/4" thick. 

Then select your chosen embossing folder, open it up and gently press your pancake onto the non-raised design side. You want your putty to go into the design. Flip the folder over and look for air pockets under the putty, if you see any, you'll need to gently press the putty in place. Use a craft roller to smooth out any finger prints and make for a smooth finish for later. 


Let your putty set for about 15 minutes then remove easily from your folder. Neat huh?


Here are some examples that the girls and I created. We just used basic distress inks. For a more precise image, chalk inks would work even better. 


Also, for a more user friendly stamp, I would recommend to mount the Mold Putty stamps onto cling mounting foam. That way you can use them easily with a acrylic block. 


The rubber of The Amazing Mold Putty makes for easy clean up.
Just wipe with a damp cloth and you are done!


This can also be done with embossing plates and brass stencils. 

Thanks for coming by, and happy crafting! 
To see more of my creations, please visit my blog "Faerie Dust Dreams" by clicking HERE.

...........................................

Do you love to create and work in 3D? Are you imaginative and think out of the box? Can you take crisp, clear yummy and enticing photos of your work? Then you could be one of our next group of "AMAZING" Guest Designers on the Amazing Crafting Products Creative Team. CLICK HERE for more details! DEADLINE is MAY 22nd.
...........................................

Don't forget to subscribe to our blog on the right side bar.
Twitter at AmazingCrafting | Facebook at AmazingMoldPutty | YouTube at AmazingMoldPutty
Related Posts Plugin for WordPress, Blogger...