Showing posts with label skeleton. Show all posts

Tuesday, September 23

Got BONES??! An AMAZING Seasonal #Cre8time CASTING CALL... by Isabel Villarreal


Hi there crafters! This is Isabel and if your summer has been as busy as mine you probably just realized that Halloween is right around the corner. In preparation for Halloween and all the future creepy crafty stuff I plan to make, I decided to make my own scary stash of bones and skulls. Since I have a variety of skeletal needs for the season I decided to make molds using Amazing Mold Putty and Amazing Mold Rubber for casting a skeleton and a few different pieces.


I used Amazing Mold Putty to make copies of a plastic skeleton. I wanted to be able to cast individual parts of the skeleton so I cast the upper body first then took it apart to cast a separate bottom half. This way I could get a good imprint of both. Since this skeleton is about 5 inches tall with very simple shapes I used the Mold Putty to make a quick easy mold {CLICK HERE to view mixing/preparation}. Using Amazing Casting Resin, I made a perfect copy of the original plastic skeleton {CLICK HERE for mixing/preparation of casting resin}.


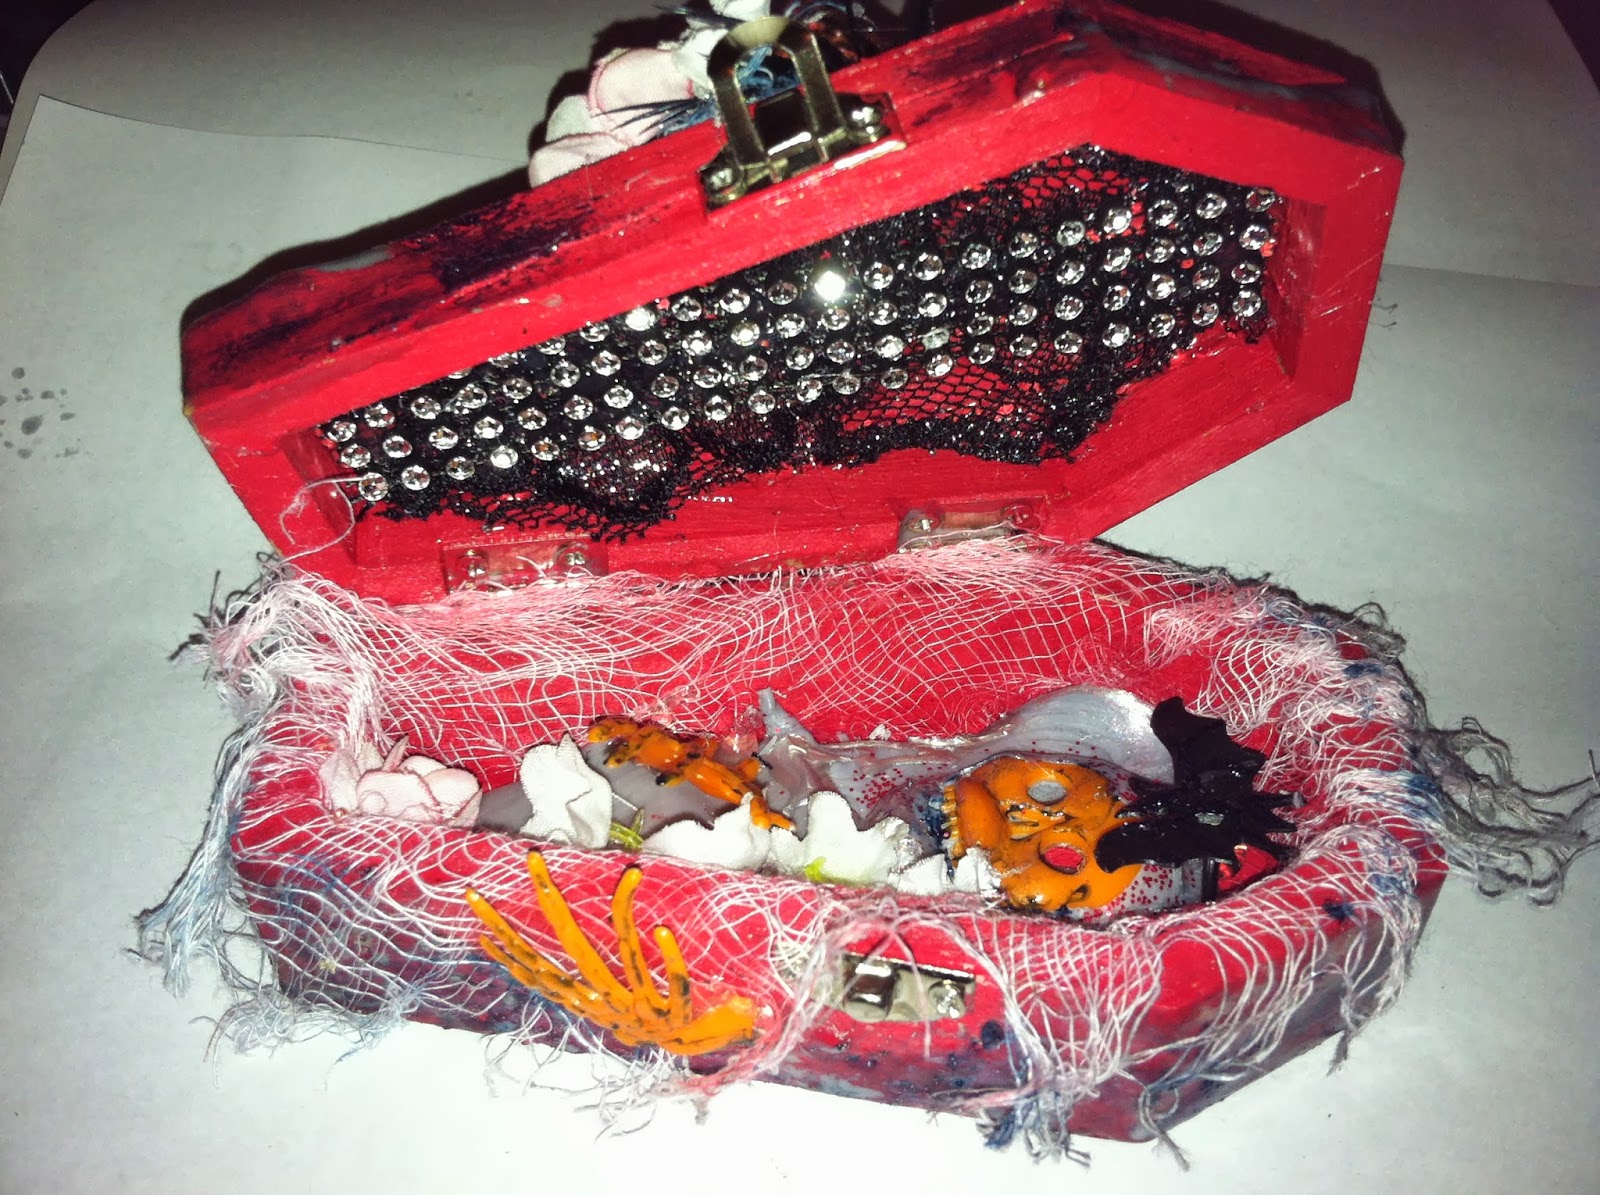
These skulls were sculpted from Sculpey polymer clay and then baked for a few minutes in a toaster oven. Because these are only about 1/2" tall I wanted to be sure to capture the tiniest details so I decided to mold these using Amazing Mold Rubber. It starts as a liquid so it can get into the smallest areas to create mold that yields highly detailed castings {CLICK HERE to view mixing/preparation}. Here I used Amazing Casting Resin with a few drops of Alumilite Brown Dye to make my castings.


Now that I can cast as many copies as I need since I have these handy molds – I'm ready for some Halloween craziness. With Amazing Mold Putty and Amazing Mold Rubber your creative possibilities are endless. And since they are so simple to use, making your own crafty stash is quick and easy.

What Halloween goodness
will you be creating this season

I'd love to see what you create! Please upload and share your creations to the

• • • • • • • • • • • • • •

Don't forget to subscribe to our blog on the right side bar:
Twitter at AmazingCrafting | Facebook at AmazingMoldPutty | YouTube at AmazingMoldPutty

Thursday, September 26

Keep Finding Skeletons in the Coffins... Make AMAZING Altered Coffins by Maria Soto


Hi there, this is Maria with another spooky project...
using no other than Amazing Crafting Products.


Wood coffin, ready to be decorated!!! 

I found this cute coffin at the craft store and decided to get a few to decorate, at the time of purchase I was thinking paper as the main material to decorate these, however once I got home and looked at all the molds I had poured I decided to go with Amazing Casting Resin to do the decorating of these coffins.

The coffin after a couple of resin pours, is all ready to add the black make up cream, yes I decided to use this instead of acrylic paint, just wanted to see how it would work on the resin and the wood.
Now I made two different ones, following the same steps. I used the Amazing Casting Resin for two reasons, it sets in a white color and it sets in just about 10 minutes each pour. I poured resin over the coffins in different areas, the objective was not to do a solid coverage, I wanted some areas of the wood to be left uncovered, and by pouring several layers of resin, you get a lot of dimension. 

This is the final result after applying with my fingers the black make-up cream paint to the areas covered in Amazing Casting Resin, you can't see the inside but I did the same as on the outside, after wards I added a little of the green make-up cream paint to the inside of the coffin to add more color.
On the other coffin used for this post (photo below) I mixed some of the Alumilite Copper Metallic Powder to add some color to the resin, once it was set, the inside was painted all in red and on the outside where I used the resin I went over in some areas with red acrylic paint, adding and removing the paint so only some areas had the red, I used some of Tim Holtz new distress glitter in red over the resin before it totally set, to use it as glue for the glitter to stay and it worked. 


Front of coffin (you can see on the bottom some of the
copper colored Amazing Casting Resin used).


Back of Coffin (used the same black make-up cream paint),
and the white you see is the white Amazing Casting Resin.


Side views showing the texture you get from the colored resin,
and the paints added to bring in more color.


Close up of the front of the coffin.

Once the coffin was painted it was just a matter of gathering objects I had on hand to decorate it. On the photos below you will see I took a skeleton that only had a head and arms, three rings a skull, spider and a bat (I cut the bands off). I like to make a lot of molds of things I have around the house, pour resin and keep on hand for future use, that is what I did with the frame you see on the top of the coffin, it was made with mold potty and I used an old makeup box to make the mold. Below are photos of the open coffins I decorated, I will be making a few more as gifts. 


A view of the Open coffin - this one was just painted all with red
acrylic paint and used black lace and ribbon.

A view of the second Open coffin. Here you can see how the inside is a lot different from the other coffin – on this photo you can see the the green make-up paint and red acrylic paint I added to finish the coffin.
I really liked the inside, I took the skeleton that only had a head and arms and cut him up, I placed the head and one hand inside the coffin and then used some old resin spill I had and placed it inside the coffin, instead of using glue to adhere the resin piece and the skeleton head, I mixed some more Amazing Casting Resin colored with Alumilite Silver Metallic Powder and poured it in the inside – leaving some areas exposed of the skeleton head. I added flowers and a bat before the resin set so they would stay permanently. I glued one hand on the outside of the coffin – to make it look as if he melted away while trying to get out.

For the second coffin, I decided to use resin only on the coffin to match the outside, the entire skeleton was used but since it was too big, I figure why not make it look like he's getting out, so I cut the head and arms off and glue them to the outside while the rest of the body was glued inside the coffin. 

Below are photos to show how different the inside of both coffins look.


A close-up of how the inside looks of the first coffin I made 


Here is a close-up of how the inside looks on the second coffin.

I used a lot of left over materials to decorate this coffin. How you decorate is up to you, but using Amazing Casting Resin to color, add texture and dimension to the coffin is what I did here, and to also use it as a glue, now you can't beat that, I say is great when one product can be used in many different ways. Not to mention I did use molded objects such as the cabochon and picture frame casting used on the front of the coffins and resin spills to decorate, I've found out working with wire ribbon has an advantage, since I didn't need the wire on the edges, I cut it off and used it as a decoration (wire already covered with fabric, a plus) as you can see on coffin #2, I wrapped the wire on a paintbrush handle and added to the coffin, nothing really goes to waste.

This cabochon casting was made using Amazing Mold Putty and Amazing Casting Resin with Alumilite Silver Metallic Powders, once set I used the Alumilite Gun Metal Metallic Powder all over. Once done, added some Alumilite Gold Metallic Powder and dry brushed some red acrylic paint on top; then coming back with a little bit more of the gun metal and gold metallic powers. These powders are amazing to work with! 

I had so much fun decorating these coffins, I can't wait for Halloween so they can go to their new owners. Have you tried Amazing Crafting Products? Here is a link to our photo gallery, come and share your amazing projects. http://www.moldputty.com/Gallery.cfm

If you have not tried resin, I suggest you try Amazing Crafting Products, it will change how you create, there are so many different ways to use their products, and the Alumilite Metallic Powders work great on resin dry or mixed in the resin,  it makes experimenting fun. Check out the website to find out more about the products http://www.moldputty.com/products.cfm

Materials used: Wood coffins from the craft store; Amazing Mold Putty; Amazing Casting Resin; Alumilite Copper, Gold, Gun Metal and Silver Metallic Powders; black and green make-up paint; red acrylic paint; Tim Holtz distress red glitter; skeletons; Halloween spider; skull; bat rings; ribbon; lace; flowers; cheese cloth; black feathers; Viva Decor glitter paints; and a hot glue gun.

***********

Thank you for stopping by. I invite you to stop over to my blog "What is Creativity" at http://chuy-creativity.blogspot.com to see more of my creations. ~ Maria Soto

What AMAZING arts and crafts can you create???

Please share them on the NEW user GALLERY on the Amazing Mold Putty Website!

How about a 20% Coupon to shop
Please use coupon code { celebrate } at http://www.amazingmoldputty.com/products.cfm

Coupon Expires September 30, 2013.
...........................................

Don't forget to subscribe to our blog via Networked Blogs,
bloglovin' or via email on the right side bar:
Twitter at @AmazingCrafting | Facebook at AmazingMoldPutty | YouTube at AmazingMoldPutty

Friday, October 19

My new Muse-One Hand Sam

I know-I know- Every month it seems lately that I am doing Halloween Projects. But I love them and they sit in my house all year long. I have found I am not the only one who does this so my weirdness isn't all that weird! THIS is why I love Amazing Mold Putty and Resin. My husband has a figure that sits in his office. I stare at it every time I go in there and think...I want to mold that! Well he finally gave in and let me but scared me so much about the figures hair I kinda held the mold a bit cock eyed and one arm did not form well. (DO NOT WORRY HIS FIGURES HAIR WAS NOT HARMED! LOL) But that did not bother me-it gave the figure much more of the look I love! Here is my mold Once I took it out of mold I poked holes in it while a bit pliable. Then I gave it a dry brush of white paint, black eyes and red in his mouth and dripping out. I added wool hair, green of course, and added wire so I could hang him. He is now hanging in my Art room in front of me inspiring me as I work! Here are my finished pictures. If you have not tried this product it is amazing. The things you can make and do with it will amaze you! It is one of my favorite Craft items.

Sunday, October 14

Skull Embellishment for Tag Mini Album ~ Amazing Mold Putty DT Post

I was trying to find an embellishment for a Halloween mini tag album I was making for a class at my local scrapbook store and was having no luck at all. I could find stickers (ugh, no please) and skulls that were too large to use for an album, and then it struck me . . . I can make my own! With Amazing Mold Putty, you are not limited to what you can find in a store to use in your scrapbooking, you can totally create an embellishment the exact size you need.


For this skull embellishment, I started with a rather large (and bulbous) skull head from my local craft store. As you can see from the picture, it way too large to use as an embellishment on a scrapbook.


So I just made a mold of the face portion - start by mixing your Amazing Mold Putty (equal parts A and B) and kneading it like play-doh until it is a solid medium yellow color.


Apply your putty to the item you want to mold (my skull face) . . .

Allow the putty to set (if this is your first time using Amazing Mold Putty, please refer to their website for detailed instructions) - click here.
Next, You will mix your Casting Resin (use the link above for detailed instructions) - equal parts A and B. As soon as parts A and B are thoroughly mixed you can begin pouring into your mold (I'm still playing with the other project you see so ignore that one -lol). It will turn an opaque milky white when it is completely hardened (unless you are using the clear resin of course).
Once the resin is completely hardened, pop it out of the mold.

Voila! I now have a flat backed embellishment that can go in a tag or any mini album and won't create too much bulk. Don't you love that you can create something so totally different from what you started with using Amazing Mold Putty and Amazing Casting Resin? I know I do.

Add a little paint and who would ever know you created this little gem yourself?


So have some fun and create something new and unusual for your next scrapbook! Make sure to check out the Amazing Mold Putty website to sample (or replenish) these Amazing products. Visit my blog to see some of my other Amazing Mold Putty projects at www.scrappinwendysway.blogpsot.com .

Thanks for stopping in to check out my project.

~ Make Today Count

Wendy


Sunday, September 30

Just Treats! Halloween Candy Box

Okay, I totally had another post all ready for today, but I've decided to keep that one for another day and because today is October 1st, we are going with a spooky Halloween Candy Box that I made today because I just wanted to play with my products and have some fun! 

If you are anything like me you are out with your child or children on Halloween and there is no one at home to give out candy.  This year instead of just leaving the candy in a dish that says "take one," I created this spooky little beauty to hand out the candy for me.

If you want to make this project you will need a skull shaped item to use as your original, a box, a strip of chipboard, a candle, some craft paints, and most importantly, Amazing Mold Putty and Amazing Casting Resin.


I started by choosing one of my husband's beer stein's that is shaped like a pirate skeleton.  I used equal parts of "A" and "B" of the Amazing Mold Putty (link above) and kneaded them together until they were a solid color of medium yellow (no white streaks showing at all).  Because I was covering such a large area, I did use two good sized balls of putty (each one was a little larger than a golf ball).  I probably didn't need quite as much as I used, but I wanted to be sure my surface was covered well.


Once the putty is well mixed I pressed it onto the stein making sure to press our any air bubbles or your mold will have "pit marks" in it.


Once I spread the putty and held the stein up to the light I could see spots where it was too thin for my liking so I just took some of the excess and used it for "patches."

The mold sets up so quickly that I didn't have to wait long - if you are unsure whether or not your mold is "set-up," gently stick your fingernail into it.  If your nail goes in and leaves a visible mark, wait a few more minutes.  If it feels rubbery and your nail doesn't go in . . . it's ready!


The first thing I noticed was that there is a seam from the stein through the middle of my mold.  In an effort to not have to do so much sanding afterwards, I did mix a tiny bit more putty and smoothed it into that line.

Next, I mixed my Amazing Casting Resin (link above).  Since I knew I was going to paint it, I just used the white (plus, it was a spur of the moment project and I wanted it to set quickly).  I poured the resin in and just before it was too thick to move around, I used my stir stick to put it up onto the sides a bit so I didn't have to have a super thick "mask."


While the skeleton was setting, I found a small shoe box and painted it black with craft paints.  I used a strip of chipboard to make a "bridge" to go inside of the shoe box on which the skull and candle would sit.  I painted that as well.  By the time I finished this, the skull was ready to come out of the mold.


This is what he looked like fresh out of the mold.  I plugged in my trusty dremmel and went to work sanding what was left of the seam lines.  Other than that, he was perfect!  I added a few different coats of paint (I can never leave well enough alone - lol) and voila . . .!


Next, I glued the skull to the candle and then glued them both onto the "bridge."  Now my candy box is ready to leave on the door step on Halloween night.


I can't even tell you how quickly this project came together.  With Amazing Crafting Products the process is so fast and simple you really can sit down to "play" and come away with a finished project in as little as a half an hour (okay, with my must add layer upon layer of paint it took me a whole hour).  Click on this link to visit the Amazing Crafting Products website and order your putty and resin and get started on those Halloween projects!

Thanks for looking at my scary candy box.

~ Make Today Count

Wendy
You can check out my blog at www.scrappinwendysway.blogspot.com

Related Posts Plugin for WordPress, Blogger...