Showing posts with label Embedded. Show all posts

Wednesday, February 28

Memorabilia of #Cre8time Family... DIY Keepsake by Tracy Krueger


Hello everyone! It's Tracy here and I wanted to share with you today a project I created that holds some memorabilia pieces. A few months back I purchased some wood pieces at an antique market that used to hold watch parts. I knew I wanted to use these with Amazing Clear Cast Resin at some point... easily transforming one into a keepsake.


I decided to join my parents, my in-laws, my husband and I in a hanging with some pieces that either belonged to them or had some special meaning. I gathered some pins, a jewelry charm, tigers eye, shells and a silver heart. I also made some clay hearts that I painted red and wrote the initials of each of us on them. I played around laying them in different spots until I found the way I wanted them.


I mixed up a small batch of equal parts of Amazing Clear Cast Resin and mixed it with some fine glitter {CLICK HERE to view mixing/preparation}. I filled up the small outside circles and the top one.


After letting cure for at least 24 hours, I mixed up another small batch of Amazing Clear Cast Resin with some gold glass glitter, then filling the bottom half of each of the center sections.


I wanted the resin to be cured, but not fully hardened so that I could lay each piece of memorabilia into the resin and it would "settle" and not move around when I add the final resin layer. I set aside to let resin completely harden.


Then I mixed up my final batch of Amazing Clear Cast Resin and filled each of the center sections to the top... covering the keepsakes in each.


After the resin is fully cured, this is ready to hang! I drill small holes in the top sides and screwed in small screws. I opened my stash of sari ribbon and tied a piece of cream sari ribbon to the top to hang it by.


I hope you enjoyed my little piece of family history.
See you again soon!

What ideas do you have
to preserve family history?

Stay tuned for more... ~ Tracy

You can find more of my work on my Blog: http://tracykrueger-nine.blogspot.com/2017/

• • • • • • • • • • • • • • • • •

Don't forget to subscribe to our blog on the right side bar:
Twitter at AmazingCasting | Facebook at AmazingMoldPutty | YouTube at AmazingMoldPutty

Friday, December 29

Serving up #Cre8time Greetings... by Tracy Krueger


Hello everyone! It's Tracy here and I'm super excited to share with you my first project as an Amazing Casting Products Creative Team member! The project I'm sharing today is something I created to display at a Holiday Market that my employer holds every December. I knew I wanted to incorporate a technique I learned about 3 months ago... Fluid (or Flow) Painting.


I started by staining two wood plates with Minwax Classic Grey wood stain. I left the centers unstained as I will be painting that area with acrylics.


After the stain has dried thoroughly, I picked out the Acrylic paint colors I want to use. I usually always include black and white, then 2-3 other colors (here I've used 4 colors of Artist Loft paints from Michaels). If you've never tried Flow Painting, there are tons of videos and techniques on YouTube.


I taped the edges of the plate so I didn't accidentally get paint outside the middle of the plate. Then I took the plate and placed it on top of the cup containing all the colors combined, and flipped over – holding the two tightly together. 

You want to wait a minute to let all of the paint settle, then lift the cup off of the plate and begin to gently tilt the plate so that the paint covers your surface. After surface is covered, I use a kitchen torch to make more of the "cells" appear (with flame couple of inches above the paint). Gently remove tape and place on a very flat/level surface. It's a good idea to covered them while drying – creating a "hood" so dust does not settle onto the paint. You will need about 24 - 48 hours for the paint to FULLY dry {depending on your climate/conditions drying time may vary}.


Now you are ready for your first coat of Amazing Clear Cast Resin. I mixed equal amounts of Parts "A" and "B" (I used two Tbsp. of each) according to the package directions, and poured onto the dry paint, using the stir stick to spread it around. Depending on the size of your substrate, you may need to vary amount of resin needed. I always let the resin cure 24 hours (sometimes even more) to make sure it is fully ready.


I pulled out some of my rub-ons and applied "Live, Laugh, Love" in white and "Family" in black on the two different plates. By placing on top of the cured layer of resin, you will see that the letters sort of "pop off" the plate. I love the dimension that it gives! 

Now you are ready for a second coat of Amazing Clear Cast Resin to seal the letters in place. Spread resin around with your stir stick so it reaches all of the edges. Again, let this cure at least 24 hours (until it isn't sticky).


These plates will make fantastic Holiday serving plates {Amazing Clear Cast Resin is food safe} or even lovely decorations for your wall.


Thank you for taking time to read my first post. 
 I look forward to sharing more in the future!

Do you have any Holiday party ideas?

Stay tuned for more... Tracy

You can find more of my work on my Blog: http://tracykrueger-nine.blogspot.com/2017/

• • • • • • • • • • • • • • • • •


You can see Tracy's work along with other AMAZING Creations from our Creative Team at Creativation – Drop by the Alumilite/Amazing Casting Products Booth #2214.

• • • • • • • • • • • • • • • • •

Don't forget to subscribe to our blog on the right side bar:
Twitter at AmazingCasting | Facebook at AmazingMoldPutty | YouTube at AmazingMoldPutty

Tuesday, October 17

Casting a #Cre8time Spell... DIY Halloween Jewels by Tracy Alden


Hello! Tracy here with another Amazing Casting Products tutorial! My favorite month and time of year is here! October is going by so quickly and it is already getting close to Halloween! 

I need to make a selection of necklaces to give as gifts... and I am running out of time. I decide to revisit an earring project using Nail Art Stickers. I knew with the right mix of Amazing Casting Products and jewelry supplies I could make easy and stylish Halloween accessories!

Supplies: 
  • Amazing Clear Cast Resin
  • Alumidust in Deep Red, Deep Purple and Black 
  • Amazing Remelt (*Optional) 
  • Nail Art Stickers (found anywhere that sells nail polish) 
  • Toothpicks 
  • Stir Sticks 
  • Resin Measuring Cups 
  • Small metal frames (easily found at your local craft store in the jewelry or scrapbooking isle) 
  • Jewelry Bails, jump-rings 
  • Gold and Silver tone chain 
  • Glitter, Acrylic Paint, and Paint Brush (*Optional) 


I found a nice set of Halloween nail art stickers at my local pharmacy. All the stickers are the perfect size to fit in a selection of frames that have shallow basins. I sorted through the frames, picking the ones that went well with the stickers.


I am not sure what color the base layer of resin to be placed in the frames needs to be. Since the stickers are on a clear backing it is easy to lay the entire sheets of stickers over craft paper to get an idea what colors would help visually pop or complement the stickers. The majority looked the best on red, purple and black backgrounds.


I mix up a small portion of Amazing Clear Cast Resin, making sure to slowly stir to reduce air bubbles and let it sit for 5 minutes. CLICK HERE to view mixing and preparation. I add small pinches of Alumidust powder to three separate cups, then slowly add the pre-mixed liquid resin to each cup and stir until the powder is combined.


With these pieces being small and delicate, I like to place them on a small platform to keep them in place and level for resin application. I pulled two blocks of Amazing Remelt from their containers and place all of the frames on top of the Remelt block. You do not have to use Amazing Remelt – though Remelt is naturally a bit sticky and it holds the pieces perfectly in place. Once I am done with my project I can reuse the Remelt for any future non-food related molding projects. 

Using toothpicks, I put tiny drops of Alumidust saturated resin in to the bottom of each frame. The tinted resin acts as a canvas for the nail art stickers, helping them become more visible. The Alumidust makes the resin have a lovely metallic shimmer that shifts in the light. I let this layer cure about 5 hours. 


I carefully peel off the nail art stickers from their plastic backing and place them into the thin resin coated frames with a toothpick. I burnish the stickers a little with a toothpick or a stir stick to make sure the stickers are firmly in place so there will be no trapped air bubbles. Nail art stickers are originally intended for use in nail polish, so they do not need to be sealed before moving onto the next step.


I add glitter to a few of the frames for a extra bit of sparkle while the resin not quite cured – the glitter sticks to the resin when a tiny bit of pressure is applied. I use acrylic paint to highlight any of the stickers that are a bit too transparent, and let the paint dry fully before moving on to the next step.


I mix up another small portion of Amazing Clear Cast Resin, this time leaving it clear, then applied it to the frames with a toothpick. By using a toothpick I am able to control the amount of resin flowing into the frames, and to make sure I add just enough resin to create a dome which naturally magnifies the nail art stickers. I let this resin layer cure completely. 


With the addition of some jewelry bails, jump rings and chain I quickly made a Halloween jewelry assortment that any ghoul would be happy to have! With other frames and stickers imagine the variety of fashion styles that can be created! 

What AMAZING Halloween
jewels will you create?

Visit my blog Art Resurrected for more craft tutorials!

Until next time, safe travels! ~ Tracy

• • • • • • • • • • • • • • • • •


• • • • • • • • • • • • • • • • •

Don't forget to subscribe to our blog on the right side bar:
Twitter at AmazingCasting | Facebook at AmazingMoldPutty | YouTube at AmazingMoldPutty

Monday, October 9

Resin Painting with Dried Orchids... #Cre8time Explorations by Tracy Alden


Hello! Tracy here with another Amazing Casting Products inspiration post! I will let you in on a secret: sometimes I have no clue what direction some of my art projects will end up going. I can collect supplies, start working on something, maybe even get a basic idea of what I would like to do... then end up making something completely different – this project was one of those. 

I have a small collection of orchid blooms that I had dried and wanted to try to preserve in Amazing Clear Cast Resin. I had never worked with dried orchid blooms as they are very delicate, and can easily crumble if mishandled. I decided a frame was the best choice to display the dried orchids and also be able to hold the resin in place... so I got to work.


I found that with the first layer of Amazing Clear Cast Resin the orchid blooms had a tendency to shift in the resin. So the first layer of resin had to be a thin pour and I let that cure to a tacky set. I added a second clear layer of resin to cover and protect the orchids. After this cured, I followed with two more layers of resin mixed with Alumidust or Alumilite Dye in different spots, using a toothpick to drag the colors through each other. This created a lovely ebb and flow of color to the resin.

I honestly lost track of time doing this and found it rather relaxing and meditative in nature. I let this layer of resin cure. The frame looks complicated but it is just four layers of resin poured. No waste of resin – just a few stir sticks, toothpicks and clean up with babywipes.


Please CLICK HERE to see the full tutorial on how I created this mixed media resin frame on my blog Art Resurrected.

What AMAZING arts and crafts can you create?

Visit my blog Art Resurrected for more craft tutorials!

Until next time, safe travels! ~ Tracy

• • • • • • • • • • • • • • • • •

Don't forget to subscribe to our blog on the right side bar:
Twitter at AmazingCasting | Facebook at AmazingMoldPutty | YouTube at AmazingMoldPutty

Tuesday, December 27

Spellbinding #Cre8time Jewels... by Kristie Taylor


Hi resin lovers! Kristie Taylor here with a bohemian inspired necklace using Amazing Casting Products. I have in my stash, some oldies but goodies from Spellbinders Paper Arts. These awesome metal bezels are solid and beautiful and have lots of room for inclusions.


I bought some bohemian beads from a local craft store... added some chunky glitter and put this all together – the pendant topped off with Amazing Clear Cast Resin


I've ended up with this gorgeous necklace... 


What would you embed in resin
for your statement jewelry?

Thanks so much for dropping by! ~ Kristie

To see more of my work, please visit my blog, "The Scrapinater", 
over on my YouTube Channel or on Instagram.

• • • • • • • • • • • • • • • • •

Don't forget to subscribe to our blog on the right side bar:
Twitter at AmazingCasting | Facebook at AmazingMoldPutty | YouTube at AmazingMoldPutty

Friday, August 19

From Stickers to #Cre8time Stylish...
by Tracy Alden


Hello! Tracy here with another Amazing Casting Products tutorial! Sometimes inspiration finds me at the strangest times, in this case I was standing in a pharmacy looking at nail art stickers. With such a wide ranges of subjects and themes, nail art stickers are tiny works of art that I felt could be made into stylish elements that don't need to be on nails only!

Supplies: 
  • Amazing Clear Cast Resin
  • Black Alumilite Dye
  • Amazing Remelt
  • Nail Art Stickers (found anywhere that sells nail polish) 
  • Toothpicks 
  • Stir Sticks 
  • Tweezers 
  • Small metal frames (easily found at your local craft store in the jewelry or scrapbooking isle) 
  • Needle nose pliers, Wire-cutters 
  • Beads 
  • Earring wires, jump-rings and chain 

I bought several sets of nail art stickers, picking flower, butterfly, swirl and sparkle patterns. I wanted to have ones that had a lot of detail and good colors, that once coated in resin would look the best.


In my dragon hoard of jewelry supplies, I have a lot of odd shaped frames that are often very small and/or have shallow basins, often just not right for most jewelry projects. However many of these little pieces were the perfect size to frame nail art stickers!


With these pieces being so small and delicate I needed to place them on a small platform to keep them in place and level for resin application. This is where Amazing Remelt came to the rescue! I pulled a block of Amazing Remelt out of its container and placed all of the frames on top of the Remelt. With Remelt being naturally a bit sticky the pieces were held perfectly in place. The earring wires were easy to push into the Remelt and any resin drips could easily pealed off once cured. Once I was done with my project I could reuse the Remelt for any future non-food related projects.


I mixed up a small portion of Amazing Clear Cast Resin, making sure to slowly stir to reduce air bubbles and let it sit for 5 minutes. Using toothpicks, I put a tiny drop of Black Alumilite Dye into a small mixing cup. I applied a very thin coat of the tinted resin to the bottom of each frame. The addition of black tinted resin acts as a canvas for the nail art stickers, helping them become more visible. I let this layer cure about 5 hours.


I carefully peeled off the nail art stickers from their plastic backing and placed them into the thin black resin coatings with tweezers. I found burnishing the stickers a little with tweezers or a small stylus made sure the stickers were firmly in place with no trapped air bubbles. With nail art stickers originally intended for use in nail polish they do not need to be sealed before moving onto the next step.


I mixed up another small portion of Amazing Clear Cast Resin, this time leaving it clear and applied it to the frames with a toothpick. By using a toothpick I was able to control the amount of resin flowing into the frames and to make sure I added just enough resin to create a dome, which naturally magnifies the nail art stickers. I let this resin layer cure completely. 


With the addition of some jewelry wire, beads and findings I made a complete collection of lovely little detailed jewelry. With other frames and stickers any number of fashion styles can be created! 

What AMAZING arts and crafts can you create?

Please share them on the user GALLERY on the Amazing Crafting Products Website!

Visit my blog Art Resurrected for more craft tutorials!

Until next time, safe travels! ~ Tracy

• • • • • • • • • • • • • • • • •

Don't forget to subscribe to our blog on the right side bar:
Twitter at AmazingCasting | Facebook at AmazingMoldPutty | YouTube at AmazingMoldPutty

Monday, June 27

#Cre8time Beachcombing... Preserve Seaside Keepsakes in Miniature Tide Pools by Lara Hjorthoy

Hi Artists! Today's "how-to" is inspired by an artist I ran into recently. He creates these stunning glass and concrete sculptures, where the glass looks like water... just gorgeous! I wanted to try my hand at what resin could do!

So for today, I'm making Personal Tidal Pools!


As a Girl from Vancouver, BC, the West Coast of Canada sports some seriously beautiful beaches, and my goal for these little pools was to capture some of that!

So to start off with I found myself a fairly generic silicone muffin "tin". I got one from a local cooking shop as the ones I found in the thrift store looked a little worse for wear, and I really wanted a smooth cast!

Next, Hubbs and I went to the beach!!! I collected handfuls of dry sand, handfuls of cool rocks, used shells and bits of interesting wood! 


When I got home, and before I went too far, I decided to sculpt some mini starfish and barnacles out of Sculpey, and then mold those with Amazing Mold Putty! Since they were so tiny, I just pressed the putty out wide and flat and in no time I had a great mold! Later I cast all these guys using Amazing Casting Resin and some glow in the dark powder!

I think it's important to explain the mistakes that happened – I would hate for anyone to think I hit pay dirt right off the bat!

So what I did, was mix up some of the sand I collected with acrylic polymer medium, and THAT I wouldn't do again. Main reason? I don't think the medium was a strong enough bond with the sand and eventually the resin, so it got flaky and fell apart in the end. ALSO, I didn't leave this step long enough -or- it might have been that my rocks were not completely dried out inside which may have introduced moisture back into the sand. Next time, if I go the sand route again, I will try something different. So even though my resin eventually set super fast, the sand didn't, which was the contributing factor to the whole, falling apart thing.

Anywho... I WAS successful eventually, so bare with me!


***here is a pic of the rocks, laid into the sand in the mold.***


I did let this stage set for 24 hours and when I touched the top it appeared hard and set, so I went ahead a mixed up the Amazing Clear Cast Resin. I wanted a slight tint to the resin, as I thought it might be a cooler look then simply just clear, and here is my second mistake! Using a drop of blue and two drops of fluorescent green into my resin part "A", the dye was SOOOO DARK!!!


Alumilite dyes are so powerful and such a very very little is actually needed! Lesson learned, so the top three in photo are the super dark dye, they didn't work – unless I was going for a tide pool at night. The two up front used the last of the dye in the container and I didn't add any more to it. It was a lovely light blue. Those were mostly successful!

After letting them set for another 24 hours, I finally removed them from the mold. The resin popped out beautifully. However the sand didn't set properly in these and kind of fell apart a bit. Bit of a bummer but left me thinking....

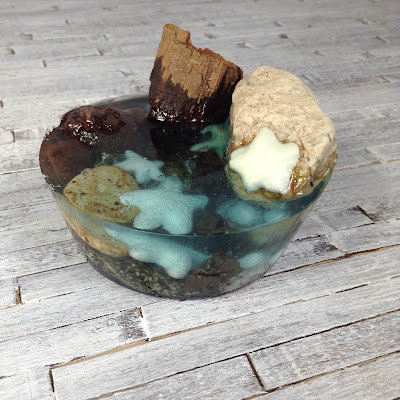
So my last try, I skipped the sand, used some flatter rocks to create a "bed" in the bottom of one mold, added some nice shaped and interesting colored rocks, some bits of wood, my glow in the dark casts of starfish and barnacles. Made sure when I poured the resin this time, I used a teeeeeeensy tiny amount of dye and poured.


After a day, here is the final result! A successful Personal Tide Pool – and it glows in the dark... so cool!!! The back two pictured are the not super successful ones from my first try. But they weren't terrible either, so they deserved a look!


Here is my final Tidal Pool – 
the one I would like to keep on making! 


How do you create a water effect?

I hope you enjoyed this How-To! Have a great week Friends.
Stay Inspired ~ Lara

Check out my website at www.larahjorthoy.com and YourToyCreation.etsy.com. You can follow my day to day creations at Facebook and Instagram, look for YourToy Creations!

• • • • • • • • • • • • • •

Don't forget to subscribe to our blog on the right side bar:
Twitter at AmazingCasting | Facebook at AmazingMoldPutty | YouTube at AmazingMoldPutty
Related Posts Plugin for WordPress, Blogger...