Showing posts with label Rub 'n Buff®. Show all posts

Friday, September 18

A #Cre8time Monster Mash... Haunted House Decor by Tanya Ruffin


Using a Halloween box, figurines from the Dollar Tree, Amazing Casting Products and some scrapbook paper I had on hand, I was able to create this awesome Haunted House box!


Dollar Tree Halloween Box and Halloween figurines.


Mold the figures with Amazing Mold PuttyAfter the mold has set, remove the originals. Mix some Alumilite Casting Resin, add Alumilite Black Dye and pour your molds.

In the meantime while they cure...


Glue scrapbook paper on the box. Make windows and shutters. I even made a chimney out of scrapbook paper. Since my figurines are so small, I made the house two stories. The best thing to do is place the box on the scrapbook paper and trace along the outside. I left a little extra space on each side to overlap the paper. I used contrasting papers for the windows and shutters. To make the singles, I cut 3 rows of shingles and haphazardly cut "V"s out for the shingles. I then alternated colors for the rows. The top piece was one sheet folded over the top to at the point.


These are the figurines with silver Rub n' Buff® added.
They are totally transformed – I love them!


Glue figurines to the house. They are flat-backed and the resin is lightweight.


I have the Bride of Frankenstein at the front door to greet guests!


The Grim Reaper is in the attic window!


This was a fun project. If you like this idea you could make the house into something for almost any season. I was thinking it could also be a Santa's workshop for Christmas, the Easter Bunny's house or a church for Easter... just buy the houses at Halloween because they aren't always available!

How do you create with Amazing Casting Products?

Craft Your Own Way! ~ Tanya


Please visit my site to see more of my inspiring creations at www.tanyaRuffin.com

• • • • • • • • • • • • • • • • •

Don't forget to subscribe to our blog on the right side bar:
Twitter at AmazingCasting | Facebook at AmazingMoldPutty | YouTube at AmazingMoldPutty

Tuesday, July 28

Macho yet #Cre8time Cool! #Steampunk Frame REDUX by Tanya Ruffin


This was made using a few items from my favorite place... the Dollar Tree!


Start with a frame and a submarine toy. I loved the look of these subs! It looked like something from 10,000 Leagues Under the Sea.  Ok, now I am thinking a Beatlesque item with a YELLOW SUBMARINE!! Now, where do I find some blue meanies??


Using Amazing Mold Putty, I made a mold of the subs. 


Once the molds are cured you can dust the inside with Copper Alumidust or use copper Rub 'n Buff® after resin cures (that is how I made this one). I also mixed in some black Alumilite Dye with the Amazing Casting Resin.


Using some left over scrapbook paper and a Sizzix Eileen Hull 3D wrapped Flower die, I made some roses. You can make some similar by using the template included on Victorian Resin roses post or just use some silk roses.

Once cured, I glued the subs and the roses to the frame and inserted a Steampunk'd portrait (shhhh... don't tell my hubby he is in this post).


Yea, I stole a cigar from my hubby's stash for this photo! 

And there you go, a macho yet cool picture frame!


Kind of Wild, Wild West-ish with this filter!

What fun ways do you embellish
with Amazing Casting Products?

Go Craft Your Own Way! ~ Tanya


Tanya Ruffin.com


Create Studios Baton Rouge

Tanya Ruffin

Please visit my site to see more of my inspiring creations at www.tanyaRuffin.com

• • • • • • • • • • • • • •

Don't forget to subscribe to our blog on the right side bar:
Twitter at AmazingCrafting | Facebook at AmazingMoldPutty | YouTube at AmazingMoldPutty

Wednesday, June 10

Ignite your #Cre8time Gifts for Father's Day... Dollar Store Frame REDUX by Tanya Ruffin


Resin~ate the Love by making this adorable "Dads and Boys, Have the Same Toys" Father's Day Picture frame.


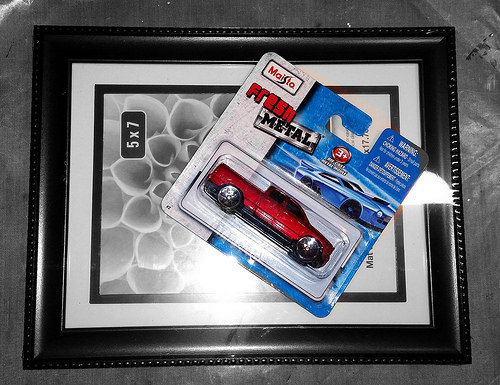
Start with a Dollar Store frame and toy truck.


Because I am such a lazy crafter, I decided to try to mold both sides of the truck at once with some Amazing Mold Putty. CLICK HERE to view mixing/preparation.


Came out pretty good, if I do say so myself!


I brushed the inside of the mold with Deep Red Alumidust.


Just about everything I cast I start by mixing in some black Alumilite Dye into the Amazing Casting Resin. CLICK HERE to view mixing/preparation.


I love how they turned out! I added some silver Rub 'n Buff® for extra roughness!


I used an Etsy purchased compass mold to cast another embellishment.


I need something else that kind of represented the truck. My first attempt was to make tread marks but the wheels on this truck were smooth, so that was a bust. My next idea was to use my hubby's truck key, but that had a giant fob on it that looked rather blah... so I settled on just an ol' generic key.


Not bad! The resin key looks almost as good as the real one! I actually walked out of my craft room and asked hubby if this could turn a lock. He doubted it, but I am not so sure!


Detail of the truck on the frame.


Pieces being glued in place. I couldn't help to add my bestie's beautiful baby to the frame. And since we are in Louisiana, the ever present Fleur de Lis was added too.

What fun things will you create for Dad

Now, go Craft Your Own Way... 

( i'm always thinking... you can go your own way... go your own way..... you can call it another lonely day....)


with 


Please visit my site to see more of my inspiring creations at www.tanyaRuffin.com

• • • • • • • • • • • • • •

Don't forget to subscribe to our blog on the right side bar:
Twitter at AmazingCrafting | Facebook at AmazingMoldPutty | YouTube at AmazingMoldPutty

Thursday, December 11

From TCHOTCHKE to Functional - Holiday Edition... by Tanya Ruffin


I frequent the local dollar store and on a recent visit I saw badly painted excuse for a nativity. Which inspired today's edition of "From Tchotchke to Functional" using Amazing Casting Products!


So of course I had to grab it up to see what I could make of it.


Using Amazing Mold Putty I made a mold. The original was more cone shaped and I knew the mold would give me a flat back. This was perfect because my plan was to glue two castings back to back!


After casting 2 pieces with Amazing Casting Resin, I painted both with black acrylic paint and then went over them with silver Rub 'n Buff®.


I then glued the lower half of the two pieces back to back with E6000® adhesive and placed a rubber band around the bottom to secure overnight.


Once it was dry you can slide a photo or, in this case, a card into the slot.

Now it looks nothing like the original piece!


What do you see when you
look at tchotchkes?

Good Luck and Craft Your Own Way! ~ Tanya


Tanya Ruffin with Create Studios

Please visit my site to see more of my inspiring creations at www.tanyaRuffin.com


Tanya Ruffin for tanyaruffin,com

Create Studios Baton Rouge

• • • • • • • • • • • • • •

Don't forget to subscribe to our blog on the right side bar:
Twitter at AmazingCrafting | Facebook at AmazingMoldPutty | YouTube at AmazingMoldPutty

Tuesday, November 25

It's #Cre8time... TAG - You're It! AMAZING Resin Present Tags with Tanya Ruffin

Christmas is a busy time, lots of presents under the tree, people tearing through packages to get to the goodies... that Christmas morning call, "hey, did you get my present?"

Wouldn't it be nice if they remembered your presents just by the wrapping, ribbon or the TAG?!


Well I have your solution!

My hubby and I have four cairn terriers. Yes, you read that right, FOUR! A few years ago I can across some cute cairn terrier pins. I bought two knowing one day I would do something with them. At the time I thought I would give one to my mom and one for myself. The other day I came across them and thought about using them to craft a tag. When I bought the pins I only had one terrier... 


So I found the best arrangement of the pins so all four dogs could be seen.


Then I taped a craft stick through the back so they
wouldn't move while I was making the mold.


I then slid the craft stick out after I placed the grouping into
the Amazing Mold Putty {CLICK HERE to view mixing/preparation}.


I then used the Alumilite Pick Set to press the pins farther down into the Amazing Mold Putty


You really need to press it down so the Amazing Mold Putty raises up between the dogs.


Fill your mold with Amazing Casting Resin {CLICK HERE to view mixing/preparation}. I even mixed some Alumilite Black Dye for resin in this mix.


My first cast I attempted to make it the same color as my dogs. I also used some copper Rub 'n Buff®, but it didn't have enough contrast. I ended up painting the whole thing with black acrylic paint. 

Craft fail!


I used a Marvy tag paper punch for my package tag.


I used gold Rub 'n Buff® on the black resin dogs and glued them to the tag.


Some of my resin dog sets came out a darker black than others, but that is ok.

Now I just need to make about 30 more tags for Christmas presents so everyone will know which packages came from me!


"Don't you forget about me..."
(Sorry, I had an 80's moment)! 


The real deal!


Left to right: Lily, Sassy, Sweet Pea, and Duncan.

Instead of just making resin pendants
and charms - turn them into a tag! 

You Can Craft Your Own Way! ~ Tanya

Tanya Ruffin with Create Studios

Please visit my site to see more of my inspiring creations at www.tanyaRuffin.com


Tanya Ruffin for tanyaruffin,com

Create Studios Baton Rouge

• • • • • • • • • • • • • •

Don't forget to subscribe to our blog on the right side bar:
Twitter at AmazingCrafting | Facebook at AmazingMoldPutty | YouTube at AmazingMoldPutty

• • • • • • • • • • • • • •

Does the idea of playing with AMAZING Crafting Products
get you in the mood to try some new things!? 

Amazing Crafting Products and the Alumilite company are looking for Creative Team Members!!

Related Posts Plugin for WordPress, Blogger...