Tuesday, June 30

Dream Big Dreams... AMAZING Inspiration by Melissa Johnson #MakeThings


Good afternoon everyone! I am winding down this month with a little dose of inspiration for you, a mixed media painting that I created using collage, and some of my favorite Amazing Casting Products

I love doing these types of mixed media paintings. They are simple, fun, and look great when finished off with a nice thick layer of Amazing Clear Cast Resin. I like to start with some collage on a gesso board. For this project I used napkins, a few Gelli® print pieces, and some wrapping paper.


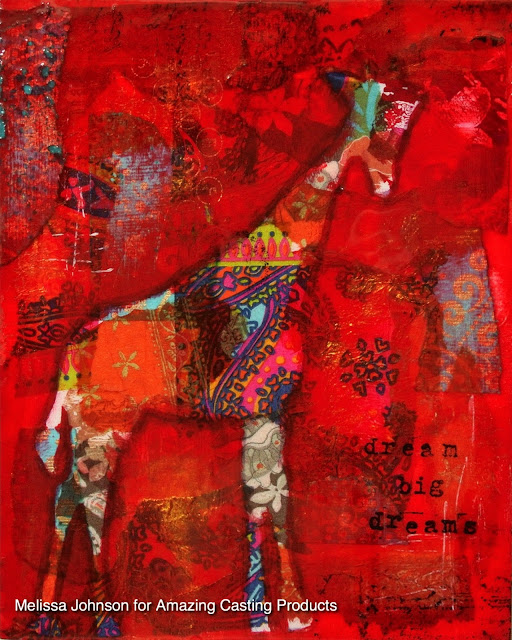
Then I chose a giraffe silhouette to mask over the collage.


I painted around the mask, then added some gold Alumidust and red Alumilite dye. I also added some stamping and scribbles in the background. 

And here is the finished product, with a coat of Amazing Clear Cast on top!


Make something that makes you happy :) ~ Melissa Johnson
Please visit my BLOG, to see more of my mixed media creations.

 • • • • • • • • • • • • • •

It's a brand new week and there's a new Make Things! Craft Challenge. Our AMAZING creative friend Katie Smith of Punk Projects is hosting a fun craft challenge for the summer and Amazing Casting Products is proud to be one of the sponsors. Play along for your chance to win weekly prizes and a grand prize at the end!


This week's "Make Things!" theme is... ANIMALS! So we hope you are inspired to go make someTHING and link-up :)

Friday, June 26

Your #Cre8time is PATRIOTIC! #ACPThrowback #MakeThings

Hello Amazing Crafters! As you are well aware you can create anything you can imagine with Amazing Casting Products... and also customize them in any color you desire. Today we are sharing some #ACPthrowback creations to inspire you for the official start of summer – the 4th of July!

Celebrating our Red, White and Blue...


CLICK HERE to view more
details on Tanya's scarf-lace.

Want to see more of what Tanya is up to?
Follow her on her website HERE!


• • • • • • • • • • • • • •


CLICK HERE to view more details
on Rachel's 4th of July BBQ invitations.

Want to see more of what Aimée is up to?
Follow her on her website HERE!

• • • • • • • • • • • • • •


CLICK HERE to view more
details on Michelle's handcast bowl.

Want to see more of what Aimée is up to?
Follow her on her website HERE!

• • • • • • • • • • • • • •

Share Your Creations with us
on Social Media to be Featured here
on #ACPthrowback Third Thursday

July 16 is our next THIRD THURSDAY... this is your chance to be featured. Post your creations to our Facebook pagePinterest, and on Twitter! We'll be on the hunt for your projects with the hashtag #ACPThrowBack, (you can even go back into your past pins and add this pin to help us find you!) and share ALL your projects using the hashtag #AmazingCastingProducts!!

• • • • • • • • • • • • • •


Our AMAZING creative friend Katie Smith, of Punk Projects is hosting a fun craft challenge for the summer and ACP is proud to be one of the sponsors. Play along for your chance to win weekly prizes and a grand prize at the end! Today is the last day of this fourth challenge - did you MAKE someTHING??!


Tomorrow begins a brand new "Make Things!"challenge... 
so please drop by and check it out!

Thursday, June 25

GREEN with #Cre8time Envy... AMAZING #Polymer Jewels by Tracy Alden


Hello! Tracy here with another Amazing Casting Products project! Following in the footsteps of my last Polymer Clay and Resin project, I wanted to try more ways of doing resin coats on clay to highlight detail and to give a more finished look. This time I thought about creating the look of glazed porcelain, perfect for a series of Garden themed jewelry. 

Supplies:


I started with conditioned polymer clay, tinted a pale green. I stacked two pieces of conditioned clay to create the base for the pieces and used an acrylic roller to blend the layers.


Using small clay cutters, I cut oval and circle
shapes to create the jewelry pieces.


Using Alumilite's 4 Piece Carver Set, I created thin lines that looked like reeds, being careful to press into the clay deep enough to act as a mini reservoir for a resin pour later on.


After creating reeds and small lines to look like branches, I used the Alumilite's 4 Piece Carver Set to press in little indentations to look like stylized leaves and blooms. I then baked the clay as per the manufacturers instructions. *If you use air dry clay make sure to let them dry overnight.* 


Once the pieces are fully cured, I lightly sanded the edges
and made sure any loose bits of clay or dust was removed.


I mixed a small amount of green Alumilite Dye with Amazing Clear Cast Resin, making sure to fully stir the dye into the resin and let it sit for 10 minutes. By letting the resin sit for 10 minutes, the resin will be thicker and stick more to the polymer clay pieces. I carefully applied the resin to the front of the pieces with a toothpick, making sure to get in all the carved elements and popping any air bubbles that formed.


I carefully removed any drips and excess resin with a cosmetic sponge, careful to blot the excess lightly as to not soak up the resin filling in the carved details. I let them cure completely, as per manufacturers instructions.


Once all of the pieces were fully cured, I carefully drilled holes with a hand drill to be able to thread cord or wire through each piece.


With the addition of chain and glass beads
from Fiona Accessories the pieces are ready to wear!

What AMAZING arts and crafts can you create?


Visit my blog Art Resurrected for more craft tutorials!

Until next time, safe travels! ~ Tracy

• • • • • • • • • • • • • • • • •

Don't forget to subscribe to our blog on the right side bar:
Twitter at AmazingCrafting | Facebook at AmazingMoldPutty | YouTube at AmazingMoldPutty

Wednesday, June 24

In #Cre8time One + One Makes Three... Amazing #MixedMedia Fusion by Aimée Wheaton


I'm not quite sure what to call this piece but it's a smorgasbord of items for sure!! I purchased the center gold piece last year at an antique shop for $5, I thought it was gorgeous, it's like carved wood and the top is painted gold. Someone told me it came from some Asian furniture or something like that. Well I decided to mold it and see how it would turn out and that's what started this little project.


I thought this was super pretty when I first saw it,
and perfect to mold using Amazing Mold Putty.


Oops... forgot to take the price tag off!


Side by side! I ended up mixing some resin to get rid of the flaked off paint that was left in the mold before I made the pieces for my art. It got most of them out. I used Amazing Casting Resin for this piece because of how fast it dries. 


As always I'm winging my art until my muse comes back, so I had no clue what was going to turn out. I looked around my studio and found this leftover painted board from an art class I took. It was perfect for a base. It's an 8" x 10" canvas board.


After more scrounging I found a 5" x 7" canvas board and some painted paper towels leftover, I save everything!!! I glued down the paper towel using Mod Podge® onto the canvas board. I'm creating levels and layers.


Here it is all glued, then I coated it with more Mod Podge®.


Checking out placement on top of the 5" x 7" board – look how pretty the resin is!!


Texture and depth – glue the pieces down when the Mod Podge® is dry.


Glue down on top of the big board and then trace
around it with charcoal pencil to frame it.


I then used some Mod Podge® on top of the resin
and sprinkled some glitter on top.


All together!! Different but still pretty. I hope you enjoyed this simple project!

To see how all of our AMAZING products can enhance your art,
please check out these AMAZING products!

Let's see what you can create

Feel free to stop by my FB page to see the latest with me. 
To see more of my work please visit my blog "Creative Flutters"
and also at the Aimée Wheaton Art and Design website.

Till next time! Xoxo Aimée

 • • • • • • • • • • • • • •

Don't forget to subscribe to our blog on the right side bar:
Twitter at AmazingCrafting | Facebook at AmazingMoldPutty | YouTube at AmazingMoldPutty

Tuesday, June 23

#Cre8time Sailing Away... #Custom Zipper Pull Tutorial by Brenda Burfeind


Brenda here from Creativity is a State of Mind. I love making jewelry and have a few friends that know they can come to me for special projects. Today's tutorial was a commissioned piece by a very close friend of mine. She wanted a ship's steering wheel for remembrance of her dad who passed away from colon cancer.

The steering wheel then needed to be blue to represent the ribbon color. Her dad was in the Navy and she wanted a zipper pull for her leather jacket so that her dad looks over her when she's on her bike. How sweet is that? My mind started racing of course. I found this gold ship's wheel jewelry at a party store in town and picked it up thinking I could make something with that.


The problem was she wanted it to be blue and painting it could have been an option, but I decided to make a mold of it and then I can prepare it with any color I want.


Here is my mold while it's curing. Mixing up the Amazing Mold Putty takes no time at all and it will set up within 5 - 10 minutes depending on the temperature in your craft area {CLICK HERE to view mixing/preparation}.


I then mixed up some Amazing Casting Resin with the Alumilite Dye in Blue. Set up usually takes about 5 minutes, but I've found curing time takes a bit longer when you add the dye to the Amazing Casting Resin {also shallow items take a bit longer to cure}. This took about 10 minutes to set up.


I recently purchased some bottle cap stickers that I used to create some jewelry and found one of a ship. The sticker was the exact size of the ship's wheel and I knew this would make a wonderful addition. I took out my Amazing Clear Cast Resin, mixed that up and domed my piece using my homemade doming board {HERE is the link to that tutorial}. The clear resin does take about 4 - 24 hours to set up, depending on the thickness, etc. This piece took about 6 hours because of the heat that day. Just to be completely safe I let it set up over night.


What an awesome transformation!


I added a jump ring and a zipper pull finding. I love how you can take something and recreate it into something personal!

What would you change up?

I hope you've enjoyed my tutorial today and thank you very much for stopping over. Until next time, Brenda sailing away...

Visit my blog, Creativity is a State of Mind to see some more of my creations.

• • • • • • • • • • • • • •

Don't forget to subscribe to our blog on the right side bar:
Twitter at AmazingCrafting | Facebook at AmazingMoldPutty | YouTube at AmazingMoldPutty

Thursday, June 18

#ACPthrowback Third Throwback Thursday... June Edition

Hey gang!! Rachel Whetzel here, and it's time for #AmazingCastingProduct's Third Throwback Thursday!! Every third Thursday of the month, I share links and projects that YOU share on line! There is no need for these projects to be NEW, because this is all about the throwback, so share some throwbacks from YOUR studios and workspaces! We want to see that you create. I hope you'll take the time to visit the links we've shared here, and enjoy all the awesome projects out there!


Revisit our posts from THIS MONTH, in 2012
See them all by clicking HERE.

INSTAGRAM
• • • • • • • • • • •

Have any Throwback Thursday
projects you can share?

Post them to our Facebook page, Pinterest, and on Twitter! We'll be on the hunt for your projects with the hashtag #ACPThrowBack, (you can even go back into your past pins and add this pin to help us find you!) and share ALL your projects using the hashtag #AmazingCastingProducts!!

• • • • • • • • • • •
Don't forget to subscribe to our blog on the right side bar:
Twitter at AmazingCrafting | Facebook at AmazingMoldPutty | YouTube at AmazingMoldPutty
Related Posts Plugin for WordPress, Blogger...