Friday, November 30

My Little Cowboy

Our road trip this summer took us to South Dakota where we visited Deadwood. That was July and I am still finishing up our journal/scrapbook of that trip. This is one of the pages I wanted to make some charms to go on the page but the only ones I had were silver, plus, with all the cowboy pictures I have of my son, I knew I would use these again and again in different ways. Soooooo . . . I made my own using Amazing Mold Putty and Amazing Casting Resin and added some Alumilite Dye and Alumilite Metallic Powder to complete the look.

These were the original metal charms:

Next I mixed my Amazing Mold Putty mixing a 1:1 ratio of "A" and "B" (click on the link at the end of this post to go to their website for a tutorial).

Then I made a mold of my charms and brushed the inside with metallic powder (link above). As I said in my last post, this stuff goes a long way - you really don't have to use much at all to cover the entire surface of what you are molding.


After trying the dyes on my last project and liking the way it looked, I mixed a couple of drops (and I mean just drops) of the African American dye and then added a little of the metallic powder to side "A" before mixing the resin on a second set and this is what it looked like in the mold:


This is what each set looked like fresh out of the mold with nothing added on the surface. As you can see, if you didn't want to play with them you could absolutely leave them as-is and have a great look. Or you could take it a step further like I did and paint, daub, brush and rub to get them the way I wanted. That's what I did with the top set. The bottom set I left alone except to rub just a bit of the metallic powder on the raised areas to highlight it just a bit.

After playing with these products, I have found that I love the dyes and powders almost as well as the putty and the resin (not quite because I love, love, love the putty and resin).

One tip I have for making charms or anything with a bail on it, is to pull it out of the mold before it is rock hard and use a paper piercing tool to open the bail and then put a toothpick or skewer in the hole to hold it open while it dries. If you try to re-open the hold once the piece hardens, you will break it. Doing this before it hardens and having it ready to go can save the major meltdown that might happen if you break it later (this would be me waiting until the last minute to make a gift and then the piece breaks when I don't have time to start over - lol). Below is an example:


Here is one last look at my finished project:


Thanks for joining me - Make sure to leave a comment and let me know what you think! Also, don't forget to check out the Amazing Mold Putty website for these and more Amazing products.

~ Make Today Count

Wendy
www.scrappinwendysway.blogspot.com

Cassette Tape Resin Jewelry


How to make Cassette Tape jewelry using Amazing Mold Putty and resin!

signature


Tanya Ruffin


Create Studios
TK Arts


Holidays with Amazing Mold Putty

 Hi everyone I want to share something a little different.  I want to show how easy it is to use Amazing Mold Putty products.  My niece Naomi is 9 and every year I try to make things with them well I thought I wonder if someone her age could use AMP.  So I let her try.  She picked an ornament she loves and I explained each and every step and this is how easy it is to use it.


 Excuse some of the painting I am working on that with her, but I really wanted to show that anyone can use AMP to create almost anything and it took just a few minutes.  We used Creative Inspirations paints to paint the finished piece.
 Her finished snow girl!! So now there is no reason people should not purchase this stuff for fear of not being able to do it because a 9 year old can!!


Wednesday, November 28

Team Edward or Team Jacob?

I enjoyed the books and tolerated the movies (but because I enjoyed the books I bought the movies - lol).  Anywhooo, I decided to make a Twilight mini album for a teenage friend for Christmas.  One of the things I needed was a big chunky Team Jacob embellishment.  So I decided to make both! 

So here's what I love about this project, not only did I get to use the Amazing Mold Putty and Amazing Casting Resin I use on all of my projects, but I also tried out the Alumilite Metallic Powders and the Alumilite Dyes.  And then to finish it off I used my Amazing Clear Cast for the first time ever (and love it!).

So, of course, I started with the Amazing Mold Putty mixing a 1:1 ratio of "A" and "B" (click on the link at the end of this post and go to their website for a tutorial).

This was the item I chose to mold.

After I made my mold, my experimenting began . . . I decided to try the metallic powder (link above).  I brushed the inside of my mold liberally with the powder on a paintbrush (and when I say "liberally" I mean I brushed the inside of the container - I didn't even have to dip the brush into the powder . . . this stuff goes a loooong way)


Next I poured the Amazing Casting Resin (link above) and waited for it to set.

Once the resin had turned completely white, I removed it from the mold and  . . . VOILA!  My piece came out with a metallic finish hard set in . . .no worrying about the color coming off or what product to use on the surface, etc. 

The next one I did I decided to go a little more crazy.  I mixed a couple of drops (and I mean just drops) of the African American dye and then added a little of the metallic powder to side "A" before mixing the resin.  This is what it looked like:


I love that the piece has a solid color and I don't have to doctor the back at all.  Once I get the desired look on the front, the back still has that brown and slightly metallic look and I can just leave it alone. 

Now when I say "desired look" you know I didn't just leave these pieces the way they were . . . nooooooo, I had to paint, daub, brush and rub to get them the way I wanted them.  You can see that I brushed them with black paint and then wiped it off so the black stayed in the low, indented or debossed areas.  Then on one of them I used some antique gold rub to finish it off. 

Once I had the frame portion complete, I glued in some pictures and THEN . . . I tried out the Amazing Clear Cast (link above) to seal the picture and create a glass look.  And look how "Amazing" it really is.


So here is another look at my finished project:

What do you think?  Don't forget to check out the Amazing Mold Putty website for these and more Amazing products.

 ~ Make Today Count
Wendy


Tuesday, November 27

Twinkle Little Christmas Star

TWIKLE LITTLE CHRISTMAS STAR
This is the material/materials I used for this cute Christmas decoration. I thought, wow, it would be nice and light, just perfect.


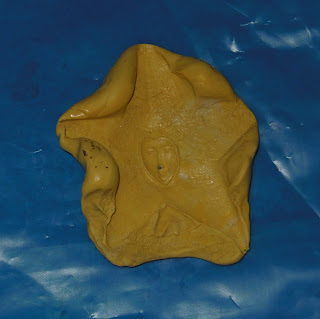
Here is the mold I made from a vintage piece of my moms. I was so happy to see the detail in the sweet little star's face. I used the usual AMP mold making material, nice and easy, giving you great results.


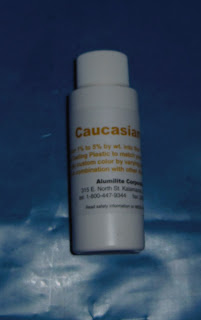
Amazing Mold Putty has a range of facial and body colors so right for doll makers, I chose this one.


This is the finished project. I used a number of things to complete this piece. Gold paint that adapts to any surface, polymer clay, for the braiding around the star's head, Dewdrops and vintage German glass glitter, and wire if I decide to use the star as a topper. I was so very pleased at the manner that the AMP face turned out. Delicate, just like the original. My next post is not until after Christmas. I wish each and everyone the happiest of holidays. Thanks for stopping by. Until December.
Joyce

Saturday, November 24

45 Adapter Bracelet


I love vinyl records.
I love all things vinyl record related...or should I say "classic rock" (which oddly includes 80's music now) related. Vinyl records, cassette tapes, boom boxes...I love almost anything that relates to that era.  So when I saw a 45 adapter silver necklace I wanted it! BUT it was way to expensive, so I decided to make my own. Then I went a step further and made a bracelet... since a tutorial on a necklace would be super short.


45 Adapter
Supplies:
Amazing Mold Putty
Amazing Casting Resin
Metallic Powders- I used Gun Metal as my base
DyesI used black
Rub-n-Buff- gold and silver
Large jump rings
Jewelry pliers
Clasp
Paint brush

Directions:
Dig out an old 45 adapter mix up the Amazing Mold Putty according to the directions. You will make 5 discs- 4 black and 1 white
Mold

Press the 45 adapter into the mold putty.
In a few minutes you will have a rockin' mold!


Next use your paint brush to dust the inside of the mold with the gun metal metallic powder.  Following the directions on the bottle mix a drop or two of black dye into the casting resin. The top of my bottle blew off when I tried to squirt it so I just use a craft stick and dip it in the dye and then mix into my resin.

I only made one mold so it was s slow process for me, but I would make other casts at the same time so it did seem like forever to just make the bracelet.


I also decided to make one gold  (to simulate the original yellow) so I just used the white resin without any dye.

After looking at my finished pieces I decided to to add some rub-n-buff to amp it up more.


4 silver rub-n-buff adapters
1 gold rub-n-buffed adapter.
Don't forget to do both sides of
all of them!


Now link them all together. I used two large jump rings between each adapter. I linked the gold adapter in the middle.

Then attach your clasp to one end and another large jump ring to the other.

And you are done!


Good luck! This is a fun and funky bracelet!

Tanya Ruffin

Create Studios


Monday, November 19

Vintage Key Pendant

I have been thinking of Christmas presents and what people would like. Amazing Mold Putty is such and awesome product because I sit and play until I get what I want and it doesn't take long at all. I am into making jewelry and using vintage pieces. When I saw the original piece of jewelry I had to cast it. It came out so great that I couldn't wait to antique and age it. First I cast the key in the Amazing Mold Putty, you use 2 of the same sizes of A and B and mix them thoroughly until they are blended and then push your piece in and leave sit for approximately ten minutes. When finished you remove your key and you have a piece that you can use resin or clay in and make the same piece over and over. I used Amazing Casting Resin for this piece because it cures in less than ten minutes and cures white which I love. They also sell a Resin that dries clear and takes 24 hours or so to cure. I took silver and gold and tapped them on the piece with a paintbrush to get a mottled look. Once dry I took watered down black acrylic paint and painted it all on the piece and wiped it gently off so it stayed in cracks and crevices. After it was dry I added Sakura 3D Crystal Lacquer let it dry added a jump ring and put it on this necklace cord. I love it so very much I am going to wear it for Thanksgiving.

Friday, November 16

Sequined Christmas Ornaments

 Hi! Michelle here with some Christmas ornaments I made using Clear Cast Resin and sequins!
To make some of these for yourself, you will need:
 Amazing Mold Putty, some clean jar lids...
 Amazing Clear Cast Resin, mixing stick, measuring cups included with the resin, dixie cup, a non-stick work surface and a old cookie sheet.
 Assorted sequins, chunky/fine glitters and some chenille stem pieces.
 First - place your non-stick work mat onto the cookie sheet.
Mix equal amounts of the yellow and white putty together until you achieve one solid light yellow color. Working quickly, make thick pancakes of the balls and press in the lids, bringing the putty up at the edges. These will cure hard in 10-15 minutes. Then measure your "A" and "B" of the Clear Cast Resin in the cups provided. Pour these two into one dixie cup and stir with the stick until blended. Set out your molds, some you see here are extra from a previous project where I made a mobile. You can see that project here.

 Crease the edge of the cup to make a pour spout and gently pour a bit of the resin to fill the bottom of each  mold. Sprinkle some glitter and add a few sequins. Add more resin as you add more glitter or sequins. The nice thing about this particular resin is, since it takes a few days to cure, you have extra time to fiddle around with your project. Place a bent piece of chenille stem into the finished  molds.
 Place your tray somewhere where it won't be disturbed for a few days.
 It your weather is warm and dry, your ornaments will cure quicker, maybe 1-2 days. If you live in a cold damp area, expect up to 5 days before they are hard and not sticky.
In checking your molds and you happen to get gooey resin on your hands...use nail polish remover to nicely get it off. :)
 Once they are fully cured, you can pop them from their molds and use sharp scissors to trim off any rough edges. Hang and enjoy!

Related Posts Plugin for WordPress, Blogger...