Wednesday, December 31

An Amazing Bucketful of Brushes... by Sandra Strait

Hi! Sandra, here today to share my new amazing brush drying system!


Up until now, I've just been laying my paint brushes flat to dry, which is better than setting them with the bristles upward, but not best. Brushes should really be allowed to dry with the bristles facing down, so all the moisture drips out. But if you leave them with the weight resting on the bristles they'll get bent out of shape.

So I was excited when I saw a DIY Brush Drying System at Woodcarving Illustrated, using clothespins that holds brushes upside down, so they can drip-dry.

'I can do that' I says. I didn't have the pieces of wood required in the tutorial, but I had an idea to work around that by using more clothespins and some Amazing Casting Resin.  

Supplies:
  • Amazing Casting Resin 
  • Lt. Green Alumidust
  • Golden Fluid Acrylics: Hansa Yellow Medium, Nickel Azo Gold, Green Oxide, Phthalo Green 
  • Pack of 36 clothespins from Dollar Tree
  • Small bucket from Dollar Tree
  • E6000® adhesive
  • 7 Sheet Metal Screws - size 6x3/4
  • Styrofoam ring from Dollar Tree
  • Duct Tape
  • 2 Jumbo Paper clips
I visited the Dollar Store and bought a package of wooden clothespins, a small bucket, a Styrofoam ring with a center slightly smaller than the bucket, and some E6000® glue. I already had everything else I needed.

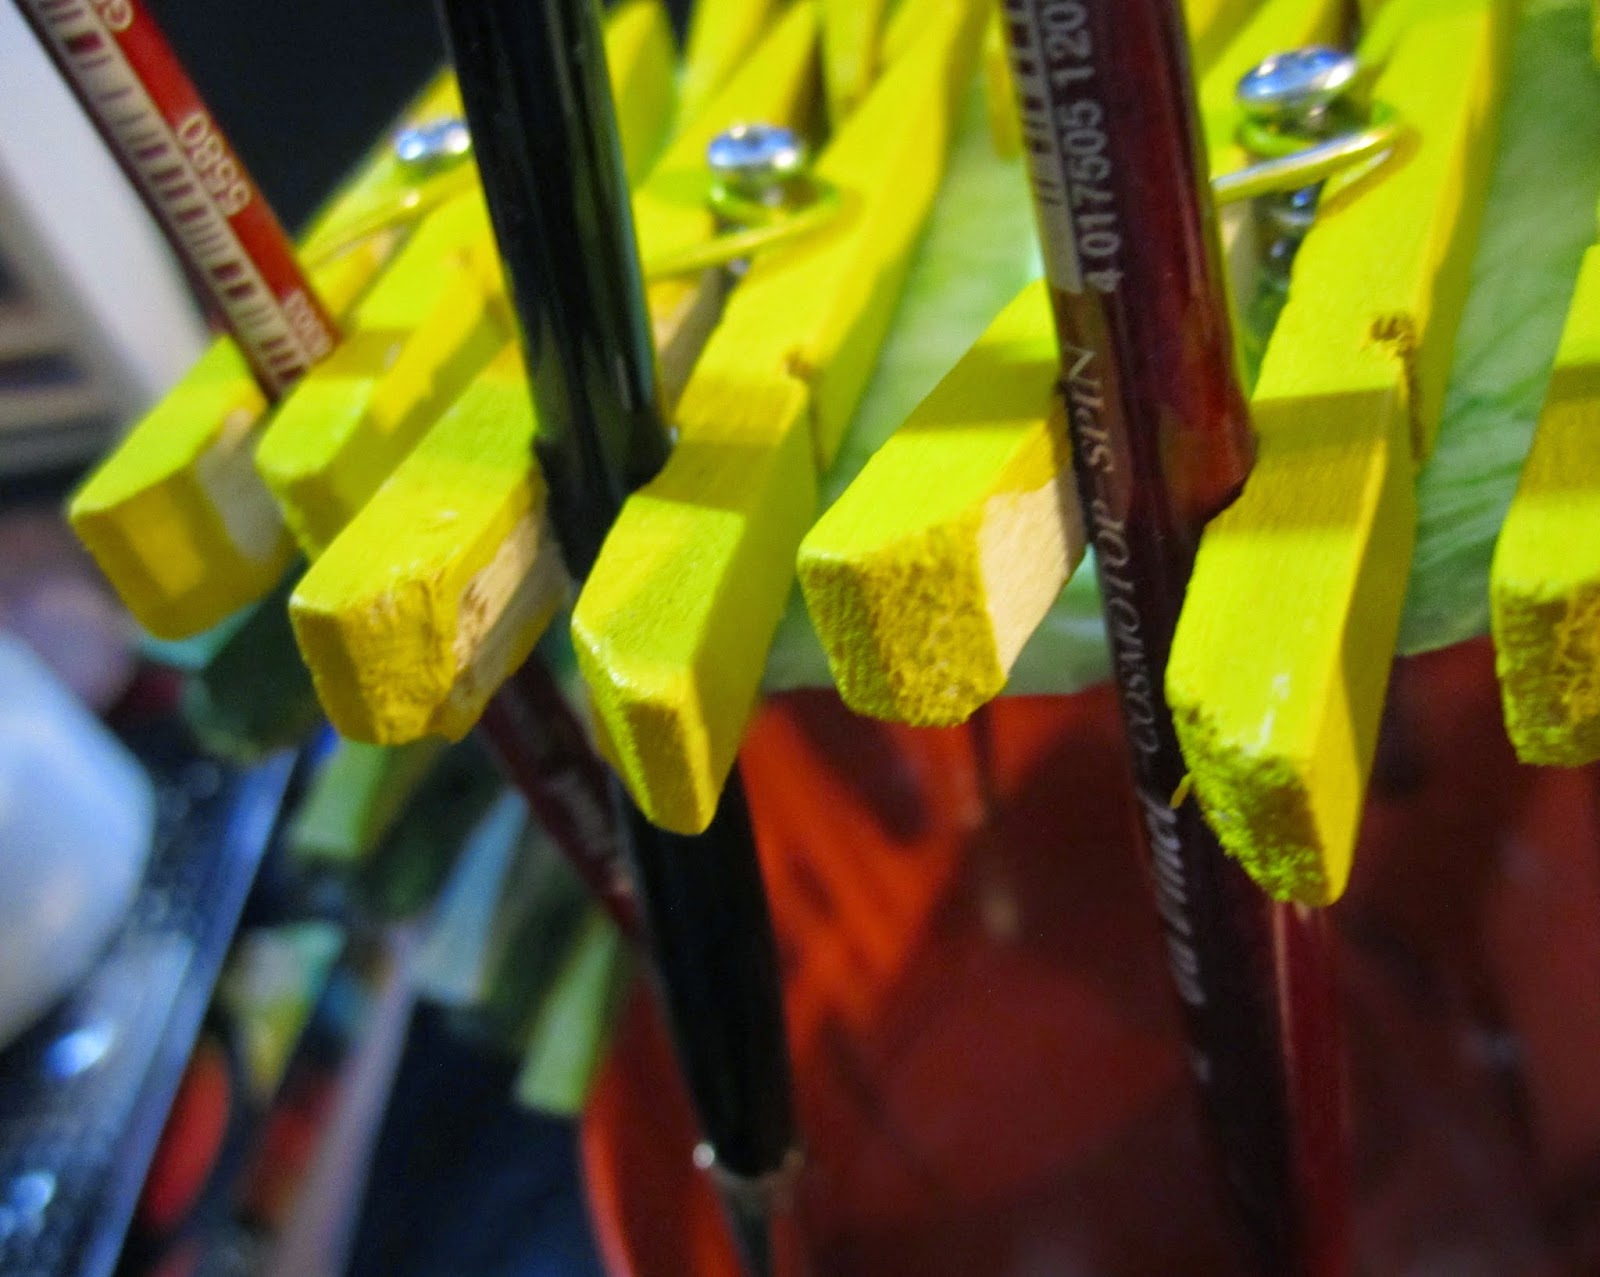
Using acrylic paint, I painted twelve of the clothespins in various shades of green. With the E6000®, I glued them shut, so they wouldn't accidentally open, and then glued them together, one-by-one, to form an arch on one side.

Following the picture of the DIY I'd seen, I glued down a jumbo paper clip, and glued my stack of green clothespins to the top of the clip.  I repeated this for the other side of the bucket.


I painted three of the clothespins with Quinacridone Nickel Azo Gold.  I was pleased--the color is usually a bit more yellow, but on the wood it came out almost exactly the same color as the bucket.  It was meant to be!


Since I knew that the hollow center of my Styrofoam ring was just a little smaller than the inside of the bucket, I decided to use it to create a mold for my Amazing Casting Resin.  I overlapped pieces of duct tape on the bottom to start.  Then I flipped it over and layered more duct tape, so all the sticky was covered.  Then I placed a layer of duct tape all along the interior sides of the ring.  I knew much of this resin piece would be covered over, and I wanted lots of texture, so I didn't worry about smoothing out ridges.


I dusted the tape with Lt. Green Alumilite dust, and then started preparing the resin.


Amazing Casting Resin comes in two parts. I poured out equal amounts of each, and then poured them together, stirring until the mix was a solid color. I poured this into my mold and waited about 10 minutes.

For more thorough instructions and tips on using Amazing Casting Resin, check out the Amazing Crafting Products website.


Within the 8 minutes the resin had solidified so it was hard enough to remove from the mold, but was still soft enough that I could easily get screws into it. It had a nice spider-web look to it.


I painted eight of the remaining clothespins with yellow, and screwed them down to the resin. Let me note, that I sort of chose form over function here. All the clothespins can be opened, but some have limited opening, and none will open enough for my largest brushes, because of the way I've got the tips intermingling. Functionally, it would have been better to use four or six pins, but I thought it looked nicer with eight pins. If I decide that it really doesn't work, I always have the option of making a new pad, removing this one, and going with fewer pins.


I like my brush holder and intend to make another, so I'll have one for my watercolor brushes and one for my acrylic brushes. This is a project that you could easily vary to your own tastes, so be sure to check out the original version, and get even more ideas.


For the next one, I think I'll try using resin clothespins, that I make with Amazing Casting Resin. That would be...well... AMAZING!

What handy tool gadget
would you create using

Please upload and share your creations to the

For more of my work in Amazing Mold Putty, zentangle-inspired art, and daily links to tangles, tutorials, and giveaways please visit my "Life Imitates Doodles" blog. Sandra Strait

 • • • • • • • • • • • • • •

Don't forget to subscribe to our blog on the right side bar:
Twitter at AmazingCrafting | Facebook at AmazingMoldPutty | YouTube at AmazingMoldPutty

Tuesday, December 30

Wear the Year on Your Sleeve! Four Seasons Snow Globe Bracelet tutorial by Isabel Villarreal


Hi there! This is Isabel with my final project for this year. As always, the new year prompts a look back at all the changes that made this past year special. And what better way to capture a moment than a series of small snow globes you can wear year-round. I'll be showing you how to make a bracelet to celebrate each glorious season that makes up a complete year. 


I started by taping one side of the copper rings with packing tape and really rubbing the tape into the surface to make sure they were stuck together well. Once the tape is on flip it over and pour in little Amazing Clear Cast Resin. I didn't use a lot of resin, just enough to cover the bottom. I did this to 3 1/2" rings and 4 3/4" rings. After the resin has completely set carefully remove the tape. My rings had a little glue residue from the tape so I used a cotton ball and some alcohol to remove it.


I filled the 1/2" rings about halfway with more clear Cast but this time I added some super fine glitter in White and Blue. Super fine glitter is very light and once mixed, will actually suspend in the resin instead of floating down to the bottom. I then added a layer of larger glitter to the 1/2 rings and now filled them to the top with Amazing Clear Cast Resin. a few pieces of glitter floated to the top but that's fine. Remember, the finished ring will be clear and it will give it more dimension when you look through it to the other side.


Using polymer clay I sculpted 4 seasonal symbols. I would be using one in each of the 3/4 rings. Then I mixed up some Amazing Mold Putty and pressed each piece into the surface of the putty. after about 10 minutes the mold was set.


With a small brush I painted colors into the mold using Alumidust. Then I poured Amazing Clear Cast Resin into my painted mold and left it for 24 hours. When I came back the next day my seasonal symbols were ready: a pine tree for Winter, an acorn for Fall, an ice cream cone for Summer and a flower for Spring.


I had some tiny black acrylic cabochons so I used a dot of E6000® adhesive to attach my shapes onto the cabochons, creating a a cool little stand for each one.


Meanwhile, I placed my 3/4" rings on the shiny side of a piece of packing tape and traced the shape using a Sharpie Marker. I then placed a second piece of tape over the tracing and poured a layer of Amazing Clear Cast Resin into the center of the circle. If you let the resin stand for about 10 minutes before pouring it will be a little thicker and won't run too much. At the top of the picture you can see the results of my pour. I made 4 of these- 1 for each 3/4" ring. Put these 4 pieces aside for now since they will be used as your covers for the 3/4 rings once they are filled.


Next I had to find a way to attach the larger hollow rings and the smaller filled rings. To connect the rings to one another I used leather lacing and a crimp bead on either side of each ring (left). A small dot of E6000® on each side will also help keep the leather lace from moving. I repeated this process with each ring, alternating the larger and smaller rings (right). What I ended up with is a 7 1/2" bracelet.


Now you're ready to add the final touches to your empty 3/4" rings and turn this into a celebration of seasons. Glue the shapes into the bottom wall of the ring using 1 shape per ring starting with Spring at one end and ending with Winter at the other. I used large flakes of different colored glitter as my "snow" in each ring and also dropped in a dash of White super fine glitter in each one. I chose glitter colors to correspond with the different seasons.


So what is that liquid in a snow globe? Mix 8 oz. of distilled water with 1 tablespoon of liquid glycerin and use a dropper or small bottle to fill the 3/4" rings until they are almost full. The glycerin thickens the water to create that cool snow globe effect when shaken. Now take those Amazing Clear Cast Resin circles we made earlier and glue them to the top of the open rings. Trim away as much excess resin as possible, this will make it easier to get them in place. Use jewelry glue or E6000® along the entire rim then press the resin sheet onto the glue to seal and let it sit. When it's dry test for leaks-I had to reattach 2 of my covers due to tiny leaks. If you find a leak just rip off the resin sheet, clean it off if necessary and reattach it. Test again. 


What I ended up with is this gorgeous snow globe
bracelet that I'll definitely be wearing daily!


This is a celebration of time and color that I can take along everywhere. You can personalize this bracelet project by creating your own themes for each globe.

help you celebrate your year?

I'd love to see what you create! Please upload and share your creations to the

 • • • • • • • • • • • • • •

Don't forget to subscribe to our blog on the right side bar:
Twitter at AmazingCrafting | Facebook at AmazingMoldPutty | YouTube at AmazingMoldPutty

Monday, December 29

Moldmaking makes #Cre8time Friends...
by Susan M. Brown {sbartist}


Hello Amazing Crafters! Susan bringing you another edition of Mold Rubber Monday. Sharing some interesting experiments I've been having with the new Amazing Remelt in conjunction with Amazing Mold Rubber – they work AMAZING together!


A wonderful thing about Amazing Casting Products... that the products work together like peanut butter and jelly! Today I'm getting double duty out of my mini AMAZING No-Gelatin Printing Plate as I use it as a nonstick base for pouring a mold with Amazing Remelt.

This project starts off with my mini Amazing Mold Rubber slab and an embossed metal ATC I created for a swap many moons ago. I love creating ATCs {artist trading cards} and find creating mini one-of-a-kind masterpieces for trade very rewarding - BUT - these hand embossed metal cards are a lot of work and were a very small batch... only six originals made. I decided I wanted to make a mold of this and it has opened up a world of possibilities for this little piece of art!


Using 3M spray adhesive, I sprayed my mini Amazing Mold Rubber slab, and allowed it to dry a few minutes to tack up. CLICK HERE to view how I created this to use for monoprinting.


Then I gently adhered my embossed metal ATC.


After mounting, I brushed spray cooking oil onto my metal ATC. This ensures the oil {serving as a mold release from the Amazing Remelt} was applied into all the nooks and crannies, and also doesn't leave any large beads of oil to displace the molding material. I also lightly brushed over the edges where the spray adhesive is exposed on the rubber slab.


I placed my mold rubber slab back onto the acrylic block I created it on and wrapped scotch tape around the sides to make my mold box walls to pour the Amazing Remelt into.


I melted 3-4 one inch cut squares of Amazing Remelt and melted slowly in my microwave in my mold putty cup I created for my cookie espresso cup project {CLICK HERE to view}. Keep in mind each microwave model varies, so you'll want to start out slow and test your melt times - mine happens to be super hot. I melt at 10 second increments on the lowest setting and after 3 cycles, I'm ready to pour. I set my makeshift moldbox up against a large mold putty mold in case the tape bowed out a lot. I usually wrap a strip of cardstock around the outside as extra support.


I popped and pulled away bubbles affecting
image surface using a pin {or toothpick}.


I let the Amazing Remelt set to cool and harden for the day as I set off to work. Should only take an hour or so as this is only about 1/4" thick.


Now for the REVEAL!!! I love the amazing detail the Amazing Remelt has captured. This will certainly save me time and money in mold rubber {and space, too} for molding items quick and that I can create a new mold whenever I need... and I can STAMP with it!!!

Keep a lookout for what I create with this in the upcoming CHA Winter 2015 sneek peeks next week. I will be attending and demoing mornings at the Amazing Crafting Products/Alumilite Corp. Booth #1427 – come by and meet me and try out these amazing products!

How will you transform your original
art using Amazing Casting Products??

Please leave a comment below to share! If you would like to see more of my creations, please visit my blog sbartist : painting in the dark by clicking here. ~ Susan
. . . . . . . . . . . . . .

Want to Socialize with Amazing Crafting Products?
Twitter at @AmazingCrafting | Facebook at AmazingMoldPutty | YouTube at AmazingMoldPutty

Friday, December 26

From Trash to Treasured Ornaments... Holiday #Cre8time Upcycling with Maria Soto


Hi there! Maria here today sharing a project that's perfectly timed – especially in planning for next year holiday decorating. Every year I like to make new ornaments for our tree. Now since we have a kitten who is still very playful, we didn't have a big tree last Christmas... and well we are not having one this year either. My two youngest made me a little Christmas tree when they were in 8th grade, so these two trees are our Christmas trees these year.


During one of my summer garage sales I purchased a lot of old fashioned lights, and when I tested them out, one literally blew out as I plugged it in – and I got to see lot of golden sparks! So I removed all the light bulbs and decided to keep them so I could use them for ornaments.


It sure was a fun and messy craft day for me, I decided to the two types of resin and the Silver and Gold metallic powders from Alumilite. It looked like this would be a very simple and easy project. I figured I would just pour the resin over the bulbs, let it set and then just go crazy embellishing them. Well let's just say I ended up with sticky hands... very sticky hands! I guess I got clumsy after spending 12 hours crafting – it was one of those days when all you want to do is craft, craft, craft!


First things first, I got my Amazing Clear Cast Resin, my measuring cups, Alumilite Silver Metallic Powder, wood mixing stick, a bowl to mix my resin and a piece of recycled Styrofoam (from a package) to hold the light bulbs.


With everything was ready to get started, I decided to use the silver metallic powder first. I added some to the part "A" of the Amazing Clear Cast Resin {click here to view mixing instructions}. Once I had the powder in my measuring cup, I mixed it for a while, then I poured it into my red bowl, then added part "B" of the resin and mixed it for a couple minutes. Once the resin and the metallic power was ready all I did was pour it over the light bulbs, you can see on the photos below.


Here you see the resin getting poured over the light bulbs. I chose to do this instead of dipping them, I wanted some of the original bulb colors to show.


This was a very thin layer of resin, so I just waited a couple of hours before going back to them – in the mean time I went to work on other projects. 


I liked the look of the light bulbs, but I wanted more dimension – so I decided to add more resin. This time however I used the Amazing Casting Resin and Alumilite Gold Metallic Powder. You mix this resin the same way you mix the clear cast resin {click here to view mixing/preparation}, but you need to remember this resin sets pretty fast {like in ten minutes}, so you have to move fast once the metallic powder is mixed well with the resin.


Here you can see the second pour of resin. I noticed the gold was not as bright as I wanted it to be. Since this resin only takes about 10 minutes to cure, I prepared another batch of the Amazing Clear Cast Resin mixed with the gold metallic powder.


This was the last resin pour I made. This project was supposed to be easy and fast, but well I had to keep going until I was happy with the final results.


After the last pour, I left the light bulbs alone to cure overnight, since the Amazing Clear Cast Resin does take longer to cure. The next day, I removed them from the styrofoam so I could finish embellishing these light bulbs – they are done, and ready for the final steps.


Now to finish these ornaments, I thought adding glitter would be a good idea! I took out my glitter pens and decided to add a little bit of gold first over the golden resin. Then I added glitters to match each original color of the bulbs – the point was to not completely cover the bulbs, but to add dimension. Using layers of the resin did just that. 


I turned the styrofoam over and placed the bulbs back
in it, just to make it easier for the glitter to dry.


One by one, I took each light bulb and started
to add glitter to a few areas only.


Here you can see all the bulbs have glitter on them. I just had to wait for the glitter to completely dry before adding wire and ribbon to finish them up for hanging on the tree.


I had some gold wire ribbon, but it was too wide to use it. So I cut the wires from the edges of the ribbon, then cut the ribbon in half – this way I could use the wire to make the hangers; and the ribbon was now thin enough to wrap around the metal parts of the bulbs making ribbon bows. I'm excited to finish these up and have them ready to hang on my small silver tinsel tree my daughter made in 8th grade {now that was 5 years ago}. This tree comes out every Christmas, this time the lights don't work, so it's used to display these tiny recycled light ornaments.


My tiny Christmas tree is all decorated, ready for display!!!


Our Christmas tree is all decorated! I hope that my post has inspired you to make your own ornaments. I've been making our ornaments for many years – this project gleamed new light to my old burnt-out bulbs.

How would you use these amazing products
in your ornaments to give them a new look? 

Share your projects with us, we love to see what
everyone creates with Amazing Casting Products.

Thanks for visiting! I invite you to stop over to my blog "What is Creativity"
at http://chuy-creativity.blogspot.com to see more of my creations. Maria Soto

• • • • • • • • • • • • • • • • •

Don't forget to subscribe to our blog on the right side bar:
Twitter at AmazingCrafting | Facebook at AmazingMoldPutty | YouTube at AmazingMoldPutty
Related Posts Plugin for WordPress, Blogger...