Showing posts with label DIY. Show all posts

Tuesday, April 24

#Cre8time Explorations... DIY Butterflies with Michele Kosciolek

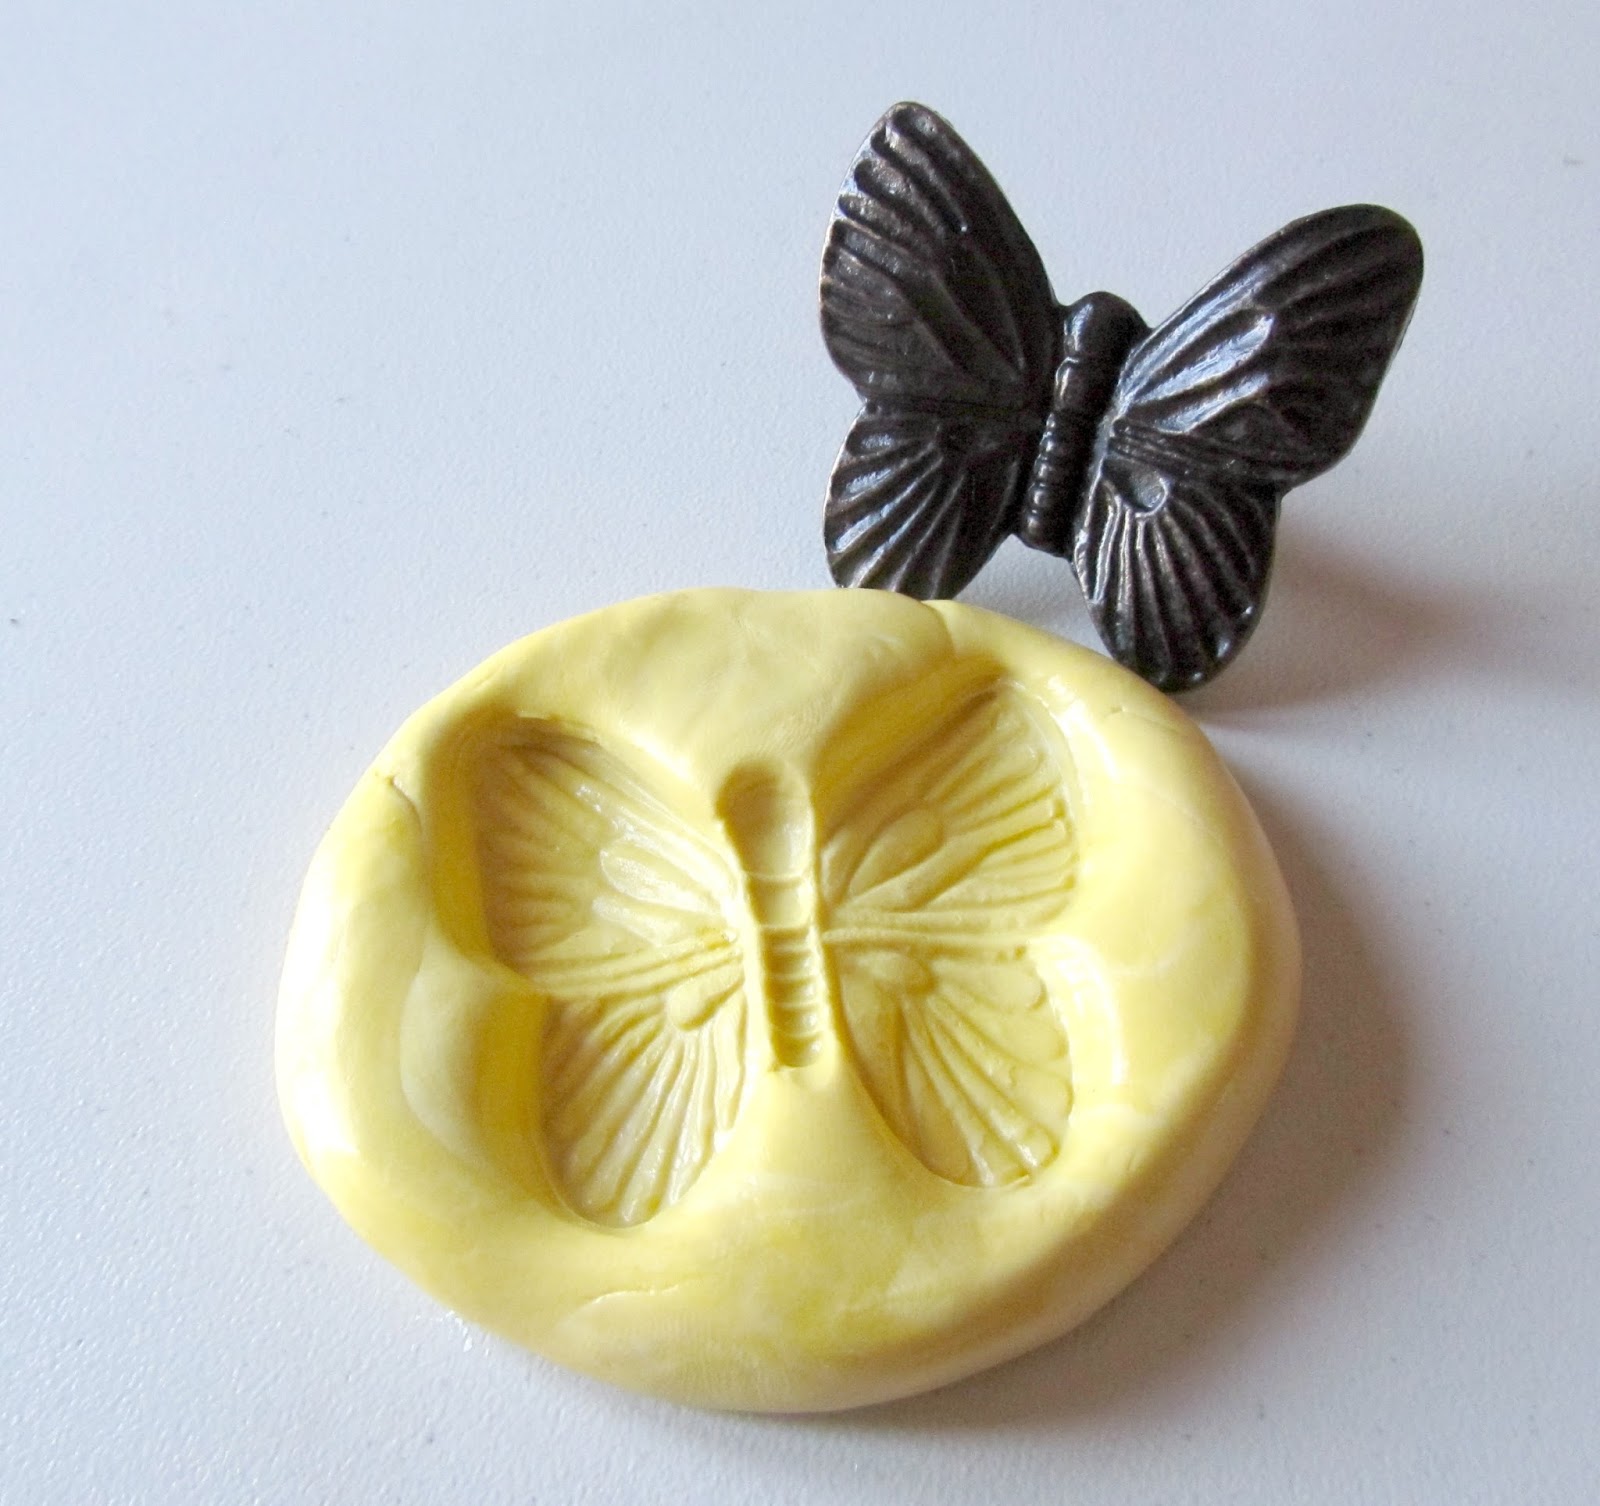
Hello friends! Michele here... I am in spring cleaning mode in my craft room and came across a butterfly knob that I stashed away to mold on a rainy day. Well since I found it and it happened to be raining, I got busy molding and casting.


I used Amazing Mold Putty to mold the knob.


I sized my mold putty just a tad smaller than the knob.


Because when you push item into
the Amazing Mold Putty it will spread.


Just look at all the detail! This mold can be used a couple of ways, to mold the entire butterfly or just the wings.


Next I cast with Amazing Clear Cast Resin, but first I painted some Alumilite Pearlescent Powder in the mold.


First the pearlescent on the wings, and then
a little bronze metallic powder on the body.


I mixed the Amazing Clear Cast Resin and poured into the mold – right over the powder.


I had a bit of the resin left so I grabbed a dictionary page that I want to use as a page in a book I will be making at a workshop this month... never waste leftovers!!


For the next casting, I used Amazing Casting Resin mixed with brown Alumilite DyeI wanted it to look like Bronze so first I used the Bronze Metallic Powder in the mold.


These two casts from the same mold turned out so different!!


The Amazing Clear Cast Resin with powder...


and the Amazing Casting Resin with the metallic powder and dye.


I am really looking forward to seeing how using
 just the wings works out too. What a versatile mold!


Be on the look out for these on future projects!!

What found objects would
you mold for Cre8time play?

Thanks for sharing part of you day with us!!!
Until next time... Michele

For more projects and inspiration please visit my blog "Stuff by Belle"
or follow on Facebook: https://www.facebook.com/michele.kosciolek

• • • • • • • • • • • • 

Don't forget to subscribe to our blog on the right side bar:
Twitter at AmazingCasting | Facebook at AmazingMoldPutty | YouTube at AmazingMoldPutty

Friday, April 20

Take a #Cre8time Spring Break... Make it Artsy Series 300 Bingewatch


Hello Amazing Makers!! Are you looking for some Cre8time inspiration over Spring Break?! We have a treat for you – we have compiled a list of links to view all episodes of Series 300 of Make It Artsy for your bingewatching pleasure. While watching you will see features by TWO AMAZING Creatives, Cat Kerr and Lynne Suprock who share ideas on using Amazing Casting Products in your jewelry and mixed media creations.

Make It Artsy is a show dedicated to the crafter, maker and artist! A series celebrates that maker spirit and enthusiasm that extends to every part of life. It’s more than crafting, more than art or scrapbooking; this is an all-encompassing show for any one that loves to make “things”. From mixed-media to metalsmithing, using tools from saws to sewing machines, and materials from paper to wood; today’s most creative “makers” join host Julie Fei Fan Balzer and unleash a new look for crafting with a touch of industrial style.


Episode 301 - Blueprints

Before you build, make a plan or blueprint. Julie Fei Fan Balzer creates a scheduling journal with lots of color and style. Lynn Suprock sculpts tiny books to use as journals and jewelry. Joe Rotella builds a planner from an ordinary calendar. Jane Dunnewold talks about personal alignment.

Episode 302 - Building Blocks

From basic blocks, great new art is built. Lynn Suprock uses a blender to turn recycled materials into paper. Rebekah Meier cuts, sews and paints a multi-media collage. Mary Hettsmansperger makes cold connection jewelry and Jane Dunnewald shares more ideas on alignment.

Episode 303 -Nuts and Bolts

Let’s get down to nuts and bolts. Candie Cooper weaves leather through washers to make a cool bracelet. Joe Rotella and Julie McGuffee join forces and power up their tools to create a musical wind chime from a wine bottle. Jane Dunnewold concludes her thoughts on alignment.

Episode 304 - Bricks Need Mortar

Combine materials with inspiration to make contemporary art. Julie Fei Fan Balzer sews and stamps fabric embellishments for book covers and more. Debbi Simon combines clay with uncommon materials to create unique 3-D pieces. Julie Fei Fan Balzer screen prints with stencils and Mary Hettsmansperger adds shine to metalwork with mica.

Episode 305 - A Good Foundation

Great art is built on a good foundation. Rebekah Meier cuts, paints and assembles layers of felt. Mystele Kirkeeng uses paints and pastels to craft a folk art house. Mary Hettsmansperger fabricates jewelry and art objects from copper. Jane Dunnewold discusses content.

Episode 306 -Tools of the Trade

Making art is easy with the right tools. Joe Rotella drills fine china to make a charming bird feeder. Cheryl Boglioli crafts a charming bisque face pendant. Candie Cooper makes metallic leather tassels to embellish jewelry, accessories and home dec and Mary Hettsmansperger fires up her torch and shares some tips.


Episode 307 - On The Surface

The surface reflects your artistic flair. Lynne Suprock transforms shot gun shells into trendy jewelry. Debbi Simon adds heat to encaustic wax to create special effects. Cat Kerr creates a beautiful pendant with cool resin techniques and Mary Hettsmansperger adds color to copper.

Episode 308 - Hard Hats Required
CLICK HERE

Grab your hard hat to make heavy-duty art. Julie Fei Fan Balzer cuts, embosses and paints metal to create home décor CLICK HERE. Make a lamp with interchangeable panels with Joe Rotella CLICK HERE. Cheryl Boglioli mixes media and crackles it on canvas for special effects CLICK HERE, and Jane Dunnewold has more ideas about the inner artist.

Episode 309 - Signage

It's all about signage and announcing your event. Julie Fei Fan Balzer makes a festive partyscape for any occasion. Julie McGuffee and Joe Rotella team up to make a shiny party banner and Julie Fei Fan Balzer makes paper tiles that look like clay tiles. Jane Dunnewold talks about collections.

Episode 310 - Finishing Touches

Add that perfect finishing touch. Joe Rotella molds and casts a one-of-a-kind gaming set. Sandra Evertson upcycles vintage bottles to make trendy Boho decor. Candie Cooper finishes off a leather cuff with colorful embroidery and Mary Hettsmansperger smooth-finishes metal edges.

Episode 311 - Below The Surface

Explore below the surface. Cheryl Boglioli adds a variety of materials to a crafted form to make a gallery-ready figurine. Rae Missigman creates a trendy artistic cuff bracelet. Rebekah Meier makes a mixed media circle abstract on canvas. Jane Dunnewold talks about planning your art.

Episode 312 - Under & Over

Look over, under and all around for creative ideas. Debbi Simon sculpts artful household hardware from clay. Candie Cooper embosses on leather and Sandra Evertson transforms candlesticks into art with clay and found objects. Jane Dunnewold talks about setting goals.

Episode 313 - Grand Opening - Proper Attire

Once it's built, it's time for the grand opening! Dress up with wood and clay jewelry holder from Candie Cooper. Jen Cushman stamps an on-trend metal bracelet. Rae Missigman makes a cute purse from recycled products. Mary Hettsmansperger has safety tips for working in your studio.


Make It Artsy launched September 29, 2016 on Public Television stations across the country! Look for it on your local PBS channel and all new episodes from the upcoming Series 400. If you can't find it on your local programming, stay tuned to the Make it Artsy website to catch weekly episodes online. Bookmark or PIN the Make It Artsy Website http://makeitartsy.com.

What have you created with 
Amazing Casting Products?


Amazing Casting Products by Alumilite Corp. is proud to be one of these fabulous group of companies partnering with Make it Artsy. Stay tuned for upcoming episodes with projects featuring more of our amazing friends using Alumilite's AMAZING products

• • • • • • • • • • • • • • • • •

Don't forget to subscribe to our blog on the right side bar:
Twitter at AmazingCasting | Facebook at AmazingMoldPutty | YouTube at AmazingMoldPutty

Monday, March 26

#Cre8time Egg Decorating... AMAZING Easter Ornaments by Tracy Krueger

Hello, it's Tracy here! Being that Easter is right around the corner, I was trying to think of a quick and fun Egg decorating project. My kids are grown so we don't decorate real eggs anymore.


Then the simplest idea came to me! I have a mold that I had made out of a cut piece of brass (to make a Christmas ornament) and it has an Egg shape. I first mixed two equal parts of Amazing Casting Resin and poured it into my mold to give it a "egg base". I just love watching the Casting Resin cure... don't you :-)


After this base egg cured (I gave it about 15 minutes), I gathered three of my Alumilite Dyes that would be good for Easter – Blue, Purple and Yellow. I poured out very small equal portions of Amazing Casting Resin and squeezed out a tiny drop of each color into part "A" of the resin, then stirred color completely before adding part "B". CLICK HERE to view mixing/preparation.


The first color I mixed up was the yellow, and poured
random lines on top of my white cured resin.


As the yellow was curing, I was thinking "there has to be a better way to have more control over the colored resin". Awhile back I bought a bunch of disposable pipettes, so after the yellow cured, I mixed up the blue dyed resin and used the pipette to draw where I wanted my colored resin to go. It worked beautifully! I just love how I got some green where the blue was over the yellow.


Now I just had purple left. I mixed it up and used another pipette to squeeze the purple where I wanted. As always I kept a spare mold around to pour the extra resin in.


Once I was done applying the three resin colors, I let the whole thing cure for a couple of hours to make sure everything was set totally.


I took it out of the mold and trimmed the back a little, then drilled a hole in the top. I grabbed my sari ribbons and cut a small piece of a greenish/blue colored one.


I really like how this turned out.
It has kind of a watercolor look about it.


Isn't it fun that you can mix up your Holidays and make decorations for both?! I had quite a few more ideas, but have had a hard time getting them to come to fruition. I'll be back soon to share a few of my bad EGGS. 

How are you decorating for Easter?

Have fun! ~ Tracy

You can find more of my work on my Blog:
http://tracykrueger-nine.blogspot.com/2017/

• • • • • • • • • • • • • • • • •


Don't forget to subscribe to our blog on the right side bar:
Twitter at AmazingCasting | Facebook at AmazingMoldPutty | YouTube at AmazingMoldPutty

Monday, March 5

WOODen it be #Cre8time Lovely... 3 Resin and Wood Projects by Cat Kerr


Hello Amazing Makers! What WOOD you do with Amazing Clear Cast Resin in your Cre8time?! Today mixed-media artist Cat Kerr shares a few easy ways to use resin in your craft projects combined with a variety of wood and natural items.

Sit back and enjoy viewing this video from Cat Kerr featuring "3 Resin and Wood Projects". We hope you are inspired to add a POP of Amazing Clear Cast Resin to your creations!


If you are having trouble viewing video, please click HERE.

Thank you so much for watching!! If you love these resin techniques and would like to learn more... please check out Cat Kerr's "3 Resin and Wire Project Ideas" video by clicking HERE.

What are you creating today
with wood and resin?

To see more of Cat's work, we encourage you to take time to visit CatKerr.com or her blog and see what other amazing things she is up to.


• • • • • • • • • • • • • • • • •

Don't forget to subscribe to our blog on the right side bar:
Twitter at AmazingCasting | Facebook at AmazingMoldPutty | YouTube at AmazingMoldPutty

Wednesday, February 28

Memorabilia of #Cre8time Family... DIY Keepsake by Tracy Krueger


Hello everyone! It's Tracy here and I wanted to share with you today a project I created that holds some memorabilia pieces. A few months back I purchased some wood pieces at an antique market that used to hold watch parts. I knew I wanted to use these with Amazing Clear Cast Resin at some point... easily transforming one into a keepsake.


I decided to join my parents, my in-laws, my husband and I in a hanging with some pieces that either belonged to them or had some special meaning. I gathered some pins, a jewelry charm, tigers eye, shells and a silver heart. I also made some clay hearts that I painted red and wrote the initials of each of us on them. I played around laying them in different spots until I found the way I wanted them.


I mixed up a small batch of equal parts of Amazing Clear Cast Resin and mixed it with some fine glitter {CLICK HERE to view mixing/preparation}. I filled up the small outside circles and the top one.


After letting cure for at least 24 hours, I mixed up another small batch of Amazing Clear Cast Resin with some gold glass glitter, then filling the bottom half of each of the center sections.


I wanted the resin to be cured, but not fully hardened so that I could lay each piece of memorabilia into the resin and it would "settle" and not move around when I add the final resin layer. I set aside to let resin completely harden.


Then I mixed up my final batch of Amazing Clear Cast Resin and filled each of the center sections to the top... covering the keepsakes in each.


After the resin is fully cured, this is ready to hang! I drill small holes in the top sides and screwed in small screws. I opened my stash of sari ribbon and tied a piece of cream sari ribbon to the top to hang it by.


I hope you enjoyed my little piece of family history.
See you again soon!

What ideas do you have
to preserve family history?

Stay tuned for more... ~ Tracy

You can find more of my work on my Blog: http://tracykrueger-nine.blogspot.com/2017/

• • • • • • • • • • • • • • • • •

Don't forget to subscribe to our blog on the right side bar:
Twitter at AmazingCasting | Facebook at AmazingMoldPutty | YouTube at AmazingMoldPutty

Friday, February 23

#Cre8time for Ocean Magic... by Kristie Taylor


Hello everyone! Do you ever create something and find it leads to an avalanche of ideas?! It happens to me all the time. Kristie here to share another under-the-sea creation... and how you can make some "Ocean Magic" in your Cre8time.

This all started when I was working on another mixed-media piece featuring a lovely handmade resin casting of a starfish which was an old refrigerator magnet I retired to my crafty stash {CLICK HERE if you missed it}.

Let me show you how easy it is!

First, we need a LOT of molds... a LOT! Let's start by molding some seashells with Amazing Mold Putty {CLICK HERE to view how to quick and easy it is to make a mold}. 


Remember, when making molds for mixed media, all sides of the object can be used!


Just look at all that yummy texture – and beautiful details!


I especially love this one!

Now we need castings of the seashells.


Begin with pouring equal amounts of Part "A" and Part "B" of Amazing Casting Resin {CLICK HERE to view mixing and preparation}. 


In a larger cup, combine both parts and stir for two minutes... then pour in to molds!


Wait until it resin cures and turns an opaque white – 
now you have amazing castings to use in your art!


I paint all the castings with gesso.


While that dries, we need to prep our substrate {for this project I've used the back of a small canvas}. Use modeling paste through a stencil. This is one of my stencil designs called "30 Point Mandala" on the outside edge.


In the center of the canvas, I used another one
of my stencil designs called "Symmetrical Waves".


Once modeling paste is dry, paint the entire surface with gesso.


Once the gesso is dry, I painted the canvas with a variety of Art Anthology paints.


I start to add the primed resin casts and painting them as I go.


On the starfish, I used a combination: first some alcohol ink,
then when dry, adding sparking minx by Art Anthology.


Then I used some metallic rubs to highlight the details.


I added some small seashells, sea glass and
some mesh to further enhance that ocean feel...


and more metallic rubs to highlight all the great texture on the seashells!


How's that for some "Ocean Magic"! Another undersea creation featuring my seahorse! The wonder of Amazing Mold Putty and Amazing Casting Resin – you can create a mold, and use an object more than once, in so many ways! 

What will you create using these

Thank you so much for stopping by today! Kristie

To see more of my work, please visit my blog, "The Scrapinater", 
over on my YouTube Channel or on Instagram.

• • • • • • • • • • • • • • • • •

Don't forget to subscribe to our blog on the right side bar:
Twitter at AmazingCasting | Facebook at AmazingMoldPutty | YouTube at AmazingMoldPutty
Related Posts Plugin for WordPress, Blogger...