Showing posts with label embellishments. Show all posts

Monday, April 30

A #Cre8time Angel in Disguise... AMAZING Inspiration by Michele Kosciolek

Hello friends! Michele back again with another way I've used casts of my butterfly – but this time just the wings...


For the project I am sharing today, I poured Amazing Casting Resin into just in the wings so they would be two separate pieces.


Here is a little reminder of the original mold.
CLICK HERE in case you missed it.


The wings bring my angel to life combined with some Tim Holtz Ideology bits, an Um Wow Studio chipboard word, Art Alchemy wax and Dina Wakley paint. The Art Alchemy wax and Distress glitter on the wings show the detail of the resin cast wings so well!


A little cheese cloth and thread make my angel in disguise pop! There are so many ways to use your molds, just a little thinking outside the box and viola!

What are you molding/casting
for use in mixed media?

Thanks for coming back to see what I have been up too!!
Until next time... Michele

For more projects and inspiration please visit my blog "Stuff by Belle"
or follow on Facebook: https://www.facebook.com/michele.kosciolek

• • • • • • • • • • • • 

Don't forget to subscribe to our blog on the right side bar:
Twitter at AmazingCasting | Facebook at AmazingMoldPutty | YouTube at AmazingMoldPutty

Tuesday, April 24

#Cre8time Explorations... DIY Butterflies with Michele Kosciolek

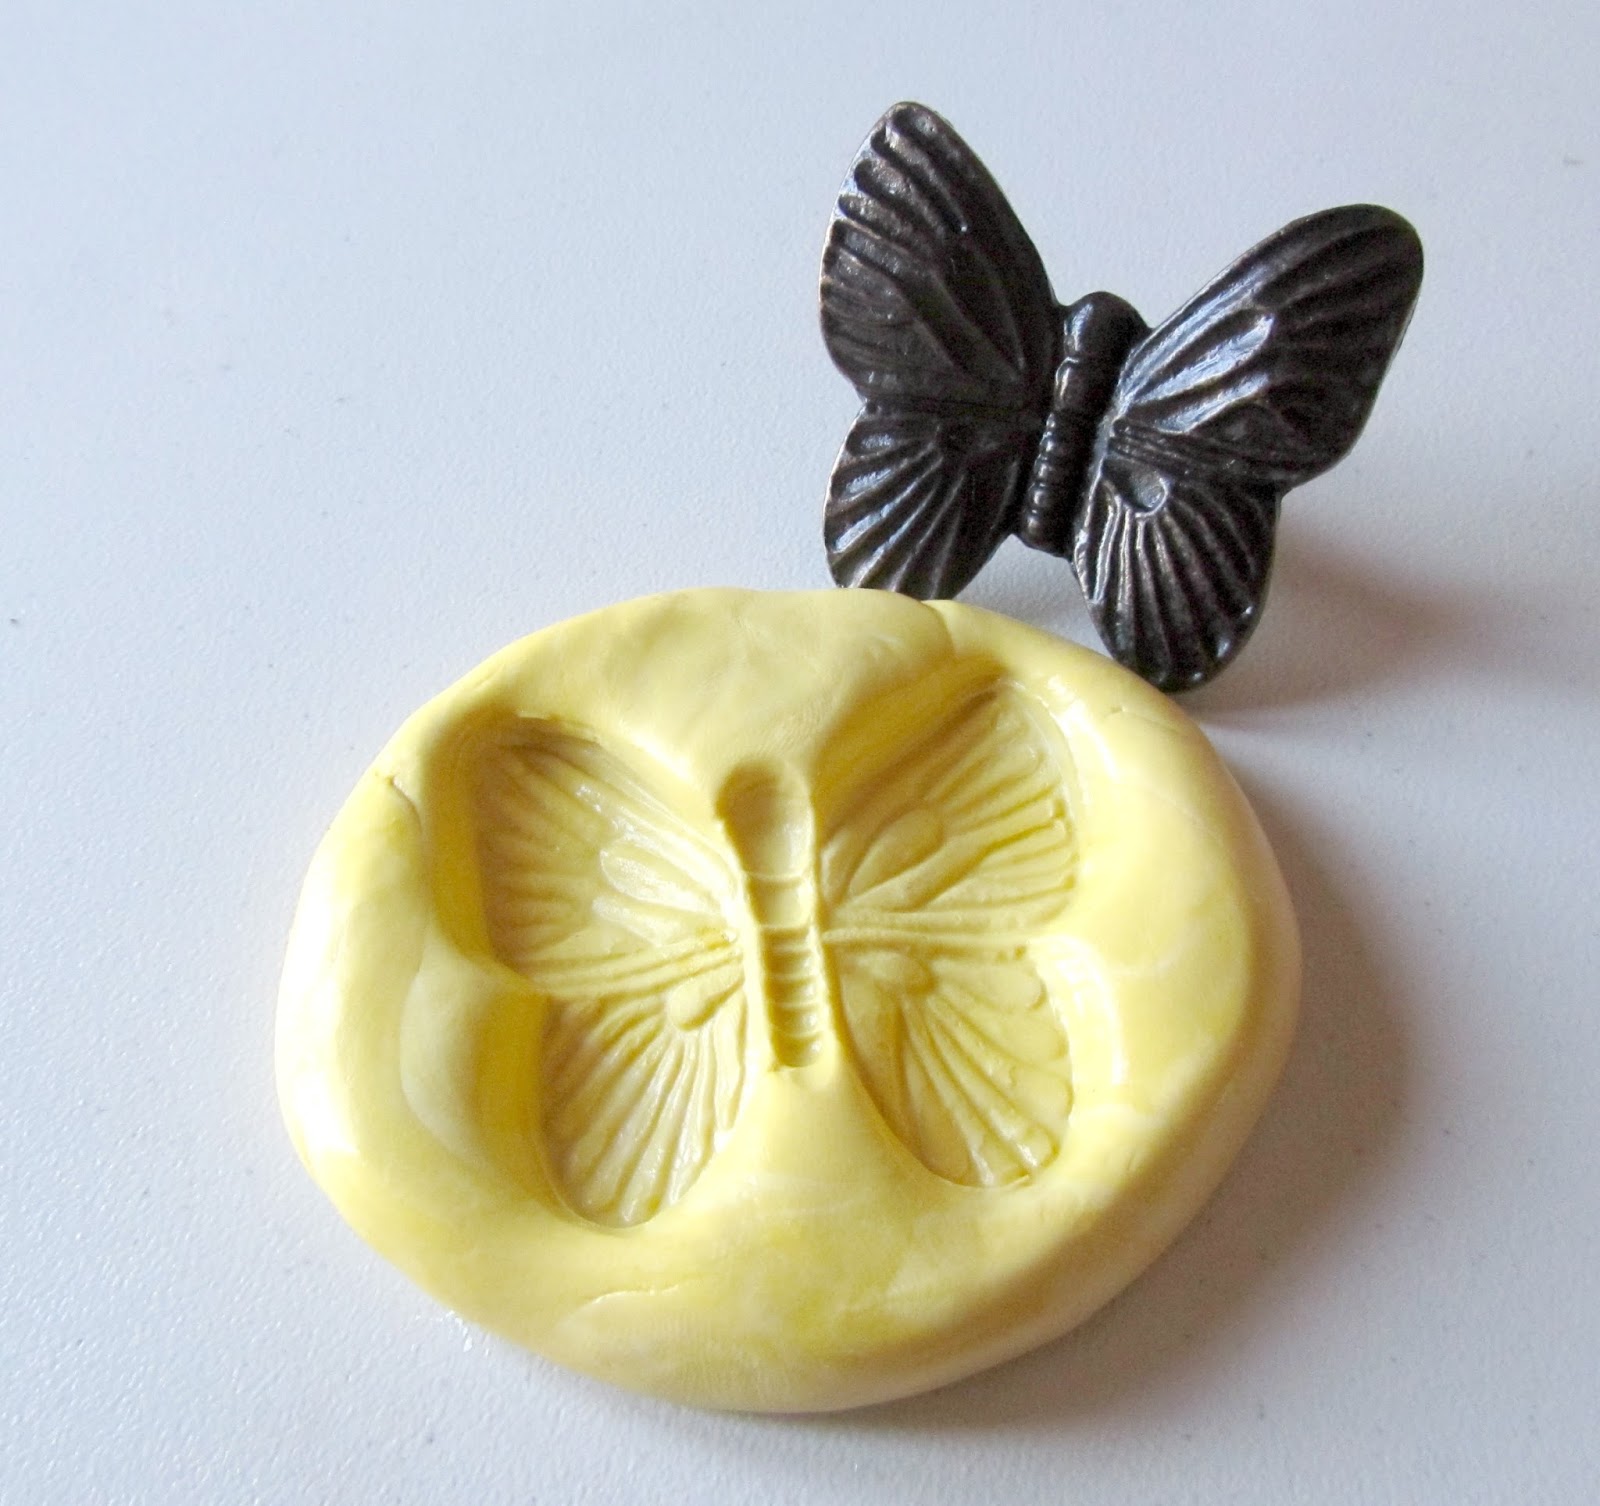
Hello friends! Michele here... I am in spring cleaning mode in my craft room and came across a butterfly knob that I stashed away to mold on a rainy day. Well since I found it and it happened to be raining, I got busy molding and casting.


I used Amazing Mold Putty to mold the knob.


I sized my mold putty just a tad smaller than the knob.


Because when you push item into
the Amazing Mold Putty it will spread.


Just look at all the detail! This mold can be used a couple of ways, to mold the entire butterfly or just the wings.


Next I cast with Amazing Clear Cast Resin, but first I painted some Alumilite Pearlescent Powder in the mold.


First the pearlescent on the wings, and then
a little bronze metallic powder on the body.


I mixed the Amazing Clear Cast Resin and poured into the mold – right over the powder.


I had a bit of the resin left so I grabbed a dictionary page that I want to use as a page in a book I will be making at a workshop this month... never waste leftovers!!


For the next casting, I used Amazing Casting Resin mixed with brown Alumilite DyeI wanted it to look like Bronze so first I used the Bronze Metallic Powder in the mold.


These two casts from the same mold turned out so different!!


The Amazing Clear Cast Resin with powder...


and the Amazing Casting Resin with the metallic powder and dye.


I am really looking forward to seeing how using
 just the wings works out too. What a versatile mold!


Be on the look out for these on future projects!!

What found objects would
you mold for Cre8time play?

Thanks for sharing part of you day with us!!!
Until next time... Michele

For more projects and inspiration please visit my blog "Stuff by Belle"
or follow on Facebook: https://www.facebook.com/michele.kosciolek

• • • • • • • • • • • • 

Don't forget to subscribe to our blog on the right side bar:
Twitter at AmazingCasting | Facebook at AmazingMoldPutty | YouTube at AmazingMoldPutty

Sunday, April 1

#Cre8time Transformations... DIY Easter Gift by Brenda Burfeind


Good day and Happy Easter everyone! Brenda here and today I want to share a project I made for my Mom for Easter. I received this cross awhile back and I love it dearly, but it's a bit heavy. Of course, since the Amazing Casting Resin is so lightweight, I decided to use it to make a lighter version of the cross to use as an embellishment.


I started with my Amazing Mold Putty and making a mold for my cross. Since the cross is a bit larger I had to mold it in chunks. You don't want to try to mold something bigger all at once since the mold putty sets up rather quickly {CLICK HERE to view mixing/preparation}. I started with the top half and let it set up; then mixed up another batch and pressed it onto the started portion and formed around to complete the bottom half.


After I mixed up a batch of Amazing Casting Resin colored with a little bit of Bubblegum Alumidust. CLICK HERE to view mixing/preparation. I poured the resin into my mold and it sets up within 10-15 minutes. I can't wait to pull it out of the mold!


The cross has so much detail, but it's hard to see like this!


For Christmas I received some Art-C products that I have been dying to try out. They are similar to rub and buff and I knew these would bring out the beauty and detail of this cross.


The gold and silver combination is stunning!


Now here you can see how "thick" the original cross is – and I can control how "thick" or "skinny" I want to make my resin duplicate within the mold by how much or how little resin I pour into my mold.


Because the resin piece is so lightweight I was able to attach it to my paper flower heart with just some hot glue without "smashing" the roses. I put a hanger on the back and its ready for gifting!


I hope you've enjoyed this tutorial. I would love to see some of your creations using Amazing Casting Products. Please leave me a comment with a link to your project and I will be sure to check it out.

Until next time... Happy Crafting!
Brenda with Creativity is a State of Mind 

• • • • • • • • • • • • • • • • •

Don't forget to subscribe to our blog on the right side bar:
Twitter at AmazingCasting | Facebook at AmazingMoldPutty | YouTube at AmazingMoldPutty

Tuesday, March 6

How does your #Cre8time Garden Grow... Amazing Inspiration from Susan M. Brown {sbartist}


Hello Everyone... Susan here sharing some amazing inspiration... an upcycled mixed media project full of sunshine using Amazing Casting Products!

This project is a compilation of bits of this and that on my craft room table inspired by some castings of a house created from an embroidery kit frame molded using Amazing Mold Putty. I had one of these in a baggy with some scraps of papers, embellishments and ribbon – seems like a perfect time to do some Cre8time SPRING cleaning!


I monoprinted a pattern onto a leftover section of muslin fabric using my Amazing No-Gelatin Rubber Plate impressed with large bubble wrap into the white paint to make a nice muted sky background. To this I add some stamped foilage and stencil sprayed sunrays, then begin layering my assortment of ephemera, trim, gems and dimensional items.

I cut a section of painted patterned paper to fit behind my cast resin house. Inside a cast resin domino with sticky back gems for window {molded in Amazing Mold Rubber cast in Amazing Casting Resin}, a mini metal bicycle charm, green burlap trim, and pen doodling make this house a home... topped off with a green gingham bow! With the addition of a pearled flower as a "sun"... this sunny garden scene is complete!


I hope you enjoyed this mixed-media garden I've created
from an assortment of leftovers in my Cre8time stash. 

What kind of garden would you create? 

Thanks for visiting. If you would like to see more of my creations,
please visit my blog sbartist : painting in the dark by clicking here. ~ Susan


• • • • • • • • • • • • • • • • •

Don't forget to subscribe to our blog on the right side bar:
Twitter at AmazingCasting | Facebook at AmazingMoldPutty | YouTube at AmazingMoldPutty

Monday, March 5

WOODen it be #Cre8time Lovely... 3 Resin and Wood Projects by Cat Kerr


Hello Amazing Makers! What WOOD you do with Amazing Clear Cast Resin in your Cre8time?! Today mixed-media artist Cat Kerr shares a few easy ways to use resin in your craft projects combined with a variety of wood and natural items.

Sit back and enjoy viewing this video from Cat Kerr featuring "3 Resin and Wood Projects". We hope you are inspired to add a POP of Amazing Clear Cast Resin to your creations!


If you are having trouble viewing video, please click HERE.

Thank you so much for watching!! If you love these resin techniques and would like to learn more... please check out Cat Kerr's "3 Resin and Wire Project Ideas" video by clicking HERE.

What are you creating today
with wood and resin?

To see more of Cat's work, we encourage you to take time to visit CatKerr.com or her blog and see what other amazing things she is up to.


• • • • • • • • • • • • • • • • •

Don't forget to subscribe to our blog on the right side bar:
Twitter at AmazingCasting | Facebook at AmazingMoldPutty | YouTube at AmazingMoldPutty

Wednesday, February 14

Like Honey to a #Cre8time Bee... DIY Valentine's Crown by Lyn Gill


Hi everyone! Lyn here again and this time I've got a really cute project to share using Amazing Casting Products just in time for Valentine's Day! 


It started out with this 5" x 6" crown shaped chipboard
"canvas" for lack of a better term.


Now first I started off with this vintage Chalkware Salt Shaker that I picked up at a thrift store a few years ago – cute isn't he? Well I needed him to be flat on the back and light enough to use on the project... so out came the Amazing Mold Putty

I quickly molded him making sure the Amazing Mold Putty covered him at least half way up the sides, then layed him down on the table to flatten the back of the putty so I could pour him "level" when filling with resin. 


Once cured, I removed the salt shaker from the mold and then mixed some Amazing Casting Resin and also made a couple of bees using another mold from a previous project. These resin castings are ready to use in about 10 minutes.


Using a honeycomb stencil and some modeling paste, I added some texture to the background. Then I decided on the placement of the handmade elements for my design.


I glued down the elements then added some graphite texture paste around them and around the edges and let it all dry.


Then I covered the entire piece with some Gesso
to give a uniform surface to paint on.


Now the fun begins! I painted the entire piece with some yellow acrylic paint, followed by some orange acrylic paint, and then spritzed the entire piece with some water and let it run down the "canvas". I finished it off with a little spray with some pearl shimmer and some Silver Spark Metallic Luster.


Now for the finishing touch! I mixed up some Amazing Clear Cast Resin with a bit of Alumilite Dye (yellow with the tiniest touch of orange), and let it set in the mixing cup for roughly an hour to thicken up – I needed it to to be thick and not runny for this step. 


I placed "drips" of this "honey" in some strategic places and the tilted the "canvas" at an angle so the "honey" would "drip". You need the resin to be thick in order for it not to run off your piece and not level out.


Cute isn't it?! I think so...

what will you make for your Valentine?

Hope you have a sweet Valentine's Day!
Till Next Time! Lyn

You can find more of my work on my blog LynzCraftz
or on YouTube LynzCraftz, or my Facebook page LynzCraftz.

• • • • • • • • • • • • • • • • •

Don't forget to subscribe to our blog on the right side bar:
Twitter at AmazingCasting | Facebook at AmazingMoldPutty | YouTube at AmazingMoldPutty

Tuesday, February 13

#Cre8time with a Little Heart... DIY Resin Hearts by Tracy Alden


Hello! Tracy here with a fun tutorial using Amazing Casting Products! Sometimes I find myself making art at the spur of the moment, with a shape or color being my inspiration. This tutorial was a result of wanting a bright and cheerful Valentine's Day decoration for display in the Amazing Casting Products booth at Creativation.


If you were able to attend Creativation in Phoenix (January 20-22, 2018) and happened to drop by the Alumilite/Amazing Casting Products Booth #2214, you would have seen a wonderful selection of art from our Creative Team. You might have seen on display a bowl full of decorative resin hearts I had created. 

There was such a positive response to these quick and easy hearts – people loved picking them up and looking at the play of light. So I decided to share how quick and easy it is to make them!

Supplies: 


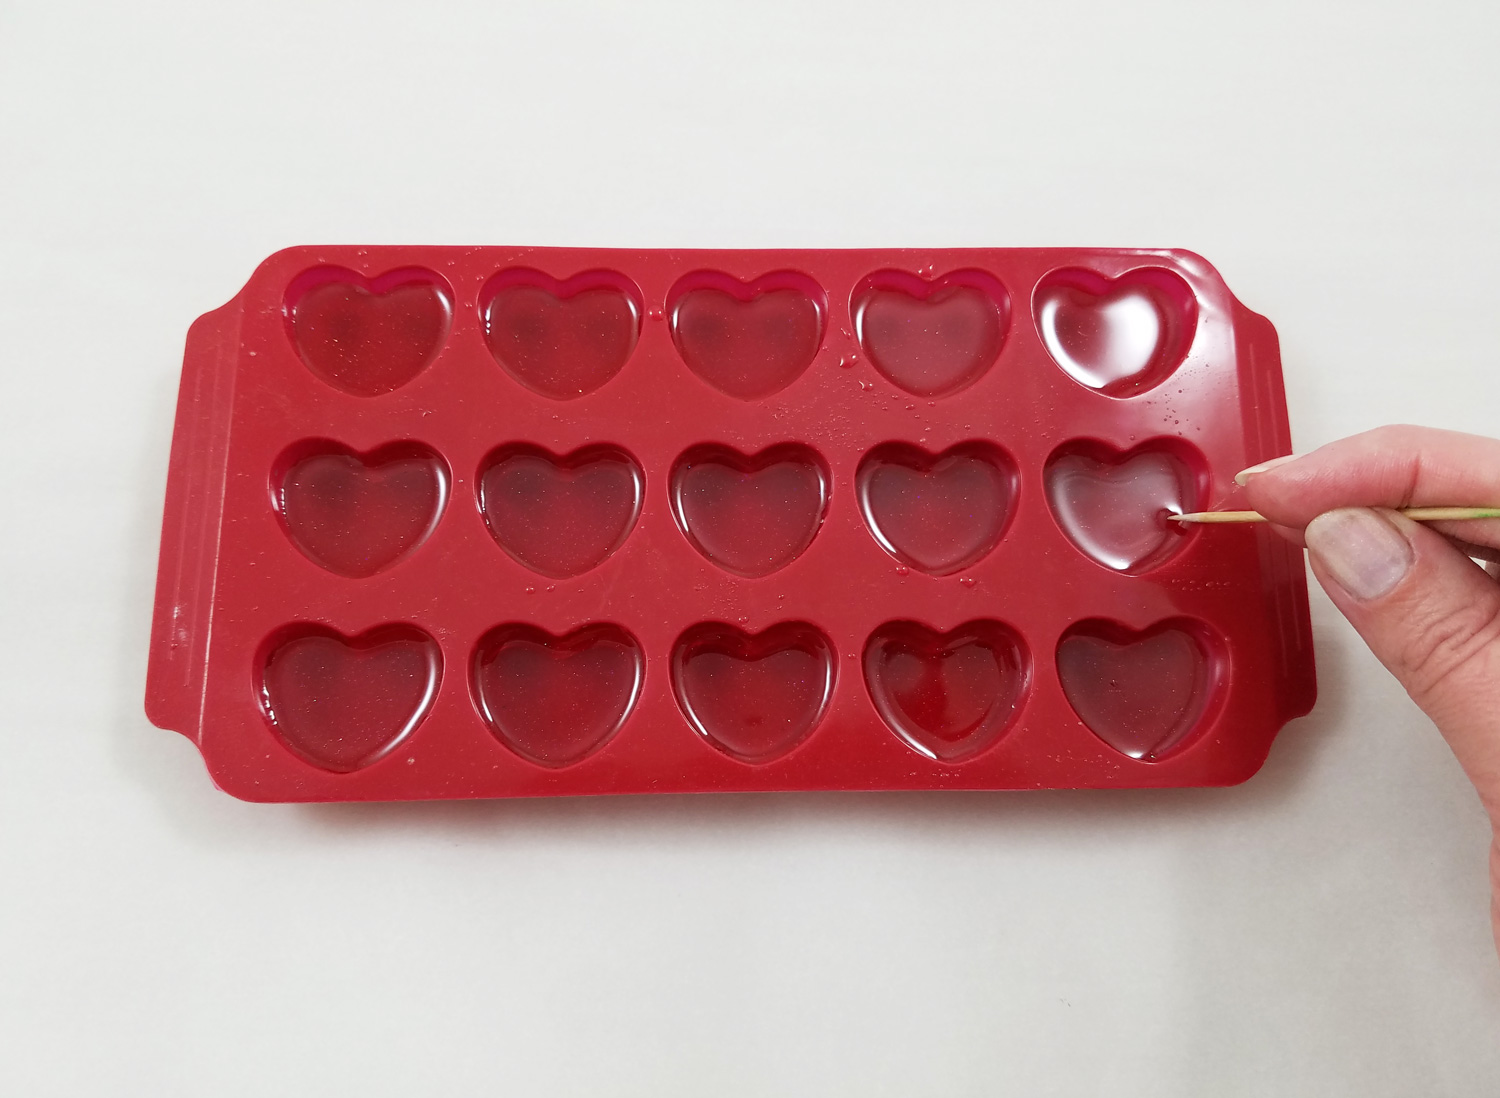
The hearts in this project were made using this ice cube tray I bought from IKEA. The cube shapes are very smooth, small, and perfect shape to pour resin. This particular ice cube tray is make from a synthetic rubber, so it did not need a mold release. 

**A TIP** If you are not sure what your ice cube tray is made from, test by applying a small amount of resin the the backside of the mold and let it cure completely. If it peels off easily when cured, you don't need a mold release... though if it sticks, then I recommend using Alumilite's UMR as a mold release.


To create the different color hearts I made several different color recipes. First we have Alumilite Violet Dye with Amazing Clear Cast Resin and glitter (on left); and a variation of this is including the addition of Pearl Alumidust (on right).


I repeated this process this time adding Alumilite Red Dye to the Amazing Clear Cast Resin, then glitter, and again the variation of this (seen on right) with the addition of Pearl Alumidust.


Getting a bright glittery or shimmery white is just as easy with Amazing Clear Cast Resin. Alumilite White Dye is opaque and not clear/transluscent like the other dyes – so to get a bit more of a pop of color and shimmer I added glitter and Pearl Alumidust. On the left I used Interference Red Alumidust which gives the resin a brighter, slightly pink shimmer; and the variation on the right uses Pearl Alumidust, which resulted in a softer white and less intense shimmer.


To fill this entire ice cube tray with resin hearts, I mixed up 4 fluid ounces of Amazing Clear Cast Resin – making sure to slowly stir to reduce air bubbles and let it sit for 5 minutes (CLICK HERE to view mixing and preparation). I used just *ONE* drop of Alumilite dye for that much resin to get the vivid red you see in the photo. I added some micro fine glitter and slowly stirred.

REMEMBER... Alumilite Dye is super concentrated and a little goes a long way!


Carefully, I poured the tinted Amazing Clear Cast Resin into the ice cube mold. Bubbles that formed in the pouring process that don't pop on their own can be removed with a simple pass of a heat gun or can be popped using a toothpick. I let the resin cure fully before removing them from the mold.


I repeated filling and casting the ice cube mold several times until I had a bowl full of bright and cheerful hearts. Being that Amazing Clear Cast Resin is FDA compliant, you can put them in a vase with flowers with no worry of the resin causing issues with the flowers. 

Now don't think they are only decor... by drilling a hole into each heart you can create beads for jewelry or small charms for gifts!

What AMAZING Valentine
jewels will you create?

Visit my blog Art Resurrected for more craft tutorials!

Happy Valentine's Day! Until next time, safe travels! ~ Tracy

• • • • • • • • • • • • • • • • •

Don't forget to subscribe to our blog on the right side bar:
Twitter at AmazingCasting | Facebook at AmazingMoldPutty | YouTube at AmazingMoldPutty
Related Posts Plugin for WordPress, Blogger...