Showing posts with label Alumilite Metallic Powder. Show all posts

Tuesday, April 24

#Cre8time Explorations... DIY Butterflies with Michele Kosciolek

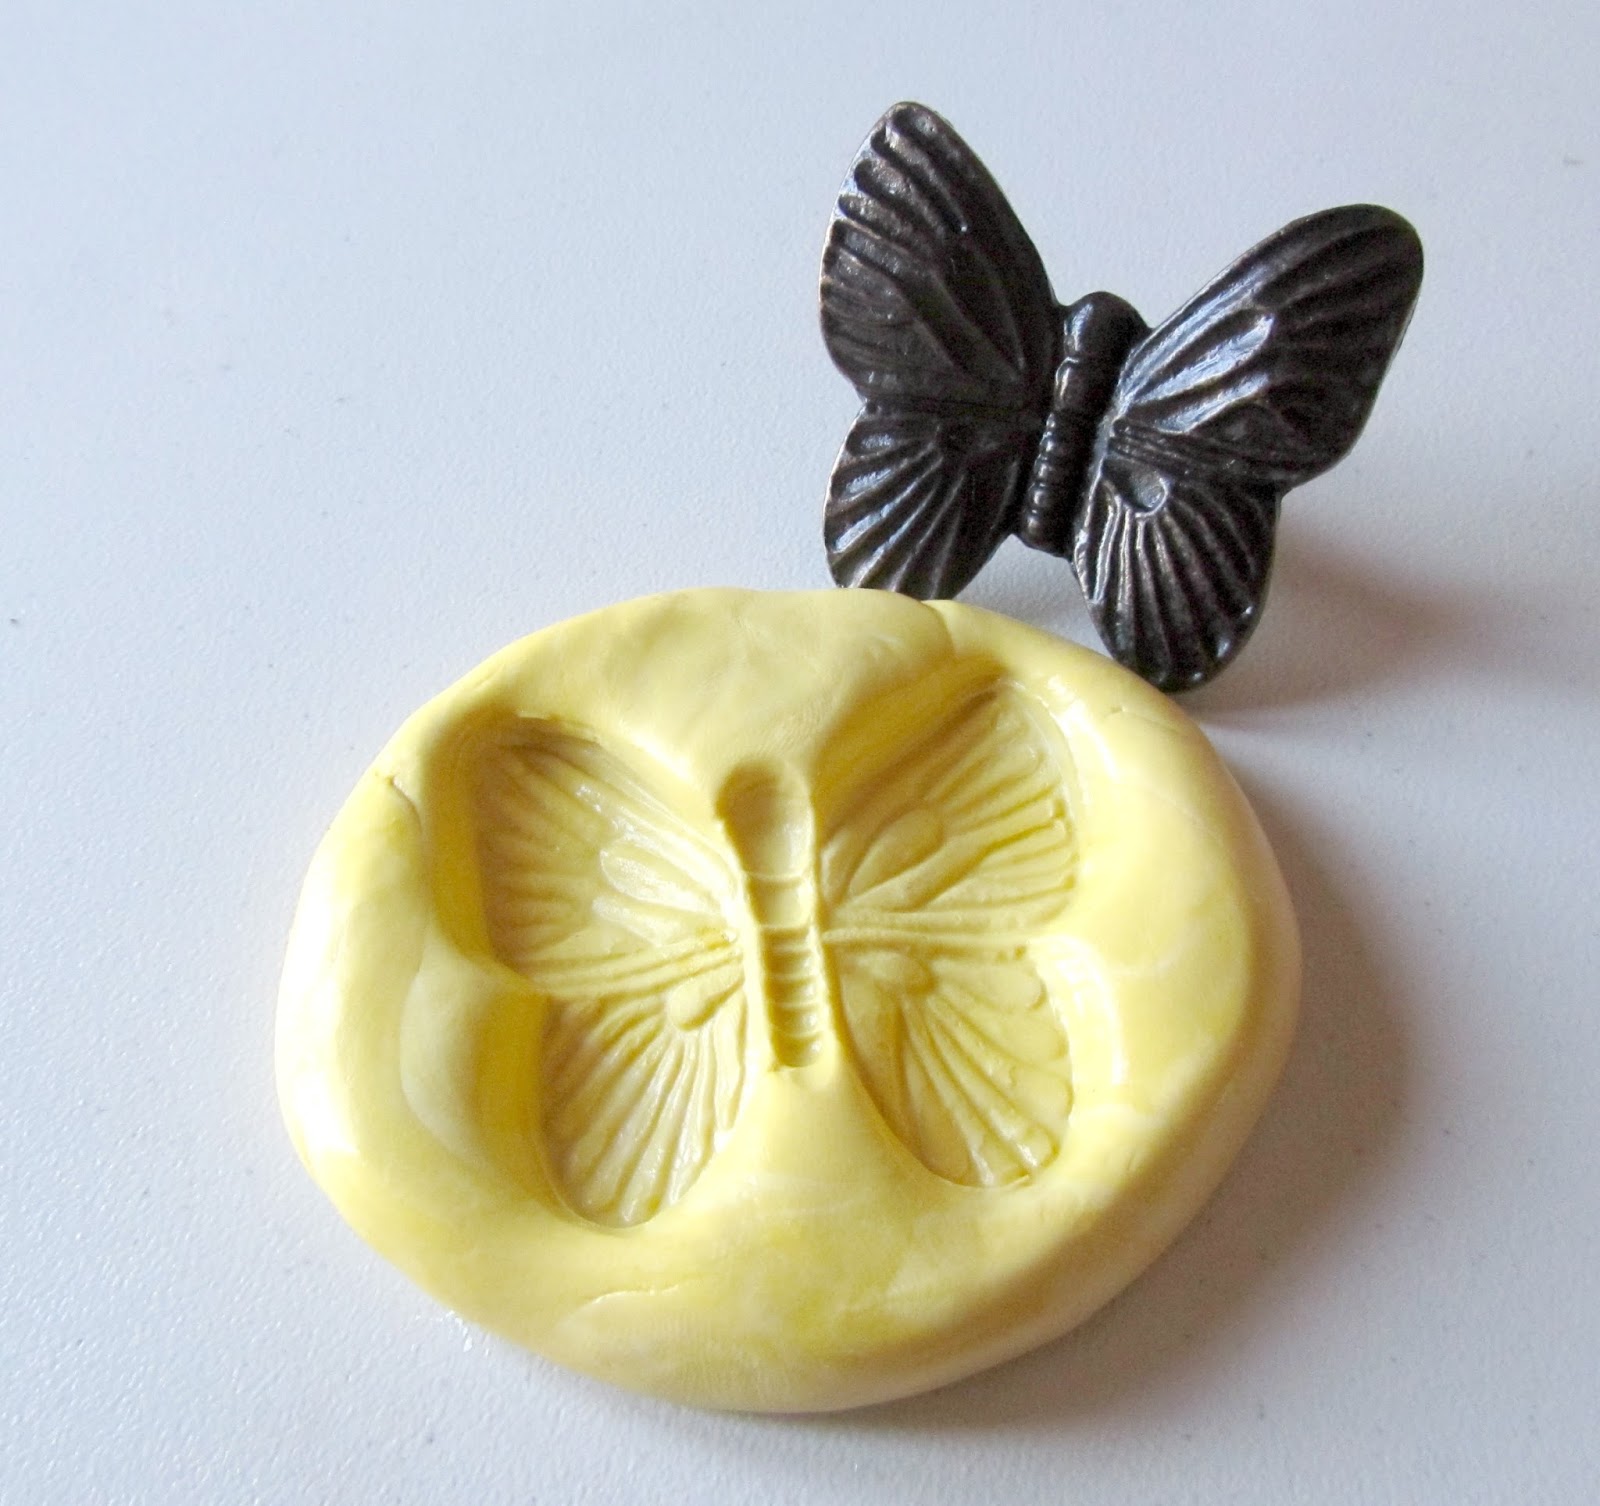
Hello friends! Michele here... I am in spring cleaning mode in my craft room and came across a butterfly knob that I stashed away to mold on a rainy day. Well since I found it and it happened to be raining, I got busy molding and casting.


I used Amazing Mold Putty to mold the knob.


I sized my mold putty just a tad smaller than the knob.


Because when you push item into
the Amazing Mold Putty it will spread.


Just look at all the detail! This mold can be used a couple of ways, to mold the entire butterfly or just the wings.


Next I cast with Amazing Clear Cast Resin, but first I painted some Alumilite Pearlescent Powder in the mold.


First the pearlescent on the wings, and then
a little bronze metallic powder on the body.


I mixed the Amazing Clear Cast Resin and poured into the mold – right over the powder.


I had a bit of the resin left so I grabbed a dictionary page that I want to use as a page in a book I will be making at a workshop this month... never waste leftovers!!


For the next casting, I used Amazing Casting Resin mixed with brown Alumilite DyeI wanted it to look like Bronze so first I used the Bronze Metallic Powder in the mold.


These two casts from the same mold turned out so different!!


The Amazing Clear Cast Resin with powder...


and the Amazing Casting Resin with the metallic powder and dye.


I am really looking forward to seeing how using
 just the wings works out too. What a versatile mold!


Be on the look out for these on future projects!!

What found objects would
you mold for Cre8time play?

Thanks for sharing part of you day with us!!!
Until next time... Michele

For more projects and inspiration please visit my blog "Stuff by Belle"
or follow on Facebook: https://www.facebook.com/michele.kosciolek

• • • • • • • • • • • • 

Don't forget to subscribe to our blog on the right side bar:
Twitter at AmazingCasting | Facebook at AmazingMoldPutty | YouTube at AmazingMoldPutty

Friday, January 6

Travel through #Cre8time with #Resin filled Talismans... by Tracy Alden


Hello! Tracy here to share another tutorial with you! The art and history of body adornment of early humans has always been an interest and inspiration to me. Tiny bits of bone, stones and shells were the most common items to be made into talismans, symbols of status and importance by our early ancestors. Harking back to a bygone time I created a small collection of faux pebbles talismans with a modern spin with the help of Amazing Casting Products

Supplies: 


Using a pasta machine (devoted to craft use only) set on the thickest setting, I conditioned some translucent polymer clay. I added small amounts of different colored polymer clay and a tiny bit of ground pepper to each ball of translucent clay. I mixed each ball of clay just enough to tint the clay and encapsulate the black pepper. The swirls of not completely blended clay and black pepper will help create the illusion of natural stone. 


I carefully pressed each ball of clay into a rough pebble shape and poked a hole through the top of each faux pebble. Using a stylus, toothbrush, dotting tools and more I textured each pebble pendant front, back and edges, which creates the effect of raw unpolished stone.

* If you rather have the look of smooth river stones skip this step of adding surface texture.


Using the 4 Piece Carver Set, I carefully carved and pressed into each clay pendant a rustic art design. I was careful to cup the uncured clay pendants in my hand while carving as to not loose my surface texture I created in the previous step. I wasn't worried about making the designs super detailed or clean as these were intended to look ancient.


Using small soft paint brushes I added Alumilite Metallic Powder and Alumidust into the carved elements on the pendants. The metallic powder bonds to the uncured polymer clay without the addition of a glue or sealant. By placing the polymer clay pieces on a paper towel I would make sure the pieces in the curing process would not lose their textured surface on the side laying flat against the tile. I then put the tile with the pendants and clay into a toaster oven, per manufacturer instructions, to cure.


Once the polymer pieces were cured and cool to the touch, I used the 1500 sanding pad from the Alumilite Polishing Kit. I sanded the front, sides and back of the polymer clay pebbles pendant just enough to remove any uneven edges created in the texture process. To remove any sanding dust I gently washed the pieces in water using my fingers to remove the sanding dust and let them dry. 


I mixed up a small portion of Amazing Clear Cast Resin, making sure to slowly stir to reduce air bubbles and let it sit for 5 minutes. Using a toothpick, I put a tiny drops of Yellow, Purple and Ocean Blue Alumilite Dye each into a small mixing cup and poured a portion of the pre-mixed resin in it. I used a toothpick to carefully drop tiny amounts of tinted resin into the carved designs on the pedant surfaces. The metallic powders acted as a lovely reflective element magnified by the resin. I let the resin cure completely. 

* Any drips made outside of the carved elements I cleaned up with a baby wipe. 


I strung the pendants onto hemp and linen jewelry cording and secured them in place with a Lark's Head knot. I added a few beads and my talisman necklaces were finished! So many symbols can be quickly carved into the polymer clay to later be filled with resin... so your creative possibilities are endless!

What AMAZING arts and crafts can you create?

Visit my blog Art Resurrected for more craft tutorials!

Until next time, safe travels! ~ Tracy

• • • • • • • • • • • • • • • • •


Visit us at Booth #2813 Alumilite Corporation
{a.k.a. Amazing Casting Products}

See all five flagship products in action, try them out, and learn something totally fun and AMAZING! Stay tuned here at Amazing Casting Products for more details and sneak peeks as we approach Creativation at CHA 2017!

• • • • • • • • • • • • • • • • •

Don't forget to subscribe to our blog on the right side bar:
Twitter at AmazingCasting | Facebook at AmazingMoldPutty | YouTube at AmazingMoldPutty

Friday, September 2

#Cre8time Explorations... Amazing Resin Painted Galaxies by Lara Hjorthoy


Hi Friends! Lara here with a "How-To" project this week – something a wee bit different! I decided with all these great frames I've been collecting... I needed to put some of them to use!

I love skies, and galaxies and stars! I often paint these scenes and they're beautiful when I do. To my delight Amazing Casting Products has all these beautiful colored dyes and one of my favourite products, the Alumilite Pearlescent Powder. So, I decided this week to try CASTING my own galaxies!


I first started out with a small 5" x 7" frame that I spray painted in a lovely semi-flat black. Then attached the piece of glass to the inside of the frame with superglue. That I allowed to set overnight just to make sure there would be no weird reaction with the resin.


I added to 6 different cups a tiny amount of black, blue, violet, yellow, green and white dyes as well as a tiny amount of the pearlescent powder to each cup.

I mixed up a batch of Amazing Clear Cast Resin and after allowing the bubbles to settle for a bit, I poured a small amount of the resin to each cup – mixing each again, very thoroughly! The Pearlescent is so-o-o-o-o beautiful in all the colors! It adds just the right amount of sparkle, or in this case, STARS!!!


Upside down, right after pouring!

I poured each color separately into the frame, allowing them to mix together a bit. I used a popsicle stick to push around the resin colors that I wanted to shape a bit more. Then sat back and allowed this to cure! Here in Vancouver, the curing time wasn't long, and I was able to see the results within 4 hours.

I flipped the piece over and boy was I surprised! The pearlescent powder had settled ever so on the glass that the resin was poured onto, and I ended up achieving a crazy sparkly effect! It's gorgeous!


Since this was so reflective and hard to capture in a photo, here's a little video capturing the full sparkly effect! If you have trouble viewing video, please CLICK HERE.

Now to do larger galaxies!!!! I can't wait to make more of these... as it was so easy to make. What a dramatic piece of art to add to your wall!


Hope you enjoyed this little How-To this week!

What out of this world resin
paintings would you create???

Stay Inspired ~ Lara

Check out my website at www.larahjorthoy.com and YourToyCreation.etsy.com. You can follow my day to day creations at Facebook and Instagram, look for YourToy Creations!

• • • • • • • • • • • • • •

Don't forget to subscribe to our blog on the right side bar:
Twitter at AmazingCasting | Facebook at AmazingMoldPutty | YouTube at AmazingMoldPutty

Thursday, April 14

#Cre8time Transformations... AMAZING Copper Resin Finish by Tanya Ruffin


When I wanted to paint a piece of MDF that I had used in a previous studio space to look like copper, I never imagined how great it would turn out!

I learned a trick a long time ago that to make copper really pop you should paint your base a rust color. It took just 3 steps to achieve this great metallic finish!

Step 1. Paint surface a rust color.


Step 2. Mix your entire box of Amazing Clear Cast Resin and add a little (I used the end of a craft stick to dip) Alumilite Copper Metallic Powder. A little goes a LONG way!


Step 3. Make sure your surface is completely dry and you don't have any wet spots from cleaning. Tape off the edge of your surface and pour. You can use a foam brush or an old credit card to smooth it out.


Allow it to cure overnight. You may have some spots you need to even out later but it really does give it character. I used a file from the dollar store to clean up the edges.

And then... TADA!


The little touch up spots (see the circle above) looks awesome!


You can make your counter any color you want using the powders!

I love it!

What would you give a metallic finish?

Craft Your Own Way!

Tanya


Please visit my site to see more of my inspiring creations at www.tanyaRuffin.com

• • • • • • • • • • • • • • • • •

It's that time to have you chance to join our team of Amazing Creatives!


DEADLINE to apply is April 22, 2016.

  http://amazingmoldputty.blogspot.com/2016/04/an-amazing-opportunity-awaits.html

• • • • • • • • • • • • • • • • •

Don't forget to subscribe to our blog on the right side bar:
Twitter at AmazingCasting | Facebook at AmazingMoldPutty | YouTube at AmazingMoldPutty

Thursday, March 3

Cherish a #Cre8time Love Story... by Maria Soto


Hi, there! It's Maria again and today I want to share a fun project I've been wanting to make for quite a while. See I got this cute candle that had a cherub for a lid, very cute with wings. It was not painted at all, it was made using plaster or something similar. I wanted to make a mold of the entire cherub and debated for a while on what product to use to make the mold, so I decided to use the Amazing Mold Putty.

I made molds of different parts of the cherub at first and noticed the molds came off pretty easy using the mold putty – so I made a mold of the entire cherub with it. Well, sadly... I have to admit I didn't realize that the wings were too fragile and as I tried to remove the cherub from my mold, the wings broke off. I guess sometimes you learn from accidents – next time I will use my Amazing Mold Rubber when making molds from fragile pieces and cut the mold if needed to remove fragile pieces.

I loved how my cherub plaque came out, not sure if I'll keep it at home or at my office, but for now, it will stay home.


Here you can see all the Amazing Mold Putty molds I made from this one item filled with Amazing Casting Resin that cures in just minutes. I decided to work with the full mold of the cherub for today's project.


Here you can see the mold and the resin piece. A blank small canvas will be the perfect base for this little cherub. Time to have fun with paints... it's my favorite part after making my molds.


I first painted the entire piece with white paint. Then I just added color to it and rubbed it off... then added more and again removed as much as I could. The result I was trying to get to, was looking at my cherub as if it was rusted and aged. You can see there's a little bit of gold that comes through. I didn't paint it all gold, I just dabbed a little bit of gold on some areas. I spent quite a few days after work, painting and removing paint until I liked the end result. The canvas was painted all in blue, then I decided to add a faux pair of wings using DecoArt's crackle paint. Finished up by adding a little bit of bling, some flowers, beads and a message to my little canvas.


Trying to find a message for this piece was not easy.
All I knew is it had to be about "love".


I thought the wings needed a little bit of gold, so I used
some Alumilite Gold Metallic powder to give some color.


Here is the final piece – I really like how this little cherub turned out. It was a lot of work, but I really love how it turned out. I hope you like it as much as I do.

Materials used for this project:
  • Alumilite Gold Metallic Powder
  • Amazing Mold Putty
  • Amazing Casting Resin
  • Mixing cups and wood sticks
  • DecoArt Media: Crackle paint; acrylic paints in blue, black and white colors
  • Liquitex: Flexible modeling paste
  • Golden: Coarse molding paste; acrylic glazing liquid (satin)
  • Ranger: Patina in Verdisgris
  • Pebeo: Buttercup (gold)
  • Mini Canvas
  • Recycled material (from a bag of potatoes)
  • Paper flowers
  • Beads
  • White lace

What cherished item will you mold for arting?

Please do share your ideas with us by leaving a comment below.

Thanks for visiting! I invite you to stop over to my blog, "What is Creativity"
 at http://chuy-creativity.blogspot.com to see more of my creations.Maria Soto


• • • • • • • • • • • • • • • • •

All month long we are celebrating our favorite
molding product in all its YELLOW glory...
Amazing Mold Putty!!


Tune in via Instagram and on our Facebook Page for games and giveaways for your chance to win some AMAZING Casting Products! The more you play along and share... the more chances you have to win!!! Use the hashtag #MoldPuttyMadness when sharing.

• • • • • • • • • • • • • • • • •

Don't forget to subscribe to our blog on the right side bar:
Twitter at AmazingCasting | Facebook at AmazingMoldPutty | YouTube at AmazingMoldPutty

Friday, January 29

#Cre8time Makes in Every Color of the Rainbow... AMAZING Inspiration from Featured Artist Lara Hjorthoy


Hello Fellow Artists! Well, I'm wrapping up this month as your Featured Artist and above all, I'd like to say "Thanks!" Not just to Amazing Casting Products for giving me this exceptionally cool experience and for a chance to share my monsters and creations with all of you... but to you all as well for following along!

I've met a number of new friends and artists on Facebook and Instagram and look forward to a continued relationship, learning new things from all of your own inspirations and projects!

So, "Thank you!"

My last post this week, is an inspiration post and honestly, it was hard to choose what I would showcase! I've had SOOOOOO much inspiration using all these products and learning what they do, that my studio is overflowing! I know, I know, tough life! LOL!

What I thought I'd showcase today are some skulls. I give these little buggers away with every purchase from my etsy store – whether monster or print and up to now, these have all been hand painted white resin. I didn't know what else I could do with them!


But thanks to Amazing Casting Products, I've learned about dyes and metallic powders and colouring agents that can be used in all sorts of different ways.


As you can see from the picture, you can first mold the skulls using either the Amazing Mold Putty, or the Amazing Mold Rubber. I've got a set of both, and they are both equally strong and easy to use.
 
My first experiment was with the Amazing Clear Cast Resin and filling in the eyes of the skulls. I used in this picture, the clear cast resin, and a mix of red and yellow Alumilite Dye to colour it. These dyes are POWERFUL, and require very little and are intense beautiful colours. A set of Primary colours and you can make just about any colour combination you desire.


The white skull's eyes are the Amazing Clear Cast Resin, and the black skull is the same colour, but with a little added touch of Alumilite Pearlescent Metallic Powder. The photo doesn't show it well, sadly, but that SPARKLE! It's simply gorgeous! Adding the powder to the resin, had the added effect of really showcasing that beautiful red colour against the black. Each of the skulls were made using Amazing Casting Resin, original and dyed black.

The next set I'm showing here has a number of different combinations used! Each mold was painted with either the Alumilite Pearlescent Metallic Powder and the Bronze Metallic Powder, or with some combination of Silver Metallic Powder and Bronze. I experimented with Amazing Casting Resin and dyes and was able to create the beautiful green and purple you see in the picture. It's important to note that when using the Amazing Casting Resin with the dyes, the natural white cure of the resin, will additionally colour the resin, creating a lighter more pastel version of the dye combination you made.


I also just used solid Metallic Powder painted into the molds
to create these beautiful solid silver and bronze skulls.


These are again combinations of Metallic Powder and dyes, here I've used Amazing Clear Cast Resin and Pearlescent Metallic Powder for the red skull. Yellow and blue Alumilite Dyes used with Amazing Casting Resin, again the white cure of the resin allowed the lighter more pastel colour to shine through and I used up the last of my black dyed resin in the eyes of the yellow skull.


This is a great way to use up the last of resin you may have in cups from other projects on the go and a fun additional gift included with purchases made in your own stores!

Once again, Thank you to Amazing Casting Products for this exceptionally fun month of learning and experiments using their fantastic array of products. And to all of you for following along!

Keep in touch and follow along during my day-to-day creations at @auntyluluscolours on Instagram and at my own Blog at www.larahjorthoy.com

Stay Inspired Friends,

• • • • • • • • • • • •


I'm Lara Hjorthoy (your-toy), from Vancouver, Canada. I'm an Illustrator, Sculptor, and Makeup Artist! Also work part-time as a retail sales clerk for Opus Art Supplies, on beautiful Granville Island.

After a life long addiction to drawing and art, I spent a year in beauty and special FX makeup school and solidified another great love... sculpture... and zombies!

Now I spend my time, sculpting and molding cute creatures of all kinds, (available for sale at my Etsy Shop: YourToyCreations.etsy.com, painting calm and whimsical worlds and occasionally creating zombie madness! Learning resin and mold making is taking all these worlds to whole new levels!! You can check out my works and Blog at www.larahjorthoy.com or my day to day art stuff at Instagram.com/auntyluluscolours.

• • • • • • • • • • • • 

Thanks so much for dropping by today as we wrap up this month with some amazing inspiration! We would like to give a huge THANK YOU to Lara Hjorthoy for sharing her amazing creative talents with us. We hope you enjoyed the work and inspiration from Lara... I know we certainly have!  CLICK HERE to head on over to Lara's Blog larahjorthoy.com to see more of her fabulous work, or pop over to her feed on Instagram to catch her latest creations and sneak peeks of what she's working on!

Have a fabulous day! :) Sb
Related Posts Plugin for WordPress, Blogger...