Showing posts with label Alumilite Dyes. Show all posts

Friday, March 30

There are no "BAD" Eggs... Amazing Inspiration by Tracy Krueger


I'm baaaack! It's Tracy here and I'm going to share a couple of "bad" eggs... ideas that were in my mind, though didn't necessarily come to fruition. Believe me when I say, I will keep on trying these until they work out just how I want them – LOL!


My first egg was trying to get Amazing Casting Resin to look like a cracked egg. First I used Amazing Mold Rubber to mold a plastic egg. Then I mixed up equal parts of Amazing Casting Resin and gently poured it into the mold. As it was curing, I "rolled" the mold back and forth to get it to coat just the sides and bottom.


Even though it didn't quite turn out like I imagined – I wanted to decorate it somehow.  So I mixed up a couple of small batches of Amazing Clear Cast Resin colored them with blue and violet Alumilite Dye. I turned the faux cracked egg upside down and drizzled the resin over the egg.


After everything cured, it created an interesting piece.


My second and third try was to create a clear egg with swirls of color. I used the same egg mold that I created, mixed equal parts of Amazing Clear Cast Resin and poured it into the mold. I then mixed up a couple of smaller batches of Amazing Clear Cast again and colored them with blue and violet Alumilite Dye.

In one of the tries: I poured a little of the colored resin on the top and took a popsicle stick and gently swirled the color around (trying not to "mix" it up).


Since this didn't give me the effect I was going for... I gave it another try – this time I mixed up Amazing Clear Cast Resin, and only filled the mold 1/2 way. Then I added and swirled in the colored resin, then filled it up with more clear resin. It still didn't give me what I was looking for, but it is pretty.

I'll keep trying! Where there is a will, there is a way....

What kind of resin projects
are you working on?

Have fun creating! ~ Tracy

You can find more of my work on my Blog:
http://tracykrueger-nine.blogspot.com/2017/

• • • • • • • • • • • • • • • • •


Don't forget to subscribe to our blog on the right side bar:
Twitter at AmazingCasting | Facebook at AmazingMoldPutty | YouTube at AmazingMoldPutty

Monday, March 26

#Cre8time Egg Decorating... AMAZING Easter Ornaments by Tracy Krueger

Hello, it's Tracy here! Being that Easter is right around the corner, I was trying to think of a quick and fun Egg decorating project. My kids are grown so we don't decorate real eggs anymore.


Then the simplest idea came to me! I have a mold that I had made out of a cut piece of brass (to make a Christmas ornament) and it has an Egg shape. I first mixed two equal parts of Amazing Casting Resin and poured it into my mold to give it a "egg base". I just love watching the Casting Resin cure... don't you :-)


After this base egg cured (I gave it about 15 minutes), I gathered three of my Alumilite Dyes that would be good for Easter – Blue, Purple and Yellow. I poured out very small equal portions of Amazing Casting Resin and squeezed out a tiny drop of each color into part "A" of the resin, then stirred color completely before adding part "B". CLICK HERE to view mixing/preparation.


The first color I mixed up was the yellow, and poured
random lines on top of my white cured resin.


As the yellow was curing, I was thinking "there has to be a better way to have more control over the colored resin". Awhile back I bought a bunch of disposable pipettes, so after the yellow cured, I mixed up the blue dyed resin and used the pipette to draw where I wanted my colored resin to go. It worked beautifully! I just love how I got some green where the blue was over the yellow.


Now I just had purple left. I mixed it up and used another pipette to squeeze the purple where I wanted. As always I kept a spare mold around to pour the extra resin in.


Once I was done applying the three resin colors, I let the whole thing cure for a couple of hours to make sure everything was set totally.


I took it out of the mold and trimmed the back a little, then drilled a hole in the top. I grabbed my sari ribbons and cut a small piece of a greenish/blue colored one.


I really like how this turned out.
It has kind of a watercolor look about it.


Isn't it fun that you can mix up your Holidays and make decorations for both?! I had quite a few more ideas, but have had a hard time getting them to come to fruition. I'll be back soon to share a few of my bad EGGS. 

How are you decorating for Easter?

Have fun! ~ Tracy

You can find more of my work on my Blog:
http://tracykrueger-nine.blogspot.com/2017/

• • • • • • • • • • • • • • • • •


Don't forget to subscribe to our blog on the right side bar:
Twitter at AmazingCasting | Facebook at AmazingMoldPutty | YouTube at AmazingMoldPutty

Wednesday, February 14

Like Honey to a #Cre8time Bee... DIY Valentine's Crown by Lyn Gill


Hi everyone! Lyn here again and this time I've got a really cute project to share using Amazing Casting Products just in time for Valentine's Day! 


It started out with this 5" x 6" crown shaped chipboard
"canvas" for lack of a better term.


Now first I started off with this vintage Chalkware Salt Shaker that I picked up at a thrift store a few years ago – cute isn't he? Well I needed him to be flat on the back and light enough to use on the project... so out came the Amazing Mold Putty

I quickly molded him making sure the Amazing Mold Putty covered him at least half way up the sides, then layed him down on the table to flatten the back of the putty so I could pour him "level" when filling with resin. 


Once cured, I removed the salt shaker from the mold and then mixed some Amazing Casting Resin and also made a couple of bees using another mold from a previous project. These resin castings are ready to use in about 10 minutes.


Using a honeycomb stencil and some modeling paste, I added some texture to the background. Then I decided on the placement of the handmade elements for my design.


I glued down the elements then added some graphite texture paste around them and around the edges and let it all dry.


Then I covered the entire piece with some Gesso
to give a uniform surface to paint on.


Now the fun begins! I painted the entire piece with some yellow acrylic paint, followed by some orange acrylic paint, and then spritzed the entire piece with some water and let it run down the "canvas". I finished it off with a little spray with some pearl shimmer and some Silver Spark Metallic Luster.


Now for the finishing touch! I mixed up some Amazing Clear Cast Resin with a bit of Alumilite Dye (yellow with the tiniest touch of orange), and let it set in the mixing cup for roughly an hour to thicken up – I needed it to to be thick and not runny for this step. 


I placed "drips" of this "honey" in some strategic places and the tilted the "canvas" at an angle so the "honey" would "drip". You need the resin to be thick in order for it not to run off your piece and not level out.


Cute isn't it?! I think so...

what will you make for your Valentine?

Hope you have a sweet Valentine's Day!
Till Next Time! Lyn

You can find more of my work on my blog LynzCraftz
or on YouTube LynzCraftz, or my Facebook page LynzCraftz.

• • • • • • • • • • • • • • • • •

Don't forget to subscribe to our blog on the right side bar:
Twitter at AmazingCasting | Facebook at AmazingMoldPutty | YouTube at AmazingMoldPutty

Wednesday, December 20

How #Cre8time Charming... AMAZING Inspiration by Lyn Gill


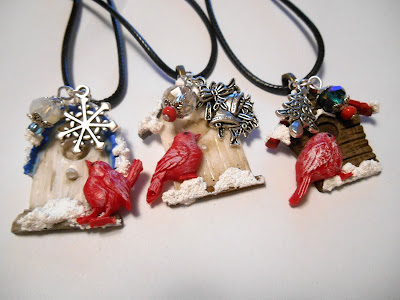
Happy Holidays everyone! Lyn here to share a bit of Christmas inspiration... cute little Winter Birdhouse Charms accented with a few feathered friends made with Amazing Casting Resin.


Using some tiny cast birds from Amazing Casting Resin and red Alumilite Dye, combined with some beads/findings, metal Christmas charms, acrylic paint and Snow Tex (available at most craft stores) –  I created these tiny Birdhouse Charms just in time for the Holidays. How cute are they? They'll be perfect Holiday gifts for loved ones!

What gifts will you create this season 

Well that's all for now... Till Next Time! Lyn

As always you can find more of my work on my blog LynzCraftz
or on YouTube LynzCraftz, or my Facebook page LynzCraftz.

• • • • • • • • • • • • • • • • •

Don't forget to subscribe to our blog on the right side bar:
Twitter at AmazingCasting | Facebook at AmazingMoldPutty | YouTube at AmazingMoldPutty

Monday, October 9

Resin Painting with Dried Orchids... #Cre8time Explorations by Tracy Alden


Hello! Tracy here with another Amazing Casting Products inspiration post! I will let you in on a secret: sometimes I have no clue what direction some of my art projects will end up going. I can collect supplies, start working on something, maybe even get a basic idea of what I would like to do... then end up making something completely different – this project was one of those. 

I have a small collection of orchid blooms that I had dried and wanted to try to preserve in Amazing Clear Cast Resin. I had never worked with dried orchid blooms as they are very delicate, and can easily crumble if mishandled. I decided a frame was the best choice to display the dried orchids and also be able to hold the resin in place... so I got to work.


I found that with the first layer of Amazing Clear Cast Resin the orchid blooms had a tendency to shift in the resin. So the first layer of resin had to be a thin pour and I let that cure to a tacky set. I added a second clear layer of resin to cover and protect the orchids. After this cured, I followed with two more layers of resin mixed with Alumidust or Alumilite Dye in different spots, using a toothpick to drag the colors through each other. This created a lovely ebb and flow of color to the resin.

I honestly lost track of time doing this and found it rather relaxing and meditative in nature. I let this layer of resin cure. The frame looks complicated but it is just four layers of resin poured. No waste of resin – just a few stir sticks, toothpicks and clean up with babywipes.


Please CLICK HERE to see the full tutorial on how I created this mixed media resin frame on my blog Art Resurrected.

What AMAZING arts and crafts can you create?

Visit my blog Art Resurrected for more craft tutorials!

Until next time, safe travels! ~ Tracy

• • • • • • • • • • • • • • • • •

Don't forget to subscribe to our blog on the right side bar:
Twitter at AmazingCasting | Facebook at AmazingMoldPutty | YouTube at AmazingMoldPutty

Monday, August 21

Singing a Whale Song of Summer... by Lyn Gill


Hi everyone! Lyn here with you today from LynzCraftz. It's no secret that I love Summer... the Ocean... the Beach... the sound of the waves and the salty sea air – so before Summer ends, I thought I would get in one last Summer project. I've named it "Whale Song" for obvious reasons...


I first started with a couple polymer clay whales that I sculpted from Super Sculpey (baked according to package directions). I left each whale flat on the back so I could glue them down. I glued each down into my mold box, then I poured over a batch of Amazing Mold Rubber to create the mold. CLICK HERE to view mixing/preparation.

In a few hours, the mold is cured! I removed the originals and it was time to pour some clear blue resin. For the whales I've mixed up Amazing Clear Cast Resin and Ocean Blue Alumilite Dye... aren't they cute?


Then using a wooden canvas I had purchased, I painted it with some acrylic paints. Just a basic underwater type background which will get mostly covered up.


Here comes the fun part... I mixed up some Amazing Clear Cast Resin and divided it into 5 small cups; adding Alumidust to each cup in similar colors to my painted background in 4 of them. In the fifth one, I added a bit of White Alumilite Dye.


Carefully pouring each of the four colors on their corresponding color area (kinda like a paint by number... LOL), I used a stir stick to help move the colors around. I placed the two original polymer whales along with the blue cast whales into the wet resin on the background and left it to cure for 3-4 hours before continuing.


The final step was to mix just a touch (the tip of my pallet knife) of the Alumilite Pearlescent Metallic Powder into another batch of Amazing Clear Cast Resin, then pour this mixture over the entire piece – whales and all.


After letting this cure overnight,
the results are well... AMAZING! 


You can see the sparkle from the tiny bit of Pearlescent powder that I added to the final layer of Amazing Clear Cast Resin – it's so pretty! A little bit of work but well worth it in the end.

What end of Summer projects
do you have planned?

Well that's the end for now – thank you so much for stopping by... 
Till Next Time! Lyn

As usual, you can find more of my work on my blog LynzCraftz
or on YouTube LynzCraftz, or my Facebook page LynzCraftz.

• • • • • • • • • • • • • • • • •

Don't forget to subscribe to our blog on the right side bar:
Twitter at AmazingCasting | Facebook at AmazingMoldPutty | YouTube at AmazingMoldPutty

Tuesday, August 15

#Cre8time for Bookmaking... Make it Artsy - Episode 207

Hello Amazing Makers!! Are you ready for some new Cre8time ideas using Amazing Casting Products! Today we share the latest episode of Make It Artsy: the TV show for makers and crafters – featuring tips, techniques and projects for makers, crafters and artists! In this episode artist Andrew Thornton sculpts an amazing book cover using Alumilite Dyes, Alumidust and Amazing Casting Resin.

Ready for a new episode of Make It Artsy?!


CLICK HERE to view this week's episode

Nourish your mind with a good book. Artist and writer Andrew Thornton sculpts a beautiful book cover. Julie Fei-Fan Balzer creates a whole book out of a single piece of paper. Tool expert Joe Rotella binds books inspired by ancient techniques from the Far East. Jane Dunnewold shares another artsy idea.


Bookmark or PIN the Make It Artsy Website
http://makeitartsy.com

Make It Artsy launched September 29, 2016 on Public Television stations across the country! Look for it on your local PBS channel – all new episodes from series 200 are now airing. If you can't find it on your local programming, you can view this episode online by clicking this link Series 200, Episode 207 - Books.


Make It Artsy is a show dedicated to the crafter, maker and artist! A series celebrates that maker spirit and enthusiasm that extends to every part of life. It’s more than crafting, more than art or scrapbooking; this is an all-encompassing show for any one that loves to make “things”. From mixed-media to metalsmithing, using tools from saws to sewing machines, and materials from paper to wood; today’s most creative “makers” join host Julie Fei Fan Balzer and unleash a new look for crafting with a touch of industrial style.


Amazing Casting Products by Alumilite Corp. is proud to be one of these fabulous group of companies partnering with Make it Artsy. Stay tuned for upcoming Series 200 episodes with projects featuring some our amazing friends using Alumilite's AMAZING products! Don't worry... we'll be sharing each new episode right here as they become available so you can tune in.

• • • • • • • • • • • • • • • • •

Don't forget to subscribe to our blog on the right side bar:
Twitter at AmazingCasting | Facebook at AmazingMoldPutty | YouTube at AmazingMoldPutty

Monday, August 14

#Cre8time Transformations... Fabulous FAUX Stained Glass by Lara Hjorthoy

Hello Fellow Artists! It's Lara here with a project I've been dreaming to make for some time – too long in fact! But finally I have managed to make it all work... and am so thrilled to share it with you all!

Who wants to make some stained glass?! 

I have actually completed a version of this a while ago, but was mighty unsuccessful in the end. So I needed to rethink my strategy for the second round and apparently, the time to think paid off! We have amazing faux Stained Glass!


To start this project off... and in my usual fashion these days, I wanted to find a way to reuse a frame that I had acquired. So I cleaned the frame and got some plexiglass for the "glass".  I glued this into the frame itself so that I could call it a "window" of sorts!


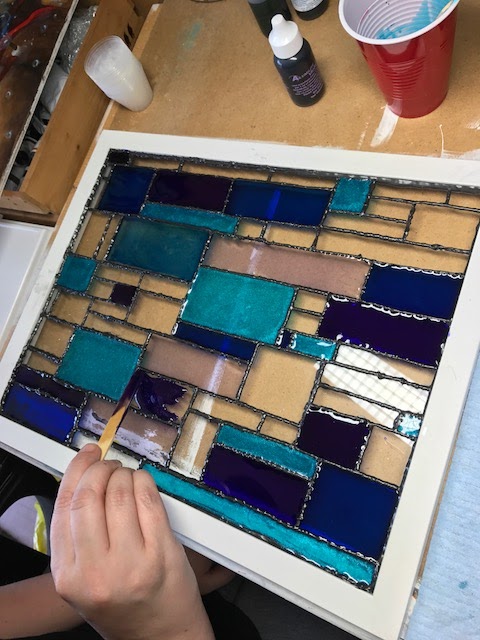
I used a relief paint by Pebeo that was the colour of lead, so it looked just like I had leaded it myself. I actually did a couple of layers of it, so I used a lot. My first go round, I had all the resin colours bleed together – so this time I made sure I was slow and deliberate and that there would be no holes whatsoever. To make this pattern, I printed a picture of a brick wall with a pattern I liked, placed behind the glass, and just followed it with the lead!

I left this to dry, well truthfully... for a long time! But I would no matter what, for at least a week, just to be safe.  

Next up! The resin!  


I mixed up he first batch of Amazing Clear Cast Resin using Alumilite dyes, different shades of blue and purple and even added some sparkle to the resin with Alumilite Pearlescent Powder.


Using a popscicle stick, I slowly added resin to each of the squares, focusing on one colour at a time. 


You can use the stick to push the resin up to the edges
of each square, which helps prevent overpouring.


And I took my time. Which in the end produced a great piece, though it meant that my resin started to cure in the cups I mixed them in. I was able to get the pour done, but next time, I would only mix and apply one colour at a time. 


Which is exactly what I did for the Alumilite Silver Metallic Powder and the clear pearlescent resin I added later to complete the piece. I covered it up and let it cure overnight.


Add hanging hardware and ribbon and it now hangs lovely in our window!
I couldn't be happier with it! Can't wait to add different colours to the collection!

What type of stained glass would you make?

Hope you enjoyed this project, I have another big one coming up soon!

Stay Inspired!
~ Lara

Check out my website at www.larahjorthoy.com and YourToyCreations.etsy.com. You can follow my day to day creations on Facebook and Instagram, look for YourToy Creations!

• • • • • • • • • • • • • •

Don't forget to subscribe to our blog on the right side bar:
Twitter at AmazingCasting | Facebook at AmazingMoldPutty | YouTube at AmazingMoldPutty
Related Posts Plugin for WordPress, Blogger...