Friday, July 31

#Cre8time Mixed Media with a TWIST of RESIN...
by Guest Designer Kimberly N.


Greetings! Today we welcome back Amazing Guest Creative... Kimberly N. – a mixed-media artist who loves vintage, Steampunkery and all things distressed. Today she is sharing some mixed media inspiration using Amazing Casting Products!


• • • • • • • • • • • • 

This mixed media project uses a 12" x 12" canvas that's been stamped, sprayed and painted – then accented with a smaller canvas {turned over creating a frame}, cast resin pieces and other chunky embellishments. Follow along as I point out the details...


I poured leftover Amazing Casting Resin onto waxed paper and let it set up some. While is was still pliable... I cut into strips with my scissors then I rolled them into wave shapes. I painted them with Tattered Angels High Impact Black Paint so the edges would stand out from my canvas.


You can see I made another heart casting {from the same mold I created heart pendant} to add to my canvas. With the leftover Amazing Casting Resin, I kept stirring until it was almost ready to cure completely... then I poured it out to to waxed paper to get this crazy bumpy rustic piece. I mounted this on the top of the small canvas as an accent piece.


Behind the butterfly is Amazing Casting Resin {with some Finnabair chunky stuff mixed in} poured onto waxed paper that I pulled up and ruffled. When fully cured, I dripped some Espresso Bean Tattered Angels Glimmer Glam onto them .


I made the head using Amazing Mold Putty and an angel wall decoration. I made the large chunky gear from a mold I made using the gears from the tape gun! The other gears are timeouts cut outs with splats of resin then painted with Tattered Angels Mallard Glimmer Mist, Tattered Angels Leather Glimmer Mist and Faber-Castell Gelatos. I stamped the back ground using a scripted word stamp and finished off the heart with a Prima key.

How do you add amazing texture
and dimension to your mixed media?

Please comment below and give our AMAZING Guest Creative Kimberly N. some love. We want to give a huge thank you to Kimberly for joining us. We hope you have enjoyed her projects using Amazing Casting Products. Please visit "Scraps of Inspired Art" to see more of Kimberly's work or on her blog HERE

 • • • • • • • • • • • • 


Hi my name is Kimberly N. – I am married to my junior high school sweetheart and I have three amazing boys, two beautiful daughters in-laws, one grandson and two granddaughters. I started crafting about 9 years ago... I started out with a Cricut then expanded from there. I enjoy altering the unexpected and I LOVE playing with mixed-media art. My creative style can best be described as being vintage-distress, as I love combining vintage and Steampunk.

 • • • • • • • • • • • • • •

Don't forget to subscribe to our blog on the right side bar:
Twitter at AmazingCrafting | Facebook at AmazingMoldPutty | YouTube at AmazingMoldPutty

Thursday, July 30

#Cre8time Resin Charms Entice #Steampunk Spells... by Bridget Cordero

Greetings! Today our newest AMAZING Creative, Bridget Cordero is back to inspire us with some beautiful beaded bracelets. She has revamped a necklace by changing out the findings and adding custom charms layered with gorgeous patterned papers, beads, flowers and more goodies embedded in Amazing Clear Cast Resin.

• • • • • • • • •


I’ve created these beautiful bracelets using Amazing Clear Cast Resin


I combined some charms and findings with an old necklace
from my stash and some nail art decorations.

Please CLICK HERE to check out my
video on how I created them. Enjoy! :)


How would you customize
your own charmed creations?

I appreciate you checking out my project! If you’d like
to see more of my creations, please stop by my YouTube Channel

• • • • • • • • •

Don't forget to subscribe to our blog on the right side bar:
Twitter at AmazingCrafting | Facebook at AmazingMoldPutty | YouTube at AmazingMoldPutty

Wednesday, July 29

#Cre8time Transformations... Boho Chic Dream Catcher by Melissa Johnson

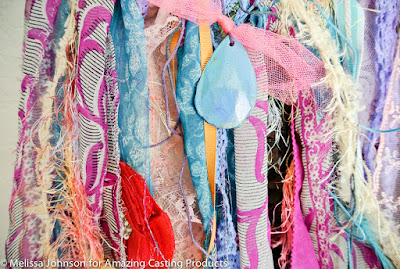
Hello everyone! Today I would like to share with you how I made this fabulously fun dreamcatcher for my teenage daughter's bedroom. 


To start out, I gathered my materials. You will need a metal hoop, some yarn, feathers, trims and lace--vintage or new (I just happen to love vintage so I went that route), vintage scarves or other silky material (I used a vintage sari, but you could use silk scarves, silk shirts from Goodwill – it all gets cut into strips), Amazing Mold PuttyAlumilite dyes, gold AlumidustAmazing Casting Resin, Golden GAC 900 Fabric Medium, and any other findings, flowers, or special pieces you would like to attach.


I started out by wrapping the wire hoop with a multicolored yarn. My daughter's room is kind of a boho style so I wanted to keep the colors bright and fun. 


Next, I tore the vintage sari into strips and began tying them around the bottom and top. Short pieces on top, longer ones on the bottom. 


The next step is to dye the lace and trims using the Alumilite dyes. I chose Violet, Red, and Blue to fit into my color scheme, but there are many other colors available! I put a few drops of dye on a paper plate, then I added Golden GAC 900 Fabric Medium. This is typically used to make acrylic paints useable on fabrics, but I wanted to try it out with the dye just to see what happened. I swirled the lace and trims around in the dye mixture, then put my heat gun on it to help it "set". I got a little impatient when I noticed that it was taking a long time to dry, so after heating them with my heat gun I rinsed out the pieces with warm water to make sure all of the extra dye came out, then put them all in the dryer for about 10 minutes. I like how they turned out, the color is still definitely there and it has a vintage look to it that I like.


While the trims were drying, I prepared a mold of a vintage crystal using the Amazing Mold Putty. I poured Amazing Casting Resin into the mold and allowed it to dry. It takes about 5 minutes here in Texas! 


I also mixed up some Alumidust (gold) -- has anyone noticed this stuff is on practically every project of mine? I love it!!--and dusted the feathers with it, just to add a little shimmer :) 


At this point, I popped the resin pieces from the mold and painted them with Golden acrylic paints in Cobalt Blue and Teal. When they dried I added a coat of gold glitter clear paint. Then I began to assemble the rest of the dreamcatcher. I added the dyed trims and lace, and several pieces of just random ribbon and fibers that I had in my stash. I just worked around the circle, tying all of the pieces in knots. I used hemp cord (colored) to tie on the feathers and add the resin pieces. I found the cute laser cut tree at Hobby Lobby in a package of 3. 


And here is the final finished product! 


Make something that makes you happy :) ~ Melissa Johnson
Please visit my BLOG to see more of my mixed media creations.

• • • • • • • • • • • • • •

Don't forget to subscribe to our blog on the right side bar:
Twitter at AmazingCrafting | Facebook at AmazingMoldPutty | YouTube at AmazingMoldPutty

Tuesday, July 28

Macho yet #Cre8time Cool! #Steampunk Frame REDUX by Tanya Ruffin


This was made using a few items from my favorite place... the Dollar Tree!


Start with a frame and a submarine toy. I loved the look of these subs! It looked like something from 10,000 Leagues Under the Sea.  Ok, now I am thinking a Beatlesque item with a YELLOW SUBMARINE!! Now, where do I find some blue meanies??


Using Amazing Mold Putty, I made a mold of the subs. 


Once the molds are cured you can dust the inside with Copper Alumidust or use copper Rub 'n Buff® after resin cures (that is how I made this one). I also mixed in some black Alumilite Dye with the Amazing Casting Resin.


Using some left over scrapbook paper and a Sizzix Eileen Hull 3D wrapped Flower die, I made some roses. You can make some similar by using the template included on Victorian Resin roses post or just use some silk roses.

Once cured, I glued the subs and the roses to the frame and inserted a Steampunk'd portrait (shhhh... don't tell my hubby he is in this post).


Yea, I stole a cigar from my hubby's stash for this photo! 

And there you go, a macho yet cool picture frame!


Kind of Wild, Wild West-ish with this filter!

What fun ways do you embellish
with Amazing Casting Products?

Go Craft Your Own Way! ~ Tanya


Tanya Ruffin.com


Create Studios Baton Rouge

Tanya Ruffin

Please visit my site to see more of my inspiring creations at www.tanyaRuffin.com

• • • • • • • • • • • • • •

Don't forget to subscribe to our blog on the right side bar:
Twitter at AmazingCrafting | Facebook at AmazingMoldPutty | YouTube at AmazingMoldPutty

Monday, July 27

#Cre8time Adventures in Moldmaking... and Fabulous FAUX Old World Tiles!


Greetings Amazing Crafters! Susan here to share a project that combines my love of moldmaking and casting with altered books... and I've transformed a plain jane kraft journal into something with old world Italian charm.

Cool2Cast is a product created by Tiffany Windsor of Cool2Craft – a fiber plaster medium which sets up really fast unlike paper maché casting or paper based air dry clays. This media brings a whole different feel, texture and effect to my stash of molds - and totally expands their use!

For my book I started with a plain blank spiral bound journal book. This particular one has a window already cut out of it and that's what I plan to house the casting in. I've also selected a texture plate from my stash made from Amazing Mold Rubber {CLICK HERE to view details}.


Since the cover made of craft paper, it's already primed and ready to go. I grabbed my three metallic colors of Ranger Distress paint and which have a dauber top, and I quickly painted the cover and around the edges, on the inside of the window and around the edges on the inside of the cover. When I am all done, I can go back and line inside cover with a pretty paper.


In just a few minutes the paint is dry and I'm ready to move
on to filling the window with a special casting.

I grabbed my Amazing Mold Rubber texture plate that I made from molding a vintage glass tile. I place the cover over it to decide what section of the design I want to have featured in my window. On the inside of the cover, I applied some removable blue painters tape to protect it from the liquid Cool2Cast from sticking. When it hardens, I plan to gently pull the cover off and place the casting back into the window after sanding/painting.

In hindsight - I really needed to protect the front of the cover and do this process from the backside {in reverse} so that I don't bend the casting in handling. Then I could have just mounted a piece of cardstock directly to the back of the inside cover to secure in place after it was hardened. Not a problem though, I got the results I was looking for... and the cracks that I created in my clumsiness actually added to the old world charm of my finished book.


I used some bags of glass beads to way down my cover so when I pour the Cool2Cast mixture it would not seep under the edges of the book cover.


In a Ziploc baggie I prepared a small batch of the Cool2Cast following the easy instructions - which is a 2 to 1 ratio of the casting medium to water, mixed to a pancake batter consistency. When ready, I snipped off the corner the baggie and squished onto my mold.


I used a small rubber spatula to spread the mixture around evenly,
and then I let it sit to harden for about an hour.


This created thin casting since I matched the thickness of the cover - next time I would go over and add second layer of Cool2Cast to reinforce it as I remove it from the flexible mold. I was so excited to see the result I really wasn't being as gentle as I should have been. It's all good though!


After sanding the edges slightly to square it up to fit back in the cover, I mounted a piece of chipboard {painted to match} as a backer and glued in place. I brushed on the same colors of the Distress Paint to give my Cool2Cast mod texture a nice matching patina.


I applied some coordinating metallic trim to line the edges and metallic bronze photo corners to finish it off add a little extra bling and interest.


Now I have a beautiful book ready to go that I can customize for a gift or I can use this as one of my many art journals in rotation. I really love the option of using the Cool2Cast because it gives a more earthen and distressed result when used in my Amazing Casting Products molds as opposed to the using resins that give you such a perfect and pristine casting.

The Cool2Cast insert really looks like it's a piece of old antique weathered ceramic tile. I think the next time I'm working with Amazing Clear Cast Resin, I will paint on a layer to add a protective seal to the chipboard and make the faux ceramic insert really POP.


I really love the finish on this and I'm happy how it turned out as I have a few more of these books in my stash! I look forward to trying Cool2Cast in my collection of Amazing Mold Putty and Amazing Mold Rubber molds to make castings with an old world plaster feel.

How will you alter books art

Please leave a comment below to share! If you would like to see more of my creations, please visit my blog sbartist : painting in the dark by clicking here. ~ Susan
. . . . . . . . . . . . . .

Want to Socialize with Amazing Crafting Products?
Twitter at @AmazingCrafting | Facebook at AmazingMoldPutty | YouTube at AmazingMoldPutty
Related Posts Plugin for WordPress, Blogger...