Showing posts with label ReUse. Show all posts

Tuesday, September 1

Take your broken Crayolas on a #Cre8time Adventure... by Susan M. Brown {sbartist}


Hello Amazing Crafters! It's September which means it's time for the kids to back-to-school. Even though I'm a big kid now – who can resist a new box of crayons!

But eventually they all end up this :(...


I had a fabulous idea... to upcycle my box of misfit crayons and give them a new Cre8time lease on life! Grab some of your existing Amazing Mold Putty molds and CLICK HERE to jump over to see full tutorial.


What little girl or teacher wouldn't love a beautiful box of ornate crayons packed in a recycled chocolate box - each crayon cast in a vintage button mold.

What fun shaped crayons would you create?

CLICK HERE to view all the AMAZING ways
you can add Amazing Mold Putty to your Cre8time.


Please leave a comment below to share your fun crayon ideas! If you would like to see more of my creations, please visit my blog sbartist : painting in the dark by clicking here. ~ Susan
. . . . . . . . . . . . . .

Want to Socialize with Amazing Crafting Products?
Twitter at @AmazingCrafting | Facebook at AmazingMoldPutty | YouTube at AmazingMoldPutty

Tuesday, June 16

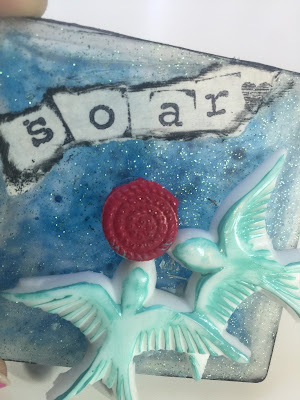
Soar with a Little #Cre8time and REuse leftover Resin... by Aimée Wheaton


Forgive me for this brief little project but hopefully it will inspire you to "soar" with your creativity. Summer break has started which means both kids full time and no me time. I am ready for school to start again LOL. Anyways I came up with the idea to reuse leftover resin pieces and turn it into something nice. This could be a magnet, a pendant (pretty large), wall hanging, something pretty to look at on your desk or whatever else you can think of.

These leftover resin pieces I have are from new projects where I make too much resin and I have molds readily available to fill so I don't waste the resin. Let's just say I make too much resin and have a box full of goodies to use.


This came together quickly because the pieces were already cured. I hope you enjoy this simple project. All you need is Gel medium, paper, stamp pad, alphabet stamps, glue, paint and leftover resin pieces!!


Hope you like it!!!


To see how all of our AMAZING products can enhance your art,
please check out these AMAZING products!

Let's see what you can create

Feel free to stop by my FB page to see the latest with me. 
To see more of my work please visit my blog "Creative Flutters"
and also at the Aimée Wheaton Art and Design website.

Till next time! Xoxo Aimée

 • • • • • • • • • • • • • •

Don't forget to subscribe to our blog on the right side bar:
Twitter at AmazingCrafting | Facebook at AmazingMoldPutty | YouTube at AmazingMoldPutty

Thursday, April 23

#Cre8time meets #Recycling for AMAZING Resin Coasters... by Tracy Alden


Hello! Tracy here with another Amazing Casting Products tutorial! Many of my craft and art projects normally have some aspect of recycling or reuse, such as using old deli containers for mold boxes or shrink plastic projects, newspaper for papier-mâché, paper scraps for miniatures, cardboard for backing or odd shaped mold boxes, and food containers to store small craft supplies.

Which brings me to my inspiration for this project: After a somewhat madcap baking spree I had several clean plastic icing containers perfect for reuse. I noticed the inside of the lids were slightly bigger than most common cups, had no pattern and had a great circle grove, so flipped over it could make a quick coaster mold!

Supplies: 


I started with making sure the former icing canister lids were clean and lint free. I then sprayed a mold release on the lids to ensure the resin would come out easily once fully cured.


My first layer of Amazing Clear Cast Resin was a thin layer tinted with Black Alumilite Dye. I made sure the entire bottom of the lid was coated with resin.


Next I added some glitter to the black tinted resin layer, gold red and a homemade mix. The homemade mix comes from often spilling glitter but saving the glitter for later use. This is one of those times that a random glitter mix is perfect for a bit of simmer in the background!


I went through some of my scrap paper to find the perfect embellishments for the resin. Old catalogs, paper samples, leftovers from projects and salvaged pieces of paper are a perfect resource for wonderful snippets of color.


After embossing and texturing some of the paper I inked the paper scraps with the StazOn Solvent Ink to highlight and age the paper. At this point I picked the papers I wanted to use for this batch of coasters, saving the rest of the papers for my next set.


I then cut the different paper scraps into smaller pieces so that they would fit inside the molds. I sealed them with Liquitex Gloss Varnish coating the front and back of each piece and letting it dry.


Second thin layer of Amazing Clear Cast Resin was poured and carefully I floated some of the sealed papers on top of the resin. I let that cure until reaching a tacky set – about a few hours in warm weather before moving on to the next step.


The third layer I poured a little thicker than the last to give some visual depth between the layers of paper. I added some clean, used tin foil and more paper to this layer of resin. Once again I let the resin cure until reaching a tacky set before pouring the final thick layer of resin.


Once the final layer of resin was fulled cured I was able to remove the now complete coasters from their molds by carefully peeling the plastic lids from the resin.


With so many other papers and embellishments that can be placed into the resin, any variety of patterns and styles of coasters can be made! 

What AMAZING arts and crafts can you create?


Visit my blog Art Resurrected for more craft tutorials!

Until next time, safe travels! ~ Tracy

• • • • • • • • • • • • • • • • •

Don't forget to subscribe to our blog on the right side bar:
Twitter at AmazingCrafting | Facebook at AmazingMoldPutty | YouTube at AmazingMoldPutty

Wednesday, June 25

#Cre8time Organization or Greencrafted Pin Catcher... by Isabel Villarreal


Hi crafters! This is Isabel and I want to share a great idea I had while organizing my craft room this weekend. The adventure begins with packaging foam and ends with a beautiful jeweled pin cushion for my sewing station.


It started after I took a trip to get some office supplies and bought a few packs of push pins for my corkboard. The push pins came on a square of foam and as someone who loves to reuse EVERYTHING I knew I had to turn these into something AMAZING.


I had an old wood block in my box-o-stuff that I used to make a mold using Amazing Mold Putty. I separated equal parts of "A" and "B" and mixed them until they were an even yellow color {CLICK HERE to view mixing/preparation}. For this particular project I used the bottom of the block, since it would be used as flat base on which I would build my pin cushion.


The Amazing Mold Putty would take about 10 minutes to cure – so while waiting I dove into my fabric scraps and chose 2 prints that matched while still contrasting. The floral fabric will be used to cover the foam later. The easiest way to cut the fabric is to turn the fabric face down and trace the shape of the foam square. Make sure to leave an extra amount around the shape when you cut it out. The extra bit will be folded around the edges of the foam square when it's covered. I also cut a 1/4" strip from the striped fabric. This would go around the edge of the resin base.


At this point the mold was completely set – I removed the original wood block from the mold putty and prepared to start creating the base for my project. For the base I decided to use Amazing Casting Resin. This resin sets in about 10-15 minutes, so my crafting groove isn't interrupted and I can easily and quickly go from one step to the next. Since Amazing Casting Resin cures as a solid white I figure I'd add some color to jazz it up and make it match the fabrics a little better. I added a few drops of Alumilite Flourescent "FLO" Yellow Dye and a drop of Flourescent "FLO" Green Dye to part "A" of the resin before mixing {CLICK HERE to view mixing/preparation}.


After pouring the resin into the mold, quickly place the foam square into the setting resin. make sure to hold it place for about a minute to be sure that it doesn't float and move around. I placed my foam square in a corner of the mold.


After the resin was set, I removed it from the mold and brought out the fabric pieces I cut earlier. Using regular craft glue, I attached the striped fabric around the edge of the base. The bright green color of the resin complements the fabric beautifully!


Next, I applied some glue around the very edge of the foam block. I placed the fabric over the foam and folded the extra little bit over the edges pressing the fabric evenly around the entire square.


Allow the glue to dry for about 5 minutes and add some small magnets along the sides of the foam square. I used magnets that had adhesive on the back. The adhesive made it easy to place the magnets and secure them in place for the next step. 


The final step is to add some Amazing Clear Cast Resin to the mix which will seal the magnets in place. I poured a thin layer of Clear Cast onto the surface and around the magnets. I then scattered some Stampendous Mica Flakes and a few assorted jewels and pressed them into the Clear Cast Resin {CLICK HERE to view mixing/preparation}.


The results are bright, funky and functional. This is exactly what I needed for my sewing station and since I created it myself, it suits my style perfectly!

How would you decorate your
pincushion to reflect your style?

I'd love to see what you create! Please upload and share your creations to the


• • • • • • • • • • • • • •

Don't forget to subscribe to our blog on the right side bar:
Twitter at AmazingCrafting | Facebook at AmazingMoldPutty | YouTube at AmazingMoldPutty

Thursday, April 10

#Cre8time makes a Candle that SEES a RAINBOW... AMAZING Inspiration by Lonnie Sexton

I happened to come across a candle-making kit on sale at a local hobby store recently and decided to give this ancient craft a try. I had some Amazing Mold Putty and Amazing Mold Rubber projects that haven’t been used in a while and this was a good reason to dust them off. One is this skull


I was surprised at how long the wax takes to cool completely at room temp. I left it for 24 hours – and then added a Tri-color LED assembly to the bottom. 


You can find the “how to” tutorial from the original skull project HERE


Thanks for visiting – stop by anytime to check out more exciting projects
from the Amazing Crafting Products Creative Team. ~ Lonnie S.

• • • • • • • • • • • • • •

Don't forget to subscribe to our blog on the right side bar:
Twitter at AmazingCrafting | Facebook at AmazingMoldPutty | YouTube at AmazingMoldPutty

Friday, September 20

Welcome Your Guests to GO AWAY!!! DIY Decorative Wall Tile for the Spooky Season by Isabel Villarreal


Halloween has got to be my favorite day of the year and to celebrate the spooky season, I've made this decorative wall tile that's actually not tile at all – it's made with recycled advertising flyers and my favorite product, Amazing Casting Resin.


To begin, I chose a stack of flyers about 1/2" thick and used craft glue to cover all four edges of the stack. This will join the stack of flyers together. A clip can be used to hold the stack together while the glue dries and you can also add a dot of glue in the center between each flyer for added adhesion. Once the glue dried I had a "tile" made from paper. The glue helped give it strength and made it a nice hard surface to work with. I mixed together equal parts "A" & "B" of Amazing Casting Resin to coat the entire surface of the tile and sprinkled some Alumilite Metallic Gun Metal Powder to give it some glitz – it's easiest to pour in the center and then spread it to the edges. I then added a second coat of resin but this time I added Alumilite Green Dye and a drop of Alumilite Black Dye to part "A" of the mixture and once again coated the tile. Working quickly, I dusted some more metallic powder onto the surface and used a wooden craft stick to swirl the powder into the resin. This gave the tile a marbelized finish.


I wanted to use this detailed skeleton as part of the tile but didn't want to take it apart since I keep it as a year round decoration (yes, I display skellies all year round). This is where Amazing Mold Putty comes to the rescue...as the resin set I prepared equal parts "A" & "B" of Amazing Mold Putty and prepared to cast the skeleton parts I would need for this project, while leaving the original intact.


I made 2 molds, one for the front of the skeleton and one for the back. Making 2 separate molds allowed me to pour just a small amount of Amazing Casting Resin into each mold in order to get a thinner casting. To color the skeleton I added Alumilite Florescent {FLO} Yellow to part "A" of the Amazing Casting Resin and once the color was mixed evenly I mixed in part "B".


For the details of this project, I also cast some random bones using my skeleton molds and I prepared a silk rose by separating the bloom and leaves from the stem. I would be adding these later to give the tile more details and pizazz.


Now that all of my parts were prepared, it was time to put them all together. I added a third layer of Amazing Casting Resin to the tile and since it dries very quickly (about 10 minutes) I quickly pressed the skely parts into the center of the tile and pressed the silk rose pieces along the right edge. As the resin cured, the skelly and rose were permantly embedded into the surface of the tile. I then added adhesive foam letters to the left side of the tile.


For the final step, I added a coat of resin to the foam letters, this time using Alumilite Florescent (FLO) Red Dye and pressed my random bone pieces into the resin as it dried. I also added a little of the red resin to the some of the petals on the rose. Once all of the layers on the tile were dry I glued some hanging hardware on to the back of tile using a 2-part adhesive and it was ready to greet all of my visitors as it hangs by my front door. 


How will you welcome your visitors this Halloween?

I'd love to see what you create! Please upload and share your creations to the NEW
user GALLERY on the Amazing Mold Putty Website for all the world to see.


...........................................

Here's your chance to get 20% discount
including the new Amazing Mold Rubber!!!
Use coupon code { celebrate } at

Coupon Expires September 30, 2013.
........................................... 

Don't miss a single post!
Please subscribe to our blog via Newtorked Blogs,
bloglovin' or email on the right side bar:
Twitter at @AmazingCrafting | Facebook at AmazingMoldPutty | YouTube at AmazingMoldPutty
Related Posts Plugin for WordPress, Blogger...