Showing posts with label mold boxes. Show all posts

Monday, February 13

For the Love of #Cre8time Recycling... DIY Art Molds by Tracy Alden


Hello! Tracy here to share some inspiration using Amazing Casting Products! Notice the interesting resin tiles and the Amazing Mold Rubber molds? Curious on how I made them? Let me introduce one of my favorite sources for inspiration... my recycling bin. Seriously, some of my best pieces of artwork gets inspiration from objects many people think has no value!


Here is a small selection from my recycling bin from this past month. What these objects all have in common is the potential to become a mold, texture or embellishment for a piece of art. I could mold the side of the light bulb to create a dome pendant, those trays can be bases for printing plates, the bottom of bottles and lids make great molds for embellishments, many pieces can be cut up or glued together to make mixed media projects! 


Grabbing just one type of recyclables, in this case a plastic spacer most likely from some sort of packaging, I noticed it had a great shape. Smooth on three sides, even in shape and thick enough to create a mold with depth for layers.


I glued the spacers into a plastic sushi tray {also from my recycling bin}, which made the perfect mold box! Carefully following the instructions, I mixed up a kit of Amazing Mold Rubber and slowly poured it into my mold box. CLICK HERE to view mixing/preparation. In the process of mixing, the Amazing Mold Rubber had formed bubbles. To quickly pop the bubbles I used a heat gun to slowly heat the uncured mold rubber to pop the bubbles.
**You can use either Amazing Mold Rubber or Amazing Mold Putty for creating molds from recyclables. Mold Putty will create a matte to satin finish (food safe!) mold and Mold Rubber will create high gloss and detail (non food safe) mold.

Once the Amazing Mold Rubber was completely cured I removed the plastic pieces from the tray. When I gently removed the pieces from the Mold Rubber they came out rather cleanly, requiring very little trimming of the mold rubber with craft scissors. Now don't think I threw away that tray or bits of plastic! They get saved for a future project or at the very least go back into the recycling bin!


I went ahead tested out my molds and used Amazing Clear Cast Resin mixed with pressed flowers, glitters, alcohol inks, beads, Alumidust powder and Alumilite Dye. Happy with my results I can use these molds for things besides resin such as clay, paper mache, embossing powder and more. 


So many objects normally only thought of as recycling can be repurposed to create molds for your art... and the creative possibilities are endless!

What AMAZING arts and crafts can you create?

Visit my blog Art Resurrected for more craft tutorials!

Until next time, safe travels! ~ Tracy

• • • • • • • • • • • • • • • • •

Don't forget to subscribe to our blog on the right side bar:
Twitter at AmazingCasting | Facebook at AmazingMoldPutty | YouTube at AmazingMoldPutty

Thursday, October 13

One Skull or Two... #Cre8time Creepy Cocktails with Alumilite

With Halloween right around the corner... our Cre8time party planning and holiday decor is in full swing. Today we have a creepy-cool project to share featuring a product from Alumilite that can be used to create food-safe silicone molds – custom skull ice cube mold using Alumilite Plat 10.

Alumilite is the company who produces all of the Amazing Casting Products you all know and LOVE – and also products for DIY fishing lures and rock climbing holds... and much more!


This project starts with two plastic skull party favors. To create an ice cube mold, one would want to make many cubes at a time. So first a mold will be made to cast these two skulls in order to make 12 blank masters which can be done with Amazing Mold Rubber and Amazing Casting Resin.

Watch to see more of this amazing process...


If you have trouble viewing video, please CLICK HERE.


After creating twelve resin skull blanks, these are mounted into a new mold box where the Plat 10 silicone is poured to create a new custom skull ice cube mold. This is so creepy cool!

Plat 10 is a platinum based silicone mold making rubber that when cured yields a soft and pliable 10A rubber. Plat 10 complies with FDA 21 CFR 177.2600 and can be used for making molds for delicate castings including chocolate, fondant, sugar... and ice cubes, too!


The Alumilite yellow Plat 10 Mold is FDA Compliant... meaning this is food safe! This is so AMAZING!!! With this product you can have the detail and versatility of Amazing Mold Rubber {not FDA compliant}, but with a silicone product that is FOOD-SAFE.

How would embellish your cocktails?

Thanks for visiting! CLICK HERE to view more videos on how you
can utilize Amazing Casting Products in your creations.

• • • • • • • • • • • • • • • • •

Don't forget to subscribe to our blog on the right side bar:
Twitter at AmazingCasting | Facebook at AmazingMoldPutty | YouTube at AmazingMoldPutty

Monday, September 22

Stamp, Stamp, Stamp! Three ways to make stamps with Amazing Mold Rubber by Lynne Suprock


Hello – it is Lynne Suprock again! I am loving being a part of the Amazing Casting Products Creative Team... and getting to play with all these wonderful products, then show you what I design. 

Today I want to share with you how to make your own rubber stamps so that you may use them in your collage work, jewelry work, tag designs, or anything else you can think of. We will make these stamps three different ways… so let’s get started.

When working with Amazing Mold Rubber, I usually like to have a few projects to work on together at one time, or work on one big project. That is just my preference, but you can measure out the mold rubber base and catalyst as needed and complete at intervals if you’d like. 


For this tutorial, I personally set up all three projects before mixing and pouring my Amazing Mold Rubber. However, the tutorials, as written, will also guide you through each project individually.

**PLEASE NOTE** Amazing Mold Rubber will cure in approximately 4-24 hours depending one your climate and humidity. The more humid the environment, the faster the mold rubber will cure. I used the Alumilite Rubber to Rubber Mold Release, but you can use a thin coating of vaseline or spray oil – just be sure to spread thinly and don't leave beads/clumps of oil (that can displace the liquid silicone and leave a mark in the mold surface). The surface just needs to be lubricated so that the surface is non stick.

STAMP ONE

Things you will need:
Using the steel die letters, hammer them into the wood. Write a name, a phrase or a story.


Build a wall around the stamped letters with popsicle sticks and attach with Elmer's glue. Make sure you dab the glue into each corner and in the cracks where the popsicle sticks meet the wood. Let dry.


Paint letter depressions and wood surface with Mold Release.


Measure and mix the two parts of Amazing Mold Rubber per instructions. CLICK HERE to see a video tutorial on mixing and preparation. When you are ready, pour the Amazing Mold Rubber into the mold and let cure.


Peel away the rubber and using the ink of your choice, stamp!


STAMP TWO

Things you will need:
Paint the inside of either top or bottom of the embossing plate with mold release. Surround all four sides of the plate with duct tape and press to secure, leaving a wall about 1/2” high.


Measure and mix the two parts of Amazing Mold Rubber per instructions. CLICK HERE to see a video tutorial on mixing and preparation. When you are ready, pour the Amazing Mold Rubber, let cure and unmold.


Use your favorite ink and stamp! 


STAMP THREE

Materials you will need:

Begin by painting the candy mold with mold release.


Measure and mix the two parts of Amazing Mold Rubber per instructions. CLICK HERE to see a video tutorial on mixing and preparation. When you are ready, pour the Amazing Mold Rubber into the mold and let cure.


Unmold and stamp using your favorite ink!


I have had so much creative fun doing these stamp making projects, and I hope that you will give Amazing Mold Rubber a try... or experiment a little too!

What items would you mold to
create your own custom stamps?

Please share what you make with Amazing Casting Products
on our website in the User Gallery.

Please visit my blog "Simply Pretty Stuff" to see more of my creations. ~ Lynne
CLICK HERE to view my upcoming workshop schedule where you can join me in person.
. . . . . . . . . . . . . . . .

Don't miss a single post!
Please subscribe to our blog on the right side bar:
Twitter at @AmazingCrafting | Facebook at AmazingMoldPutty | YouTube at AmazingMoldPutty

Monday, July 21

AMAZINGLY Jaw Dropping with Rachel Whetzel and Amazing Mold Rubber

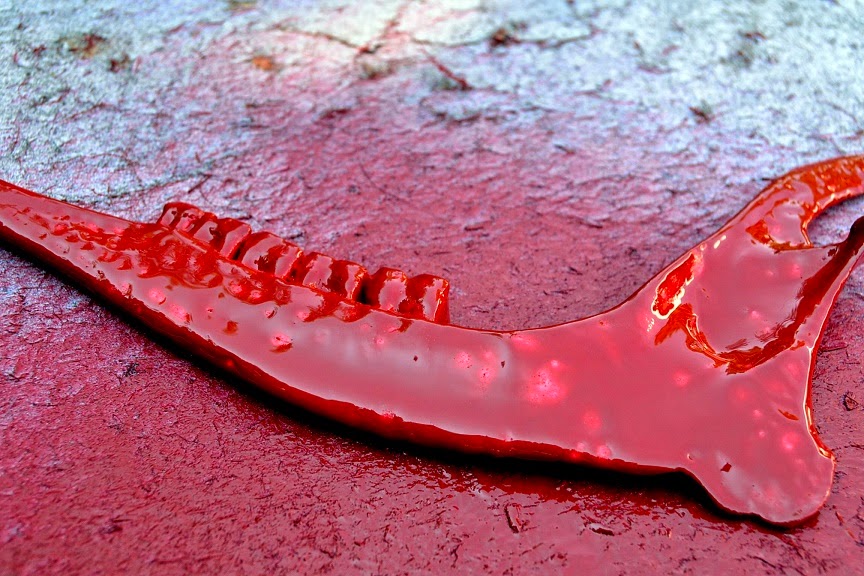
Hello, AMAZING peeps!! It's Rachel Whetzel... this month, I get the pleasure of sharing a project I made using Amazing Mold Rubber!! I have an art project that I'm working on for Gauche Alchemy, and I needed something especially unique and interesting. Naturally, I wanted my piece to be *Jaw Dropping* (heh heh) so I turned to Amazing Crafting Products, and got busy making something I'm pretty sure most people haven't thought of.


That's right! I created a jawbone!! A long time ago, I found a jaw bone left over from a deer that had been hit by a car on one of the country roads near my house. Being the morbid human that I am, I decided to pick it up and bring it home, because I thought it might look cool in a piece of art work. Bones are popular in art, and I have used them a few times myself.

Here's what you'll need to make
a jaw or bone replica of your own:
Here is my original jaw bone that I found on my walk.


I cut a box and used it's sides to make a smaller compartment to hold the jawbone, and keep Amazing Mold Rubber waste down.


Next, I sealed all the seams with duct tape. 

Then, to keep the jawbone in place while the Amazing Mold Rubber was curing,
I used duct tape rolled and cut to hold the piece in place.


Then I used a disposable container to mix my
Amazing Mold Rubber, and pour it into the mold.


The sides of my mold were a little flimsy once the Amazing Mold Rubber was in, so to keep things where I wanted them, I used a bit of ribbon to keep my sides in place during cure time. 


When I poured my Amazing Casting Resin, I wanted to make my piece red, but when I used my Alumilite Red Dye, I didn't use enough, and my piece turned out pink. I'm still getting the hang of dyes in the Amazing Clear Cast Resin. It wasn't too big of an issue though. I just used paint to make the piece the color I wanted. 

Here's a view of the backside of the piece,
with the duct tape spots and my seams untrimmed.


CLICK HERE for directions on mixing Amazing Casting Resin.

Once I pulled my piece, I cut off the excess from the pour,
and sanded edges, etc. to clean up the piece.


To get the Jawbone the color I REALLY wanted it, I used some spray paint I had on hand, and got busy layering it on. 


Then the spray paint was dry, I painted the teeth a different color, and then used stain to fill in the crevices of the piece and make it look aged. 


Last but not least, I used a toothpick to make flowers and dotted swirls all over the Jaw. I finished off the flowers with more stain when they were dry.


Be sure to hop over to Gauche Alchemy in August to see this Jawbone on it's final art piece! I can't wait to share with you!

Thank you for reading! Want to see more of what I'm up to?
Visit me on PINTEREST and INSTAGRAM, or like MY PAGE on Facebook!
Thanks for stopping by! ~ rachel

• • • • • • • • • • • • • •

Don't forget to subscribe to our blog on the right side bar:
Twitter at AmazingCrafting | Facebook at AmazingMoldPutty | YouTube at AmazingMoldPutty

Monday, July 14

Capturing AMAZING Detail in #Cre8time!!! Casting Variations in Amazing Mold Rubber


Welcome to another Mold Rubber Monday! Susan here to share some molding and casting techniques using Amazing Mold Rubber.


I've created two REAL-TIME videos for you today... so grab a cuppa and enjoy. I have several items to mold which need special attention to mold box preparation and Amazing Mold Rubber pouring. Feel free to ask questions in comments below. Enjoy :)

Video One - Preparation

If you have trouble viewing... please CLICK HERE.

Preparing items to mold/cast in Amazing Mold Rubber and building mold boxes.


Video Two - DEMOLDING

If you have trouble viewing... please CLICK HERE.

Here's a few pix of the completed molds...


Success!!! All items molded perfectly... even the starfish with all it's spiny details.


The sand dollar was a success with only one broken section.


Even the fine, shallow details of the sand dollar were captured!


I can't wait to use my new circle stamp that will make double duty as another AMAZING No-Gelatin Rubber Plate on the other side. The glossy detail has been captured beautifully and will be gorgeous in a resin pour too! Now what am I going to make with these new AMAZING molds??!

What items would you love to cast
in Amazing Mold Rubber???

Please leave a comment below to share your ideas -or- please, ask us questions! If you would like to see more of my creations, please visit my blog sbartist : painting in the dark by clicking here -or- check out more videos on my YouTube channel here. ~ Susan

** As referred to in the videos above: To view mixing and preparation of Amazing Mold Rubber and how I created my AMAZING No-Gelatin Rubber Plate CLICK HERE! To view a second video which is a test run on my faux gelatin plate... and my FIRST TRY at Gellin' – CLICK HERE.

Thanks for stopping by and have a creative evening!
...........................................

Want to Socialize with Amazing Crafting Products?
Twitter at @AmazingCrafting | Facebook at AmazingMoldPutty | YouTube at AmazingMoldPutty

Amazing Mold Rubber is now available MICHAELS!!! It's also available in Hobby Lobby Stores, other retail locations and also at the moldputty.com website – so please feel free to search our archives and get inspired and excited about mold-making and casting... and MORE! 


Amazing Mold Rubber is an easy to use, high strength liquid silicone mold making rubber that is strong, soft and flexible - great for undercut parts and cures in approx. four hours. Amazing Mold Rubber is a two-part liquid rubber used to make extremely elastic molds to produce quick and exact reproductions of your original. Replicas can then be cast in Amazing Casting Resin, Amazing Clear Cast Resin for plastic parts - or use other materials such as plaster, wax, clay or polyester... and that's just the beginning to all the fabulous uses just waiting to be discovered!
Related Posts Plugin for WordPress, Blogger...