It just happened that I have created some star shaped magnets that were super easy to make using a star shaped ice cube tray {which was never going to be used to make ice}. SO for this project I am featuring Amazing Casting Resin colored with various Alumilite Metallic Powders.
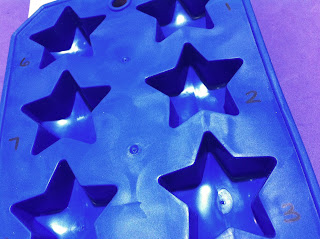
It's no secret that I'm a fan of stores that are of the dollar and tree variety. I always find something fun to create with there. I recently picked up a star shaped ice cube tray which seemed perfect to make some star shaped embellishments using the Amazing Clear Cast and Casting Resins.
Then with a permanent marker I labeled each star. This mold has ten star molds. Why do I need to number them??? Well, the short answer: for the purpose of experimentation and so I can remember what I did. I figured it would be a fun way to test out all the metallic colors.
Then I gathered my collection of Alumilite Metallic Powders. I have six colors: Gold Metallic, Silver Metallic, Copper Metallic, Gun Metal Metallic, Pearlescent and Bronze Metallic Powders. When I was at CHA Winter this past January at the Amazing Mold Putty booth, I learned that more colors are in development, too...YAY! I've used the Gold Metallic and the Gunmetal on my Steampunk Eggship and Wishbone Casted Charm projects {please click the names to go to the post}.
So back to why I labeled the tray - this started out as an experiment to just see how each metallic powder came out. Who can't use an extra star here or there? For each star I dusted one of the metallic powders and wrote them on a note pad with corresponding number. This left me with 4 empty stars. For these I dusted the mold with some perfect pearls to see what happens (red, purple, blue and green).
Now for the FUN to BEGIN! Time to get out my Amazing Casting Resin!
Photo(s) #1: Following the directions on the package I measure out to equal parts of Part A and Part B to mix Amazing Casting Resin which sets up in approximately 10 minutes. Both parts of the resin pour out clear. Photo #2: Combine both parts "A" and "B" and stir thoroughly and quickly - Amazing Casting Resin sets up quickly. Photo #3: I poured resin into each star shape of the mold. The batch of resin only gave me enough to fill each about 2/3 with resin. Photo #4: Amazing Casting Resin as it reaches the flash point and turns from clear to opaque white. Once it turns white it is hardened. After about 10 minutes I can remove these from molds. Photo #5: I had a "bright idea"!!! I can make some magnets. I had a pack of 10 magnets just sitting in the junk drawer. Can you believe I actually started out thinking..."oh I'll just glue the magnets on the back"???
Then after I set one magnet in the center of each star, I had an AMAZING idea!!!
Pour more Amazing Casting Resin around them to embed the magnet into the star!!!
Completed cured resin after second pour.
I also wrote the number on the back of each star for my corresponding color list.
Now I can remove them from the mold and I am so excited to see the results!
Not all of the magnets look pretty on the back. A couple have some resin over lapping the magnet edge - but they do work. The Alumilite Metallic Powders look like real metal and the pearlescent is a beautiful pearly white. The perfect pearls unfortunately didn't turn out the same - the colors became watered down from the wetness of the resin resulting in an interesting muted color effect. Also, since I didn't brush the metallic powders all the way to the top of the mold, the stars have a nice blended two-tone effect on the edges of the stars from the double pour. Next time I will try mixing the colored powders directly into the resin. This was a fun project and now I have some custom magnets to use in my studio. I plan on making some custom pushpins, too.
Presenting my "Super-Star Magnets".
I hope you enjoyed today's project. I encourage you to take some time to explore and search through the many AMAZING projects from my fellow Amazing Mold Putty Design Team members. There are so many great tips and ideas!
Use coupon code AMP20 to receive 20% off your order.
Coupon expires - Sept 30, 2012
If you have any questions, please leave a comment, select receive e-mail follow ups on comments and I will respond. If you would like to see more of my creations, please visit my blog sbartist : painting in the dark by clicking here.
Happy Crafting : )


that looks like a fun project with endless possibilities. Great job on the tutorial and numbering your product - a good idea!
ReplyDeleteI love the project!! I love even more that you placed your magnets into the resin!! Brilliant, and WHY DIDN'T I THINK OF THAT!!? lol
ReplyDelete