Showing posts with label Amazing Clear Cast. Show all posts

Tuesday, January 12

#Cre8time Adventures in Landscape #Resin Paintings... by Sandra Strait

Hello! Sandra here to continue my adventures in 3D resin painting. I've been experimenting (and got my Christmas presents done, too) with the technique, and decided to try it with a more traditional style of painting – the landscape.


Supplies:
  • Amazing Clear Cast Resin
  • 4 x 6 Postcard
  • Paint Brush
  • Duct Tape
  • Golden Acrylics – Green Gold, Chromium Oxide Green, Phthalocyanine Green, Quinacridone Nickel Azo Gold, Iridescent Bright Gold

This was surprisingly simple. Although, it took seven days because each layer of resin had to cure, I think actual painting time was about 1/2 hour.

I made some mistakes, none of them fatal, but I'll know better next time.


To start, I used a postcard to use as my base and a
photo reference from my brother's North Carolina farm. 


I mixed up the two parts of the Amazing Clear Cast Resin, letting it sit so any bubbles would clear, while I did my drawing and painting. Please CLICK HERE to view mixing/preparation.


I drew an outline of the scene, numbering sections of it, each section corresponding to the layer I wanted. I scanned the numbered outline, and reprinted it as a guide, then erased all the numbers.

I painted the base layer on the postcard. At this point, the sky was the only section I was really worried about, because the rest would all be painted over. Once the paint dried completely (about 10 minutes), I created a mold by sticking duct tape all around the postcard (mistake #1), to hold the resin.

Then I poured the resin so that the postcard was completely covered with about 1/8 inch of resin and set it aside to cure.


Each day, I painted another layer. Mistake #2 happened while the 3rd layer was curing. You can see from the photos, how each day I added a few more trees, varying the colors. In the first couple of layers, I kept the colors lighter, and had no real details. In the last two layers, I painted the darkest colors, the most specific details, and I used the Iridescent Bright Gold, which just grabs your eyeballs and demands your attention. These are common techniques for implying distance, even if you aren't doing a 3D painting.

So what were my mistakes? Number 1 was using the duct tape frame to hold the resin. I've done this before with good results, but the postcard was too flimsy as a base, and the tape buckled giving me uneven edges. I wasn't expecting completely straight, but what I got was beyond sanding down.


The second mistake was that I set my piece on a flat surface, but it wasn't safe. Somehow, it slid down on one side, so that my resin cured thicker on one side. This just got worse as the layering process went on.

I'm not sure when the 3rd mistake happened, but I think about the 4th layer. I missed a bubble that formed on the surface. It isn't surprising. I can't actually see the bubble because it is soooo tiny, and I can't feel it. But it casts a shadow. It happened just at the skyline, against the blue, and it looks like there is a distant UFO coming over the hill. It isn't incredibly noticeable, but annoying all the same.

So my conclusion – next time use a sturdier base. Maybe a mixed media board or canvas. The duct tape might be okay with the sturdy base, but I'm still trying to think of something that would work better. And, last of all, I'll make sure I've left the piece where it will stay completely flat until the resin is thoroughly cured.


It took about 20 minutes a day, including the time for set up, mixing the resin, waiting for bubbles to pop, and painting. A good project for the person, who has several days to get a something done, but very little time in any given day.

For more complete instructions in using Amazing Mold RubberAmazing Casting Resin and Amazing Clear Cast Resin, see the videos at Amazing Casting Products website.

To see more of my watercolors, Zentangles and resin projects,
please visit my Life Imitates Doodles blog. ~ Sandra

• • • • • • • • • • • • • • • • •
Don't forget to subscribe to our blog on the right side bar:
Twitter at AmazingCasting | Facebook at AmazingMoldPutty | YouTube at AmazingMoldPutty

Friday, September 11

#Cre8time Dilemma... What to Do with Left Over #AmazingClearCastResin


Hi everyone! Have you ever wondered what to do with leftover resin? Recently I was working on a project and was using Amazing Clear Cast Resin. I greatly overestimated how much I would need and ended up with a lot left over. I refuse to waste product, so I began looking around my art space for something to do with it.


Knowing I had a small window of time to use the resin before it
began to cure, I searched for something that I could coat with the resin.


It started with this mixed media storage box
that I created using paint, washi tape, and rubons.


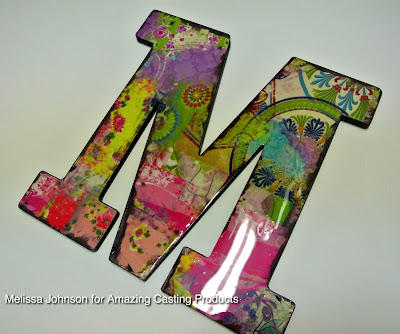
Then I found a cool monogram letter that my sister-in-law
bought me. I jazzed it up with the leftover resin, too! :)

What will YOU do with your leftover resin?
I'd love to see!

For more of my mixed media projects, please visit my blog.
Make something that makes you happy :) ~ Melissa Johnson

• • • • • • • • • • • • • •

Don't forget to subscribe to our blog on the right side bar:
Twitter at AmazingCasting | Facebook at AmazingMoldPutty | YouTube at AmazingMoldPutty

Thursday, August 20

#ACPthrowback Third Thursday Throwback... August Edition

Hey gang!! Rachel Whetzel here, and it's time for #AmazingCastingProduct's Third Throwback Thursday!! Every third Thursday of the month, we share links and projects that YOU share on line! There is no need for these projects to be NEW, because this is all about the throwback, so share some throwbacks from YOUR studios and workspaces! We want to see that you create. I hope you'll take the time to visit the links we've shared here, and enjoy all the awesome projects out there!


Revisit our posts from THIS MONTH, in 2012
See them all by clicking HERE.

INSTAGRAM

PINTEREST

On a final note: I (rachel) have been hired at a local school, and this will be my last post for a while... so I thought I would share some of my own throw backs... You can revisit my past projects using Amazing Casting Products HERE! The #ACPthrowback Third Thursdays will continue and I look forward to seeing what everyone is creating.

• • • • • • • • • • •

Have any projects you want
to share for the next
#ACPthrowback Third Thursday
on September 17, 2015?

Post them to our Facebook page, Pinterest, and on Twitter! We'll be on the hunt for your projects with the hashtag #ACPThrowBack, (you can even go back into your past pins and add this pin to help us find you!) and share ALL your projects using the hashtag #AmazingCastingProducts!!

• • • • • • • • • • •
Don't forget to subscribe to our blog on the right side bar:
Twitter at AmazingCrafting | Facebook at AmazingMoldPutty | YouTube at AmazingMoldPutty

Friday, January 16

#Cre8time Wedding Favors... Transform a Glass Bowl into a Candle Holder by Maria Soto

Hi there, this is Maria and I hope that this post inspires you to try these amazing products if you haven't already. We had a wedding in our family last weekend. My baby sister got married and well she's pretty crafty herself and decided to do as much as she could on her own. I wanted to make all her wedding favors to which she agreed.


I had to make 200 favors and I didn't like the idea of making all the favors the same, so I made some choices. I decided to add some glass items and candle holders sounded like a good idea, I got the glass marbles and the tea lights but I thought it would be more fun to transform the glass bowls into a candle holder by using resin.

Simple and pretty – I figured adding some of the Alumilite Silver Metallic Powder would be perfect since gray/silver is one of the wedding colors. I etched some designs on the glass bowls first, to add some pretty decorations, and to play off the light effects.

I remembered from a prior project in working with resin and glass, that resin gets hot! Since I was going to pour into glass containers, I needed to pour resin in small amounts, letting it cure over night, before adding another layer. It did take a few nights to finish these, but I love the finished look. 

A long time ago I made a some floating candle holders using Amazing Casting Resin and a mold of a tea light. It was the perfect mold to use again for this project! One thing I've learned in the time I've been working with these amazing products, is that making molds of interesting objects can come in handy in the future... you never know what your are going to make or need. 

Let me share with you the process to transforming
a simple glass bowl into an actual candle holder.

First here is a list of the products I used:

To get ready, I gathered my plastic cups, measuring cups, stirring sticks and my resin. The glass containers were all ready for the resin.


Amazing Clear Cast Resin takes a while to cure, so I decided to mix two ounces of each part of resin. This product is very easy to use – you just need to make sure to measure equal amounts of each part "A" & part "B". CLICK HERE to view mixing/preparation. If you chose to add color to the resin, make sure to mix it into part "A" very well, then combine with part "B" and mix it a bit more {slowly so you don't create too many bubbles}. Then let resin rest for 5-10 minutes to let bubbles escape. In this case, the bubbles would have just added more interest to these items.


With the resin and Alumilite Metallic Powder mixed, I poured it back into a clean 1 oz measuring cup – just so it could be poured easier into the glass bowl and allowing me to add equal amounts to each bowl. Since I only had one tea light mold, I worked on finishing one bowl at a time. It did take me a few days to finish these because I only had one mold to use. This was not really an issue, since I had so many other types of favors to work on... so no time was wasted at all. I slept so little last month – it was crafting night after night, but I had fun!


Resin getting poured into the glass bowls, little by little. 


Bowl with resin, waiting for it to cure over night.


This is the first bowl, after one pour – ready for a little
bit more resin, and the final pour with the mold.


Here you can see the different views – I really like the silver color. 


A funny thing happened! I guess after all the lack of sleep for weeks... I went to mix resin for the last bowl, and it looked different to me. I looked at the bottles of resin and realized I had mixed and poured Amazing Casting Resin. This resin get hotter as it cures, and I was afraid it would break the glass bowl. I poured it into the bowl, and it all went well.  It was done in minutes! I guess I didn't add enough metallic powder, because this resin cures an opaque white... no big deal, it blended nice with the tea light.


Finally the fourth night, all bowls were done and all ready to be displayed at the wedding. I ended up with three different bowls; one only had resin added as a base, glass stones were added and a tea light was placed in the middle. Now that Amazing Clear Cast Resin is FDA Compliant {meaning it's food safe}, I could fill this with candies or other treats.


Here you can see how the tea light mold made it possible for the tea light to sit safely inside these two glass bowls – keeping it in place and making it safe to light it.


Here is another bowl – I added a little bit of red
to the hearts etched onto the glass.


The last candle holder made using the Amazing Casting Resin. I frosted the glass on the outside to work perfectly with the color of the resin and the candle.


Here is a side view of the candle – the silver frosted glass
and the white resin just worked great together!

It was so much fun to create this wedding favors... all different and unique. My sister loved them and they were a hit at the wedding!

I hope that I have inspired you to look at these Amazing Casting Products and find a way to not only create something new – but use them to transform an existing item into something new and different.

How would you use these amazing products
to create custom items for your event? 

Share your projects with us, we love to see what
everyone creates with Amazing Casting Products.

Thanks for visiting! I invite you to stop over to my blog "What is Creativity"
at http://chuy-creativity.blogspot.com to see more of my creations. Maria Soto

• • • • • • • • • • • • • • • • •

Don't forget to subscribe to our blog on the right side bar:
Twitter at AmazingCrafting | Facebook at AmazingMoldPutty | YouTube at AmazingMoldPutty

Friday, January 9

An AMAZING CHA Sneak Peak by Tracy Alden.
Visit us at Booth #1427!


Hello! Tracy here with sneak peak at some of the Amazing projects to be introduced and showcased by Amazing Crafting Products at the 2015 Craft and Hobby Association Mega Show. Coming up January 10th-13th! This year Amazing Crafting Products/Alumilite Corp. will be in Booth #1427 AND in the 2015 Hot Product Nominees area! Amazing Remelt by Alumilite is up for nomination in the Bead & Jewelry and Cake & Food Decorating categories!


Many different Amazing Remelt molds are being created for the CHA show, here is just a few of my food molds. There will be many more from other Amazing artists on display at the booth and Hot Product Showcase! After the show the molds can easily be reused and Remelted for more Amazing Remelt projects.


Here is a few of my fondant pieces drying and ready to be assembled into cake and food decorations. Fondat can easily be pushed into Amazing Remelt molds and then quickly popped out onto a cold cutting board to dry. 


There will be many demos, using all kinds of products, at the Amazing Crafting Products booth #1427. I will be there afternoons doing demos of my push molds such as those seen in the Polymer Clay Push Mold post. 


Have no fear it is not all about Amazing Remelt – many other examples and uses of the tried and true Amazing Crafting Products will also be on display at the booth. Such as one of my favorites Amazing Clear Cast Resin which is now FDA Compliant {meaning it's FOODSAFE}, in this case molded in vintage cabochon molds. With layers of resin and Alumilite Metallic Powders, I've created a wonderful glittery mix of mini galaxy pieces to be attached to art piece on display at the Amazing Crafting Products booth! 

What AMAZING arts and crafts can you create?

Visit my blog Art Resurrected for more craft tutorials!

Until next time, safe travels! ~ Tracy

• • • • • • • • • • • • • • • • •

Don't forget to subscribe to our blog on the right side bar:
Twitter at AmazingCrafting | Facebook at AmazingMoldPutty | YouTube at AmazingMoldPutty

Wednesday, September 10

How Does Your AMAZING Garden Grow?? Fabulous Faux #DIY Garden Markers by Isabel Villarreal


This summer I decided to try my hand at growing a vegetable garden and it's been fun planting seeds and watching them grow into actual plants. I've watched my plants go from tiny seedlings to leafy sprouts that are starting to look like actual things and what I've learned is that all plants look incredibly similar when they first start out, especially if you're a noobie gardener like me. So how do I keep track of what I'm planting? I figured the easiest way was to use garden markers to identify my new leafy friends as they grew. 


When I started this labeling adventure I had an idea of the size and shape I wanted so i looked through my supplies and found this plastic jar of Stampendous Pearlized Mica I got in a Frog Dog Studio kit earlier this year. It was the perfect size so I used it to create a custom mold using Amazing Mold Putty. I coated the jar with alumilite rubber release (you can also use olive oil) and pressed the bottom of the jar into the mold putty, making sure the edges were snug and even around the original jar. It only took about 7 minutes for the mold to set and the jar was really easy to remove from the mold since it had been coated. Please CLICK HERE to view mixing/preparation.


Amazing Casting Resin cures in just a few minutes, so I mixed up a batch and poured it into my mold {CLICK HERE to view mixing/preparation}. I poured a layer about 1/2" thick and figured I would use that as a base and build up layers until I got to a thickness I was happy with. Once the resin cured, I used Sharpie Markers to draw pictures of the veggies in my garden. This resin turns solid white when it dries so it makes an ideal canvas. The Sharpies dry quickly and are smudge free, but just to be safe I brushed a thin layer of Mod Podge® over the entire surface to protect the ink from smearing or running.


Once the Mod Podge dried it was nice and clear so I mixed up a round of Amazing Clear Cast Resin to pour my next layer {CLICK HERE to view mixing/preparation}. This resin is crystal clear, so I added the tiniest amount of Alumilite Green Dye to give it the look of vintage green glass. This layer was also about 1/2" thick.


Okay, so I cheated and made a couple of molds – since I'm trying to grow lots of different veggies at once. I ended up with 8 different varieties. Since I was mixing individual batches of resin for my molds I got some slightly varying shades of green, but I think it gives each marker it's own unique look.

Now when I removed the markers from the mold I realized that the edges were a bit sharp and the markers looked a little flat. My original goal had been to create garden markers that simulated the look of polished glass rocks, but these were flat and I would have to do something to give them a smoother, more rounded look.


I built up the rounded surface by adding thin layers of Amazing Clear Cast Resin until it started to dome on top. This gave me the smooth top surface I was trying to create. The domed top also refracted the light and made the colors a little brighter. If you prefer, you can print out images and cut them to size instead of drawing. Just be sure to coat your images with a clear sealing coat for protection so they don't smudge or run before pouring resin over the top.

It's been about a month since I started gardening and I'm now on my 4th raised garden box so these cute garden markers give my garden a personal touch and they are really helping me keep track of what's sprouting. Plus I no longer have to recite a list when friends are curious about about what I'm growing. And since these are so easy and fun to make, I'll just keep making and adding new markers as I add variety to my garden.

What will you create with

I'd love to see what you create! Please upload and share your creations to the


• • • • • • • • • • • • • •

Don't forget to subscribe to our blog on the right side bar:
Twitter at AmazingCrafting | Facebook at AmazingMoldPutty | YouTube at AmazingMoldPutty

Tuesday, August 26

#Cre8time meets Vacation Memories... DIY Souvenir Wine Glass Candle by Tanya Ruffin

Making your own souvenirs with Tanya Ruffin for Amazing Mold Putty

Save yourself a little money by making your own souvenirs! Take all those shells your kids have collected and make a lasting souvenir of your vacation.

Materials:
Directions...

Making your own souvenirs with Tanya Ruffin for Amazing Mold Putty

Pour sand in the wine glass. This is going to replicate the ocean. This is the sand on the bottom of the sea, so fill it about 1/6th up.

Making your own souvenirs with Tanya Ruffin for Amazing Mold Putty

Drop some shells on top of the sand, stick close to the outside edge of the glass (you won't be able to see the shells in the middle very well, so don't waste them). Mix up some Amazing Clear Cast Resin (clear) and slowly pour in wine glass. Avoid the side of the glass, you don't want clear drips down your glass. The resin will slowly soak into all the sand. You may see air bubbles. Let cure. It took about 3 hours for my clear resin to cure enough to move to the next step.

Making your own souvenirs with Tanya Ruffin for Amazing Mold Putty

Using the Alumilite Blue Dye, mix a small amount into part "A" of your Amazing Clear Cast Resin. You want just a small amount!!! I made the mistake of thinking it would cure more transparent the first time and it did not! Start light – you can always make it darker. Let this cure over night.

Making your own souvenirs with Tanya Ruffin for Amazing Mold Putty

Add a layer of Amazing Clear Cast Resin on top of the blue layer. You can throw in a shell or two if you like. I dropped a little sand on the top after it had cured a little while. I decided to do this clear layer before I added more sand because on a test glass, the sand actually fell all the way through the blue in a few spots. The clear layer will seal the blue water layer and keep it separate from the sand.

What Will You SAVE now?

Making your own souvenirs with Tanya Ruffin for Amazing Mold Putty

Now add some more sand and position your glass votive in the center. You can start arranging more shells. After you have the shells arranged you can add more Amazing Clear Cast Resin. I let the resin cure for a few hours then added more shells and more resin.

Making your own souvenirs with Tanya Ruffin for Amazing Mold Putty

I love how it looks! You may see air bubbles coming up from the sand and need to add more Amazing Clear Cast Resin as it starts to soak into the sand. 

Making your own souvenirs with Tanya Ruffin for Amazing Mold Putty

Measure the bottom of your glass so you can use a computer to layout text. 

Making your own souvenirs with Tanya Ruffin for Amazing Mold Putty

I used CorelDRAW – but you can use any software that lets your curve text. Print it out and place glass under the print out and trace with a glass marker.

Making your own souvenirs with Tanya Ruffin for Amazing Mold Putty

 Now light your candle and reflect on your vacation. 

With all the money you saved on souvenirs you have a jump start paying for the next trip! Think about how much grandma would love a gift like this made from shells her grand kids collected. This is much better than a "I went to the Caymans and all i got was this lousy t-shirt" shirt!!!

Until Next Time... ~ Tanya

Tanya Ruffin with Create Studios

Please visit my site to see more of my inspiring creations at www.tanyaRuffin.com


Tanya Ruffin for tanyaruffin,com

Create Studios Baton Rouge

• • • • • • • • • • • • • •

Don't forget to subscribe to our blog on the right side bar:
Twitter at AmazingCrafting | Facebook at AmazingMoldPutty | YouTube at AmazingMoldPutty
Related Posts Plugin for WordPress, Blogger...