Showing posts with label tags. Show all posts

Monday, December 26

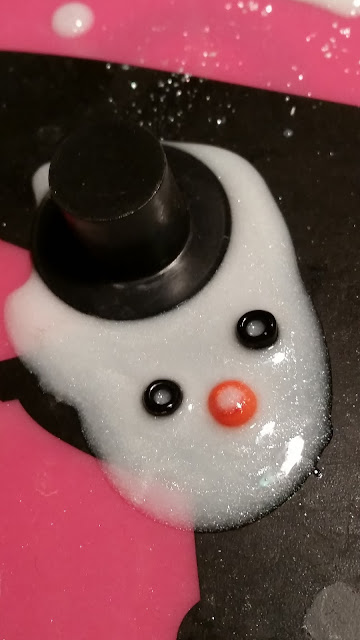
#Cre8time Resin Play... Quick and Easy Melted Snowman Gift Tags by Tanya Ruffin


Spruce up your gift wrapping with an adorable melted snowman gift tag!


I wanted to make some cute, kid friendly, name tags for my Christmas gifts and thought a melted snowman would be quick and flat enough that I would be able to write the "to" and "from" on... and be oh-so-adorable. In south Louisiana, the only snowmen we have are melted ones anyway! 

In my stash I have a small bag of mini top hats. No idea why I bought them, clearance I assume. I have had them for several years and darn it – it is time to use them!!

Supplies:
  

Mix up some Amazing Casting Resin (follow directions based on how many snowmen you want to make). I made two the first time so I mixed 15 ML of each part ( using the measuring cup in the box) and scooped up some pearl Alumidust on the end of a craft stick and mixed them all together.


On a silicone mat, pour out 3 puddles of resin for each snowman – each one getting larger than the last. On the smallest one, set the top hat and the beads into the resin. Let cure {this is at about 20 minutes}.


Some of mine ran together, so I picked up the resin before it completely cured and simply cut them apart with scissors. You can reshape your pieces at this point. 


I used Allene's Tacky Glue to secure all the pieces together.

Tada!


If you made these tiny enough you could make them into pins or even earrings!

How do you embellish your gifts?

You can Craft Your Own Way!


Please visit my site to see more of my inspiring
creations at www.tanyaRuffin.com

• • • • • • • • • • • • • • • • •

Don't forget to subscribe to our blog on the right side bar:
Twitter at AmazingCasting | Facebook at AmazingMoldPutty | YouTube at AmazingMoldPutty

Monday, December 21

Merry and #Cre8time Bright Christmas Tags...
by Bridget Caldwell-Cordero

Hello everyone! I’m super excited to bring you this project. I wanted to make tags for some Christmas gifts but did not want to use or make the traditional ones... so I came up with this idea to create them out of resin {or should I say Amazing Clear Cast Resin and Amazing Mold Rubber}.


How does one make a resin tag??! I cut out a chipboard tag and wrapped it with saran wrap. Then used am empty tin I had and securely glued the tag to the inside. After that, I mixed up some Amazing Mold Rubber and poured it in {CLICK HERE for mixing/preparation}. Once this was cured I pulled the mold out and then the fun began...


I mixed some Amazing Clear Cast Resin – which is so easy to work with! Since the curing time takes longer, it gave me longer time to play around with the scenery I wanted to create on my tags. I also used the White Alumilite Dye to make it look like snow. I placed buttons and stickers to make little scenes on each tag.


Once the first layer cured over night, I mixed up some more of the Amazing Clear Cast Resin and added another layer. At this time I placed more decorations on a few of my tags to give them a 3-D layered effect. Once the tags were completely cured, I popped them out of the mold, drilled a hole in the top and added some ribbon and other fibers.


But the fun does not end there… When you share your gift with that special someone attach a ornament hook and they have a keepsake to hang on their tree for years to come!


How would you take your
holiday tags to a new dimension??

Thank you everyone for stopping by and I hope I have inspired you.
If you would like to see my video process by please click HERE.


If you’d like to see more of my creations,
please stop by my YouTube Channel

• • • • • • • • •

Don't forget to subscribe to our blog on the right side bar:
Twitter at AmazingCasting | Facebook at AmazingMoldPutty | YouTube at AmazingMoldPutty

Friday, December 12

Make a Tag... or Three or TEN! AMAZING Remelted Tree Tags by Tracy Alden


Hello! Tracy here with another Amazing Crafting Products tutorial! I always love adding a hand crafted element to gifts given out each year for the holidays. It can be foods, cards, fabric decos or in this case gift tags that can be used as ornaments after gifts have been opened!

I needed to make quite a few tags and didn't have the time to stamp and cut all the tags out. So making a mold from Amazing Remelt that could be used for the holidays and remelted later for other projects was just perfect!

Supplies: 


I started by rolling out polymer clay to a thickness of a little less than half an inch. I attached an arrangement of clear stamps to the stamp block, sprayed the stamp with water to act a release agent so the stamps don't stick to the clay, and pressed the stamps firmly into the clay.

I used Stampendous Clear Stamps Winter Tree stamp set for this project because it is one of my favorite holiday tree stamp sets. Feel free to use your favorite stamps to create your own style of tags!


I carefully trimmed away the excess clay from the edges,
making simplistic gift tag shape. 


After stamping and cutting several tag shapes I placed them on a large ceramic tile and baked them in a designated toaster oven.


Once the polymer clay pieces cooled, I did NOT remove them from the tile. When baking polymer clay on a tile they often stick after cooking, often needing to be removed with a thin blade. With the pieces so neatly stuck to the tile I don't need adhesive to glue them to the tile to mold. I just left them in place and carefully taped on duct tape, smoothing the edges tight to the tile. I then sprayed the piece with a mold release before pouring Amazing Remelt.


As I noted in my Previous Post about Amazing Remelt – when heating up the Remelt I was careful to try heating it for 15 second intervals. Depending on how much Remelt you are trying to melt and how hot the microwave being used is, the time needed to melt can vary dramatically. 

From a 12 -15 inch distance I poured the Amazing Remelt in the duct Tape and tile mold box – the distance gives the Remelt a chance to release more bubbles before cooling. I used a paperclip to drag any bubble caught in the Amazing Remelt before it cooled to make sure to get a better casting. 


Once the Amazing Remelt was cooled, and no longer warm or sticky to the touch, I carefully removed the duct tape, tile and the originals from the Remelt. A little of the Remelt was uneven and I removed the excess with sharp crafting scissors and saved it for another mold.


I conditioned the polymer clay, making sure the clay was soft and warm enough to be pushed into the molds. I pushed the clay into the molds tight, and used a acrylic roller to push the clay further into the molds, making sure the clay got into the tiny embossed details.


I then carefully placed the mold, with the polymer clay still inside, face down on a ceramic tile. I then peeled back the mold and the polymer clay piece was then stuck to the tile. I then refilled the mold with more polymer clay and repeated this process several times so I had plenty of tags and then baked the polymer pieces.


I lightly sanded and trimmed the edges of the now baked polymer clay pieces with a craft knife and an emery board. I then used my finger and a paint brush to apply a black acrylic paint wash to the tags and let dry. They might look dark and dreary now but don't worry they will not be for long! 


Using an emery board, I sanded the raised surfaces of the tags. The embossed portions were now back to the original clay colors and the black in was left in the grooves to increase the visibility of the detail.


I painted on some Liquitex Gloss Varnish to the tags and while wet applied metallic powders – Alumilite Metallic Powders in Gold, Silver and Pearlescent.


I painted on some more Liquitex Gloss Varnish to the tags and while still wet I sprinkled on the Gold, Silver and Clear Glitter from the Stampendous Frantage Treasures Glitter 5-Jar Kit and let dry.


I threaded ribbon through each of the holes created in the tags, put names on the tags and attached them to presents and tree. 

With your favorite stamps, images
and Amazing Remelt, what handcrafted
Holiday tradition can you create?

Please share them on the user GALLERY on the
Amazing Crafting Products Website!

Visit my blog Art Resurrected for more craft tutorials!

Until next time, safe travels! ~ Tracy

• • • • • • • • • • • • • • • • •

Don't forget to subscribe to our blog on the right side bar:
Twitter at AmazingCrafting | Facebook at AmazingMoldPutty | YouTube at AmazingMoldPutty
Related Posts Plugin for WordPress, Blogger...