Tuesday, March 31

Sail Away With Me... #MixedMedia on the #Cre8time Seas by Melissa Johnson


Good morning! Today I am sharing a fun little project that I made using some Amazing Mold Putty, Amazing Casting Resin, and Amazing Clear Cast Resin


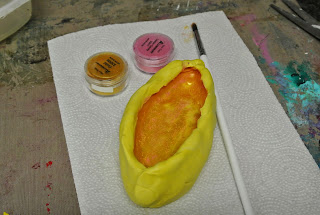
I was inspired to make a little vintage style sailboat after seeing some cheap neon colored plastic boats at Dollar Tree. To begin, I mixed up some Amazing Mold Putty and molded the bottom piece of the boat. I pulled the plastic sail off because I wanted to make my own. Before I added the Amazing Casting Resin, I dusted the mold with Cotton Candy and Gold Alumidust.


My mold was a little bit wonky, but I was actually good with that. I wanted the boat to look a little bit beaten and worn to really give it that vintage feel. I mixed up some more Cotton Candy Alumidust with some Golden Clear Tar Gel and brushed that on over the top.


Then I decided that I didn't like the way it was looking, so I added a layer of printed tissue paper collaged over the top and brushed with a mixture of Golden Raw Umber paint and Golden Acrylic glaze. 


While that was drying, I coated a piece of vintage paper with Amazing Clear Cast Resin using a sponge. I let that dry overnight then cut it into the shape of a sail for the boat. 


I used my Dremmel tool to drill a hole in the boat. Then, I went hunting around in my backyard for the perfect stick to use as a mast. I hot glued the stick inside of the hole and held it upright until it was set. 

And here is the finished product! 


How would you use
in your mixed media arting?

Make something that makes you happy :) ~ Melissa Johnson
Please visit my BLOG, to see more of my mixed media creations.

 • • • • • • • • • • • • • •

Don't forget to subscribe to our blog on the right side bar:
Twitter at AmazingCrafting | Facebook at AmazingMoldPutty | YouTube at AmazingMoldPutty

Friday, March 27

Everything in it's PLACE... AMAZING Inspiration by Brenda Burfeind

Good day crafters! Brenda here from Creativity is a State of Mind to show you what I did with some of my LEFT OVER resin pieces. If you follow me here you know how I am always talking about my EXTRA resin pieces especially when I am pouring molds and have extra resin.

Well, my box is overflowing a bit with "not finished", "half finished" or "finished" pieces that I didn't know what to do with. The other day I went through my box and found some of my FAVORITE pieces I've made in the past and decided to incorporate all of them into something uniquely mine!

Here is my UNIQUE jewelry holder...


and you can jump over to my blog HERE and see exactly how I created this. 

What would you make with
your amazing left overs?

Please leave me a comment and tell me one of your ideas!

Thanks for stopping by and until next time ~ Brenda
Visit my blog, Creativity is a State of Mind to see some more of my creations.

• • • • • • • • • • • • • •

Don't forget to subscribe to our blog on the right side bar:
Twitter at AmazingCrafting | Facebook at AmazingMoldPutty | YouTube at AmazingMoldPutty

Wednesday, March 25

Molded Lace Makes a Wearable Statement...
by Isabel Villarreal


Everyone loves statement jewelry and this necklace made from molded lace definitely makes a statement! Lately I've been seeing accessories made from lace and I decided to try my hand at creating something for myself. I originally tried to use a lace piece for my necklace but it was a little too droopy so I figured I would mold it and cast it. This started out as an experiment but the results were so amazing I had to share! Follow along to see how to make a stunning statement piece for yourself.


I started with a nice lace piece that I trimmed down until I was satisfied with the shape. I mixed up some Amazing Mold Putty and using a rolling pin, I flattened the putty to fit the size of the lace and then rolled the lace piece into the putty face down. CLICK HERE to view mixing/preparation.


The resulting mold is very shallow, but this way the final piece will be thin and light enough to wear comfortably. I got a great impression from the lace with some really great detail.


The next step was to add some color with Alumidust pigment powders. I used some small brushes to coat the mold using a variety of colors to bring out the intricate design and leaving some areas with no pignment so that they would be clear. 

To fill the mold I mixed a batch of Amazing Clear Cast Resin {CLICK HERE to view mixing/preparation}. I filled the mold very carefully to try to avoid any over spill since the mold is so shallow. While the resin was still wet I sprinkled iridescent glitter along the entire surface. 


The resin was pretty thin and being that I live in South Florida, the temperature was pretty nice so it was dry to the touch in about 8 hours. I carefully released it from the mold while it was still a little soft so that I could trim away any unwanted areas and smooth out the edges. 

The resin piece was beautiful on its own. The original lace piece has sequins and embroidered edges and you can see that the resin piece picked up all of the beautiful details perfectly!


These pictures show the back of the piece, which I covered in glitter and the front of the piece to show the results. It has sort of a watercolor feel that works well with the floral theme. 

The front of the piece has color but if you look you can see the way the glitter shows through the color to give it dimension. 


To finish the piece I coated it with a super thin layer of Amazing Clear Cast Resin to smooth out the surface and added some crystals to bring out the details. Once the crystals were set I used my Crop-A-Dile to make a couple of holes in the resin in just the right place so it would hang at an angle from around my neck and used sterling jump rings to hang it from a fine Silver chain. 

How will you make a statement

I'd love to see what you create! Please upload and share your creations to the

 • • • • • • • • • • • • • •

Don't forget to subscribe to our blog on the right side bar:
Twitter at AmazingCrafting | Facebook at AmazingMoldPutty | YouTube at AmazingMoldPutty
Tuesday, March 24

#Cre8time meets Play-Doh! AMAZING Wearable Inspiration from Aimée Wheaton


Hi all! Aimée back with a little inspiration from my three year old's play time. While cleaning up her Play-doh stuff this funky orange hardened piece of Play-doh fell out of the plastic mold and onto the table. It was super funky and cool looking and of course I thought it would be the perfect item to mold.


If you don't have a young child at home you probably don't recognize the shape, it's from a Despicable Me Minion Play-doh set. The funky bomb looking shape at the top of this necklace is from the head of a minion and the little knobs are supposed to be the hair coming out. This dried up in her set and came out looking like this...


It molded well too!! So I decided to go with it.


I painted in some metallic Alumidust into the mold and then prepared my resin. I used the Amazing Casting Resin along with some Alumilite Blue Dye – mixed it up then poured it. I let it set and then drilled holes in the top and bottom. I filed it in areas to distress it a bit and then started building my funky pendant using various chains, beads, wire and charms. Lastly, I added it to a shorter cord. This one of a kind necklace you won't find in a store!


I like that it looks substantial but it's light as a feather.


The rounded beads at the bottom are resin druzy beads I found at Michael's.


I hope you enjoyed this and I bet you'll look at your kids dried Play-doh pieces differently now! ;)

To see how all of our AMAZING products can enhance your art,
check out these AMAZING products!

Let's see what you can create with
AMAZING Casting Resin and Play-Doh!

Feel free to stop by my FB page to see the latest with me. 
To see more of my work please visit my blog "Creative Flutters"
and also at the Aimée Wheaton Art and Design website.

Till next time! Xoxo Aimée

 • • • • • • • • • • • • • •

Don't forget to subscribe to our blog on the right side bar:
Twitter at AmazingCrafting | Facebook at AmazingMoldPutty | YouTube at AmazingMoldPutty

Monday, March 23

Organic and Natural Shapes that are #Cre8time Charming... by Tracy Alden


Hello! Tracy here with another Amazing Casting Products tutorial! Organic shapes and forms are a constant source of inspiration for me – be it leaves, twigs, a pool of water or even a strange crystal. I love the idea of being able to duplicate these shapes to create new forms and "canvas" for art. This is where Amazing Mold Rubber comes in handy. 

Supplies:


I went through my collection of polished stones and glass pieces looking for smooth and/or interesting shapes that would look great for pendants and small art pieces but in the natural state would be too heavy to wear.


I placed the chosen pieces on a ceramic tile, trying to see how many pieces I could fit on the tile. The ceramic tile acted at the base to my mold box, with sides made from a coated cereal box. I used packing tape and hot glue to seal the edges. I hot glued my originals to the bottom of the mold box


Carefully following the instructions I mixed up the Amazing Mold Rubber and slowly poured it into the mold box, then let cure. CLICK HERE to view mixing/preparation. After I extracted all of the stone and glass pieces, I cut and trimmed any raw edges off the Amazing Mold Rubber mold.


I mixed up some Amazing Clear Cast Resin and poured the resin into the mold filling each mold up to about 1/4 of the way. I let this cure for a few hours until tacky and poured another layer of resin and sprinkled in Alumidust and glitter. This technique is very similar to my layered Resin Halloween Cabochons

While the second layer of resin was still uncured I made up several small batches of Amazing Clear Cast Resin mixed with a variety of Alumilite Dyes. I dropped little tooth pick amounts of tinted resin into each mold, making random swirls and patterns in the clear resin. I let this cure a few hours until tacky set.


The final layer was a thin layer of Amazing Clear Cast Resin mixed with more Alumilite Dyes, making sure to tint the resin a bit darker. Carefully I applied it to the back of each cab and let cure completely. This final dark layer of resin helps the glitter and mica "pop" more visually.


Using a small hand drill (or craft knife), I removed any uneven edges off the resin pieces. The finished pieces can easily be wire wrapped or have a hole drilled to create a pendant and be put on chain or ribbon to create one-of-a-kind wearable art.

With so many shapes to mold and so many things you can place in the casted resin pieces your only limit to wearable art is your imagination!

What AMAZING arts and crafts can you create?


Visit my blog Art Resurrected for more craft tutorials!

Until next time, safe travels! ~ Tracy

• • • • • • • • • • • • • • • • •

Don't forget to subscribe to our blog on the right side bar:
Twitter at AmazingCrafting | Facebook at AmazingMoldPutty | YouTube at AmazingMoldPutty

Saturday, March 21

Capped Off and WINE-ing About It... #Cre8time Discoveries by Sandra Strait

Much of what a design team does is experimental. I'm here today to share some experiments I did with Amazing Casting Products and some wine foil caps that a friend gave me. She was closing her wine shop after 15 years, and had bags full of the caps. You've probably noticed the beautiful designs embossed into the top of bottles of wine. They are awesome, but the foil is flimsy, and the embossing is shallow. I didn't think they would work for molding.

So, of course, I tried molding them, anyway.


I picked out a few caps, looking for variation in the complexity and depth of embossing. One of them, I cut around the edges and flattened.


Uh-oh! I tried molding and casting a couple of them, and they just weren't flat enough. The foil caved in in places and I ended up with lumpy, warped discs. Surprisingly, though, the detail was good where there was no warping.

'What a shame', I thought. Then I started thinking. I had flattened the caps as much as possible, then pushed them into the mold putty. One, I stretched the putty over the cap. Neither way worked because the foil was too flimsy.

But the detail was also debossed inside the caps. What if I used the inside of the caps?

Eureka!

Because Amazing Mold Putty sets fairly quickly, I mixed up enough of Part "A" and "B" for about two caps at once and pushed them into the caps.


Success! And the detail was even better than before. I could have stopped here, and use the putty as stamps, but I wanted to make resin discs. So I mixed up more mold putty and made ridges around each mold.


I dusted each mold with a different color of Alumidust...


...and then mixed up Parts "A" and "B" of Amazing Casting Resin. It only takes about 5 minutes for the resin to set (setting time differs according to the temperature). CLICK HERE to view mixing/preparation.


Since the molds were so shallow, I mixed up more of the resin than needed, and I drizzled the left-over into shapes (which you can see in the first photo). I also trimmed off excess resin from the discs. No waste though. I'll use all these pieces as embellishments for art journals and mixed media canvases.


I was happy with the result, but again, I got to thinking. I had plans to use the wonderful Gelli Arts® Gel Printing Plate that a creative friend had sent me... and I wondered how well these discs would work to leave impressions on the gelli plate. But that meant getting paint all over them.

Then I thought – two birds with one mold! I'd make up another set of discs without the Alumidust, and use those to make impressions. And at the same time, I be painting the discs with paint off the gelli plate! Oh, I was so excited, I was flapping my arms, LOL!

This post is already lengthy, so I won't go through the Gelli monoprinting process, but you can find out more about it on the Gelli Arts® blog. If you don't have one of these plates... you can do a DIY version with Amazing Mold Rubber – CLICK HERE to see how make a custom Amazing No-Gelatin Printing Plate.


I was happy on all counts. The amount of paint on the plate made a difference. In some cases, it obscured the detail, but the imprint still looked cool.


The same thing occurred with the paint job on the discs. The best ones came when there wasn't too much paint on the plate.


Here are a couple of my favorite pages from the printing session. All around, I think I stumbled on a fun way to get the most from my casting and printing projects.


I hope you've enjoyed my 'wine-ing' today, and that I've inspired you to experiment yourself. 

For more complete instructions on how to use Amazing Casting Products please check out the Instructions page on their website.

Supplies:

What handy items would you mold
for Cre8time mark-making using

Please upload and share your creations to the

For more of my work in Amazing Mold Putty, zentangle-inspired art, and daily links to tangles, tutorials, and giveaways please visit my "Life Imitates Doodles" blog. Sandra Strait

 • • • • • • • • • • • • • •

Don't forget to subscribe to our blog on the right side bar:
Twitter at AmazingCrafting | Facebook at AmazingMoldPutty | YouTube at AmazingMoldPutty
Related Posts Plugin for WordPress, Blogger...