Hello! Tracy here with another Amazing Casting Products tutorial! I recently started to change the decor in one of my bathrooms, going with sea life, drift wood and glass themes in shades of blue, white, gray and brown. I noticed that one of the walls was missing a little something. With the help of Amazing Remelt it was easy to mold some of the sea shells and glass bobbles I already had as decorations in the room to create that final decoration!
Supplies:
- Amazing Remelt
- Amazing Clear Cast Resin
- Blue Alumilite Dye
- Bright Blue, Ocean Blue, Interferance Blue and Pearl Alumidust
- Liquitex Gloss Varnish
- Stampendous Crystal Snow White Glitter, Ultra Fine
- Beacon Gem-Tac Adhesive
- Viva Decor Inka Gold Metalic Rub, Silver
- StazOn Blue Hawaii Ink
- Paint Brush
- Small Canvas
- Stir Sticks
- Craft scissors
- Plastic lunch tray (from pre-prepared small wraps and sushi)
- Small shells
- Glass marbles
- Cosmetic Sponge
Using a plastic lunch tray as my mold box, I carefully placed sea shells and glass marbles on the bottom layer of the tray, making sure none of the pieces reached the top lip of the tray.
I heated the Amazing Remelt in the microwave, in the container it comes in. I poured the heated Remelt into the plastic lunch tray with the shells and glass pieces from a 12 -15 inch distance – the distance gives the Remelt a chance to release more bubbles before cooling. A few of the shells floated, because of trapped air bubbles, all I had to do was push the shells back down with a stir stick and the air bubbles rose to the surface of the still-liquid Remelt.
I let the Amazing Remelt cool until no longer tacky or warm – putting the tray in a refrigerator can speed up this process. Once the mold was cool and no longer tacky, I carefully removed the Remelt from the tray and flexed the mold until the glass pieces popped out.
Some of the Remelt had gone between the glass pieces and shells – requiring me to cut and remove the excess Remelt with sharp crafting scissors. I trimmed the uneven edges and made sure there was no loose or over hanging Remelt.
Some of the Remelt had gone between the glass pieces and shells – requiring me to cut and remove the excess Remelt with sharp crafting scissors. I trimmed the uneven edges and made sure there was no loose or over hanging Remelt.
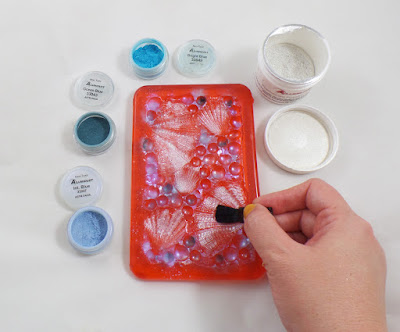
Using a small cosmetic brush I dusted the inside of the mold with Bright Blue, Ocean Blue, Interferance Blue and Pearl Alumidust.
I mixed up a small portion of Amazing Clear Cast Resin, making sure to slowly stir to reduce air bubbles and let it sit for 5 minutes. Using a toothpick, I put a tiny drop of Blue Alumilite Dye into a small mixing cup and poured a portion of the pre-mixed resin in it. I poured un-tinted Amazing Clear Cast Resin in the mold and used a toothpick to drop in small portions of blue tinted resin in different areas to create visual contrast.
Once Amazing Clear Cast Resin was cured I carefully removed it from the Amazing Remelt mold and trimmed any uneven edges.
Using a plain gesso covered canvas I applied Viva Decor Inka Gold Metalic Rub, Silver and StazOn Blue Hawaii Ink with a Cosmetic Sponge.
I glued on the casted resin piece to the canvas with Beacon Gem-Tac Adhesive and let dry. I added some Liquitex Gloss Varnish over and around the edges of the resin and sprinkled on Stampendous Crystal Snow White Glitter.
With as easy as I found this to do I am now looking at what other decor items I can create with Amazing Remelt!
What AMAZING arts and crafts can you create?
Please share them on the user GALLERY on the Amazing Crafting Products Website!
Visit my blog Art Resurrected for more craft tutorials!
Until next time, safe travels! ~ Tracy
Please share them on the user GALLERY on the Amazing Crafting Products Website!
Visit my blog Art Resurrected for more craft tutorials!
Until next time, safe travels! ~ Tracy
• • • • • • • • • • • • • • • • •
Don't forget to subscribe to our blog on the right side bar:
Twitter at AmazingCasting | Facebook at AmazingMoldPutty | YouTube at AmazingMoldPutty


No comments:
Post a Comment