Showing posts with label owl. Show all posts

Thursday, February 25

#Cre8time Alterations... DIY Thrift Store Frame Redux by Lyn Gill


Hi all! Lyn Gill here again for with a DIY project – an Altered Framed Owl. I bought this frame at the thrift storeand it was a worn, scratched yellow color, and very unattractive. By just using some Amazing Casting Resin, black Gesso, crackle glaze and metallic acrylic paint I was able to completely transform it.


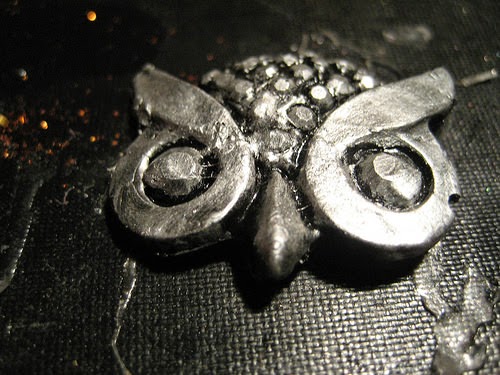
I decided to use some Amazing Casting Resin to create the Owl using an Amazing Mold Putty mold I created for a previous project... Oooo I can see it coming along nicely.

I used the black Gesso and Crackle Glaze in it as well as some Gold Leaf Flakes & the Metallic Acrylic Paint... WOW did it transform this thrift store frame!


I can't wait to hang it in my Craft Studio!
I do have a love for all things metallic... LOL.

What kinds of thrift store finds could
you alter with Amazing Casting Resin?

Well thank you so much for joining me today
with Amazing Casting Products... Till Next Time! ~ Lyn

You can find more of my work on Facebook Page LynzCraftz,
on YouTube atLynzCraftz, as well as my blog LynzCraftz.

• • • • • • • • • • • • 

Don't forget to subscribe to our blog on the right side bar:
Twitter at AmazingCasting | Facebook at AmazingMoldPutty | YouTube at AmazingMoldPutty

Tuesday, November 11

When the Cold Winds Blow... OWL Spoon You! Altered Spoon Pendant by Tanya Ruffin

Owl Spoon You: Tanya Ruffin with Amazing Mold Putty

For this project I started out with a spoon, a resin owl head,
a resin clock face and watch parts.

Owl Spoon You: Tanya Ruffin with Amazing Mold Putty

First thing is gather your pieces. I thought the flourishes (under the spoon) would make great wings. Well, they didn't. but the resin clock face did. I had a mold I purchased off Etsy and had a spare cast laying around. I also used a little piece of a book page as my base.

I mixed up some Amazing Clear Cast Resin and using a craft stick dripped it in the spoon {CLICK HERE to view mixing/preparation}. You may have to prop the spoon on another craft stick so that the resin won't run out. I actually bent my spoon handle back some. You can see that in the photo above. 

Owl Spoon You: Tanya Ruffin with Amazing Mold Putty

I put the book page pieces on the bottom (so you could see my silver watch parts) and started dropping in the watch parts.

Owl Spoon You: Tanya Ruffin with Amazing Mold Putty

This is starting to look fun!

Owl Spoon You: Tanya Ruffin with Amazing Mold Putty

Silverware, its not just for breakfast anymore!

Now I cut with a pair of scissors the resin watch face. It isn't exactly in half, it is more like 1/3 of the left and 1/3 of the right side. This formed the wings. The Amazing Clear Cast Resin is all the way to the top of the spoon so dripping a little more over the top of the clock face pieces and smoothing out a nice top layer will work as a glue. I also dropped in a second hand.

Owl Spoon You: Tanya Ruffin with Amazing Mold Putty


While the Amazing Clear Cast Resin is curing I painted the white resin owl head with black acrylic paint. I molded the head from an old ring. I have probably 100 cast resin pieces in multiple drawers and pull them out and rummage through them when I start a craft project. So no telling how long ago I made this. After the black dries I go over it with silver Rub 'n Buff®. I LOVE that stuff! 

Owl Spoon You: Tanya Ruffin with Amazing Mold Putty

After the Amazing Clear Cast Resin has cured I can bend the spoon. Using two sets of pliers, I held the bottom of the spoon with one set (you could use your hand for this) and grabbed about 1/2 inch above the spoon part (I need to leave room for the owl head, be sure to test out where you want the head to sit) slowly bending the spoon handle back. I folded mine all the way back because I wanted the tip of the handle to represent tail feathers. 

Owl Spoon You: Tanya Ruffin with Amazing Mold Putty

This is how it looks from the side.

Owl Spoon You: Tanya Ruffin with Amazing Mold Putty

This was originally going to be another pendant, but the opening on it was large enough to make it a scarf pendant. With winter coming, even in south Louisiana, we need something to keep our necks warm!

How will you alter your flatware

You Can Craft Your Own Way! ~ Tanya

Tanya Ruffin with Create Studios

Please visit my site to see more of my inspiring creations at www.tanyaRuffin.com


Tanya Ruffin for tanyaruffin,com

Create Studios Baton Rouge

• • • • • • • • • • • • • •

Don't forget to subscribe to our blog on the right side bar:
Twitter at AmazingCrafting | Facebook at AmazingMoldPutty | YouTube at AmazingMoldPutty


Tuesday, October 7

Here Kitty...Kitty! #Cre8time Halloween Inspired Decor by Aimée Wheaton

Hi all! Aimée here with some cute Halloween decor ideas. You'll never know when inspiration hits, this hit me while browsing the Dollar Tree for an event I was doing and I saw this cute little pumpkin ice cube tray, I thought perfect for resin and not ice! That got me thinking for a few days at first I thought I'd do earrings or pumpkin inspired jewelry but felt I'd take it a bit further but wasn't sure what yet. I had to go to Michael's for something and looked in the dollar bins as well and was further inspired. Well before I blah blah anymore let's get to it!

I made a cute swag decor for my home. My girls are little and get freaked out by anything not so cute for Halloween. This is a great craft on a budget, total cost for the trinkets was $8. :)


All items hung on the ribbon I molded with Amazing Mold Putty and used Alumilite Metallic Powders on each. I then embellished with a gold, white and black Sharpie. When the Amazing Casting Resin was curing I added in an eye pin to all but the keys to make it easy to hang on the ribbon. The keys were hung with copper wire.


Pumpkin ice tray painted with Alumilite Copper Metallic Powder.


I really LOVE how the key's turned out!!!


Embellished with Sharpies!


I really like how it turned out!! If you already have lots of Halloween trinkets this would be easy for you to make. Put your own spin on it.

Let's see what you can create
with your variety of items,

Feel free to stop by my FB page to see the latest with me. 

To see more of my work please visit my blog "Creative Flutters"
and also at the Aimée Wheaton Art and Design website.

Till next time! Xoxo Aimée

 • • • • • • • • • • • • • •

Don't forget to subscribe to our blog on the right side bar:
Twitter at AmazingCrafting | Facebook at AmazingMoldPutty | YouTube at AmazingMoldPutty
Related Posts Plugin for WordPress, Blogger...