Monday, February 27

Reminds me of a lumberjack....

When I purchased this mold from my local craft store, the first thing I thought of was that this little guy on here could pass for Santa or a lumberjack.  Since Christmas has come and gone I thought it might be fun to make him into a lumberjack and place a pin back on it.  I enjoy wearing a pin on my coat and thought it might be fun to place him on it.  I haven't decided what to use the girl for yet so that's still a work in progress. 


For my lumberjack, I started by mixing enough of the White Amazing Casting Resin to pour into the mold and let it sit until it was hardened (approximately 20 minutes).  Now I had a fun piece to use, but needed to figure out how to color him.  That night I really didn't want to dig out my paints and brushes and mess with having to clean those up after I was done.  While I sat at my desk I kept looking at my colored pencils and then thought hey why not try those to color the resin?  Thus, a new level of fun began....


I used my colored pencils and even my blending pencil to add some skin tone and then colored his eyes and hat in. Every so often stopping to blend the color together.  


After I had finished the skin tone, I used a pink pencil to give him a little color in his cheeks and blended it in.  Before I knew it my lumberjack had a personality all of his own.  


I glued a pin back that I had also purchased at my local craft store on and sprayed him with a matte sealer to protect the pencil coloring.  Before it was sealed the pencil did not rub off at all, but overtime with wear and tear it might have so I wanted to keep it from happening so I used the sealer on it.  


This is a picture of my completed pin.  What could be more fun?  Making Santa Claus just by coloring him with red and green pencils!  

Sunday, February 26

Forgotten in Time by Jennifer Ingle

This piece is called Forgotten in Time. I created it using a mold of my own hand and when I cast it the fingers were blurred creating a movement through time effect I simply could not ignore. The string around the finger is a reminder of that which has been long forgotten over the course of the ever changing, ever moving, always pushing time. I hope you enjoy it.

DSCN5584


I began by creating a mold of my hand using Amazing Mold Putty. I mixed it quickly and had The Hubbums help me press it in around my hand to be sure that it was tightly fit. I did coat my hand with some baby powder to make the release a bit easier, but it really wasn't hard to get my hand out of the mold at all and it sets within 15 minutes, so it wasn't too inconvenient, either.

Mold Putty Glove


Once the mold was ready I brushed the inside of it with the Gun Metal metallic powder. I then mixed parts A and B of the Amazing Casting Resin according to the instructions and poured it in the mold. I allowed this to set (it only takes about 10 minutes) and then I allowed it to cool because it heats up quite a bit during the setting process and because this was a large piece it got rather warm. I then removed the cast from the mold by cutting the mold carefully (I can use it as a two part mold in the future) and removing the hand. Some parts were not fully covered with the powder so I mixed some powder with Crystal Laquer and touched up those areas by hand with a paint brush.

DSCN5572


DSCN5573


DSCN5577


The detail that the mold putty captured and the resin took on is just amazing to me! I absolutely LOVE this piece!!!

DSCN5583


You can see more of my work over on my blog, Just Jingle! Thanks for leaving your comments!

Jingle Out!

Friday, February 24

Make a Mold of a Sculpture... by Niki Meiners


The other day I wanted to try my hand at making a sculpted face. I had a bit of Paper Clay left over from a jewelry project. Like a kid who just received their allowance... it was burning a hole in my pocket. I had never really tried to make a face. So, I started molding and forming. (Not having any person in particular in mind gave me a little advantage.) It took me quite a while to get the proportions correct. 

After all the time and effort I spent making the face I did not want to have to do it again. That is when I decided I would grab my Amazing Mold Putty and make a mold of her. I think her mold turned out fantastic. Now I need to come up with a project to use her on. If you have any suggestions I am open...


~ Niki

Wednesday, February 22

Making a Permanent Wish using Amazing Mold Putty & Amazing Clear Cast

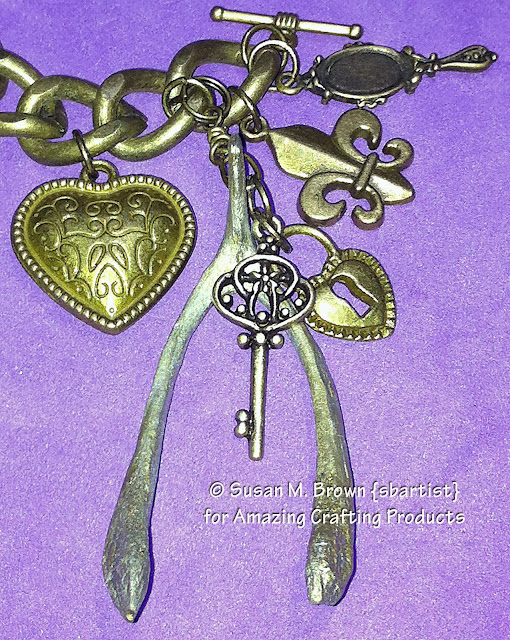
Hello...Susan here to share another adventure with Amazing Mold Putty. Today's project I will be sharing a jewelry project cast from a "WISH BONE" that my husband and I were drying out to break to see who gets the wish. Well - this has been stolen for another project!

To mix up Amazing Mold Putty, I followed the simple illustrated instructions on the packaging. If you want a more in depth how-to of mixing Amazing Mold Putty please click here.

For today's project I am casting a two-part mold of a wish bone from a roasted chicken [that has been dried out and cleaned} in Amazing Mold Putty. After molding the bottom half of the mold, I did the following:

Please see accompanying image number(s) to go along with written instruction/description.


Photo 1: Mix equal parts of part A and Part B of Amazing Mold Putty and blend evenly. Flatten into an oval and place the wishbone into the putty and let cure. Photo 2: After first half of mold has completely cured - I coated the mold with three layers {as instructions prescribe} of Alumilite Rubber to Rubber Mold Release. This helps in keeping the second half of this two-part mold from adhering to first part . Photo 3: Mix up a second batch of mold putty and impress around other side of wish bone. Photo 4: Before part two completely cures, I fit both parts together encaseing wish bone and label sides with a sharpie marker. Photo 5: Completed cured molds with wish bone removed.


After curing I needed to make a patch of additional mold putty on one side to repair a thin area where the bone was flush with the edge of the putty. This was repaired by flattening out a ball of prepared mold putty and placed over the thin area. I also made sure this was level so that resin will remain in mold when poured.

Please see accompanying image number(s) to go along with written instruction/description.


Photo 6: Dusting mold with Alumilite Pearlescent powder and also metallic powders to add color. Photos 7: Measuring out to mix Amazing Casting Resin which sets up in 10 minutes. Photo 8: I poured mixed resin into each half of molds separately - THEN - right when I start to see the flash point {color changes from clear to opaque}, I quickly place the two molds together. Some resin seeps out - but this is to be expected. Photo 9: I let the mold set for about 10 minutes to harden, then gently remove it from mold. I carefully trim away excess resin from cast wish bone shape while resin is still soft and pliable. Photo 10: I replaced the trimmed cast wish bone back into mold to complete curing and hardening process. I really love the metallic color achieved with the Alumilite metallic powders.

Detail of wire wrapping to complete charm.

After letting the wishbone set in mold to continue to harden for several days, I sanded and polished with a rotary tool. Some of the metallic powders were removed so I added metallic color back with a Krylon pen and Rub and Buff. After wire wrapping an eye pint at the top and adding a jump ring, I hung a heart lock and key charm. Now I have a wonderful replica life size "Wish Bone" charm to add to my charm bracelet. I will be making many of these for gifties this year. I used to only make jewelry for gifts... and maybe now I may make them for my craft show, too. I have been casting many wonderful beads, buttons and other interesting found objects for creating jewelry - my new found favorite hobby.


I hope you enjoyed today's project. I encourage you to stroll around through the many AMAZING projects from the other Amazing Mold Putty Design Team members for some great tips and ideas!

Did you hear??? There is a call for the next Amazing Mold Putty Design Team! You can apply to be on this awesome team {CLICK HERE for info}.

If you have any questions, please leave a comment, select receive e-mail follow ups on comments and I will respond. If you would like to see more of my creations, please visit my blog sbartist : painting in the dark by clicking here.

Have a wonderful Wednesday : )

Monday, February 20

My turn @ jewelry!

Hey everybody! DeeDee here for my monthly post.. and I've only got one more after this, I hope above all else I've inspired you to try molding and creating your own pieces for use.. from scrapbook embellishments to card pieces and more.. I hope you've wanted to experiment with pigments, finishes and double pours! And with that.. today I wanted to show you how I did a piece of jewelry.. a couple of the other gals have already touched base but I really wanted to mold a metal bangle bracelet that a friend had...

I Tried a couple of ways and both failed.. then I thought.. maybe it wasn't that I needed to mold differently.. but pour differently! and so that's what I did.. maybe a slight combination of both.. and I'm sharing that with you today!!

the bangle was very thick, very three dimensional and didn't wrap all the way around the wrist..

so to make sure that I didn't use too much putty and had enough time to work with it, I mixed three different times.. working the putty around the bracelet each time... once on the left.. then the right.. and finally in the middle..

here is a photo:


see the separation line there? 

and here is the inside of the mold.. I wanted the inside of the bracelet to be smooth, while capturing the shape of the outside:


Now... onto pouring.. I poured much in the same way as I molded.. in sections.. but more like 6 or 7.. rather than just three. and with the quick cast white resin it actually went pretty fast! I mixed just a couple of table spoons of resin at a time.. then I would "swish" it back and forth in a small area until it hardened into place (only about 3 minutes) then I gave it about a half hour to cure stronger..

then I would move onto the next section over! 

after the piece was all cast I gave it a full 24 hours to cure completely.. and then demolded! The one I'm sharing today was finished with a metallic brown glaze... I brushed it on nice and deep in the crevices.. then wiped it off the raised edges. 


Here is the inside: nice and smooth! I did take the time to sand down any rougher edges so that it was a comfortable fit


and here's this baby on!!


Let me know what you think! I'd also love to answer any questions you have about the AMP -- are you wanting a specific tutorial? Leave me a comment and I'll make it my last post for you!! :) --DeeDee


Thursday, February 16

Paper Clay vs Amazing Mold Putty

Good day all

Today I have a quick tutorial on how to create a fabulous way to create a monogram plus name to your project. A loooonnnngggg time ago I had purchased a "candy mold" alphabet but never used it.  When I became addicted to Creative Paperclay® and Amazing Mold Putty I remembered this mold and wanted to use it.  It was so old that I was afraid that it would hold up with the Amazing Mold Resin so first I made each letter using the paperclay.
 Then I molded the paperclay into the Amazing Mold Putty.
 Then I combined the Amazing Casting Resin "Liquid to Solid in 5 minutes" with some pink alcohol ink to make the letters and I also made a butterfly mold with some plum alcohol ink.
 After the letters casted I glued them to a painted wooden A and added the butterfly also.
 I really like how I can personalize almost anything using the Amazing Mold Putty with the casting resin.
I hope you enjoyed this week's project of mine and I will see you again next month.

Wednesday, February 15

ATC Accessories with Amazing Mold Putty

Artist Trading Cards [ATC for short] are little pieces of art contained on a "card" the size of 2½×3½. These can be made out of anything. I have plans this year to try to make ATCs in an effort to broaden my creativity. Today I present to you an ATC comprised of my favorite things!  I hope you enjoy!
Favorite Things ATC--felting, steampunk, Amazing Mold Putty
Terri Sproul Mixers, and Sizzix Dies--these are a few of MY favorite things!
I began the construction of my ATC by die cutting from felt the
ATC base, gears, hearts and other potential items that I might
need in the construction of my ATC.
I then also die cut foam core board to use for making my mold.
I rolled out a large piece of putty after combining Part A and Part B.
I pressed the foam core die cuts into the putty and went over them
with my brayer pushing putty to enable an even pour of resin.
The completed molds looked like this. They were perfect for
pouring the white Amazing Casting Resin. I also practiced with
some Creative Paperclay that I will use for a future project. These
steampunky molds will get quite the workout!
I added the felt components to the felt ATC base
by needle felting them.
Prior to pouring the casting resin, I dusted my molds with bronze
Metallic Powder by Allumilite. It provide this matte finish to my
resin gears.
I coated my gear for my project with Sakura Hobby
Crafts 3D Crysral Lacquer mixed with the Allumilite
Metallic Powder to give it a sheen. I then also for the heart
sprinkled Terri Sproul's Mixers Glitz Effects--which are
small Vintage Glass Particles--think chunky glitter.
AWESOME.
The elements were then trimmed and added to my felt ATC with hot glue.The edges that were revealed by cutting the resin were touched with more Allumilite and lacquer

I adore how My Favorite Things ATC turned out. The elements that can be molded and casted are virtually unlimited!! I can't wait to make  more "die cut" molds and create accessories for all of my crafty needs!! stay tuned...


Monday, February 13

Rehab on Barbie's Doll House


This project showcases the diversity of Amazing Mold Putty and its companion Amazing Casting Resin. On evening not long ago when I got home from work, my two year old grand-daughter greeted me with a doll house door in hand. She excitedly told me a long story about the doll house, Barbie, and the door. The bottom line was that the door was broken and would I fix it. 


An inspection of the door showed that the lower hinge was broken off.
Luckily, the top hinge was in tact.


Amazing Mold Putty to the rescue!! I kneaded equal parts of "A" and parts "B" of Amazing Mold Putty together until there were no streaks. Then I molded the good hinge and upper corner of the door. When the mold was set, I poured Amazing Casting Resin into the mold and set the lower part of the door where the hinge was broken into the groove in the mold that was formed by the top of the door during the molding process.

This shows the mold and the new hinge adhered to the Barbie house door!! I was surprised that the Amazing Casting Resin actually bonded with the door – no gluing required.


Amazing Mold Putty and Amazing Casting Resin saved the day and made one little girl a very happy doll house landlord! :)


There is so much you can do with Amazing Mold Putty and 
Amazing Casting Resin! Check out my Create & Craft blog for more project ideas.   ~ Carole

Sunday, February 12

A HAPPY VALENTINE’S DAY TO YOU!


I Hope everyone is ready for Valentines Day! I just had to make another Valentine before the great day arrives!


I used the Amazing Mold Putty to create the hearts in a previous post and the frame I created new:

Mix equal parts A & B to create your putty and press your frame into it to make your mold:

Rusty and mold putty 005 Once it sets you pop the frame out and you have this:Rusty and mold putty 006 If you mix equal parts of the Amazing Casting resin along with a little dye and pour it into the mold you get this when it sets up:Rusty and mold putty 007 I also made some resin hearts, which I dusted the mold with pearlesent powders first and they look like this: mold putty valentine 003 I also cast some of the resin into a mold from the Articus company. I then put all of the pieces together and created this happy little Valentine:

mold putty valentine 006

You hold the key to my heart

I’m thinking this would be something that a young girl would enjoy receiving don’t you? Happy Valentine’s Day to all of you!


Barbara

Friday, February 10

Sweet Treats Tin

Hello Amazing Mold Putty Fans!  Jan here sharing a small tin that would be perfect for sweet treats or keepsakes.  I molded the knob and then cast with resin.  Gray paint was applied to the knob and when that was dry, a coat of peach paint was applied.  I'm just lovin' this amazing mold putty!

Related Posts Plugin for WordPress, Blogger...