Showing posts with label layout. Show all posts

Friday, February 7

"For the LOVE Of" my DIY No-Gelatin Printing Plate... AMAZING Inspiration by DeeDee Catron

Hi Folks! DeeDee here today, inspiring you with a layout and one GIANT Amazing Mold Rubber PLATE. If you need a bit of a refresher course, check back to Susan's post about creating your own heavy duty long lasting printing plate from Amazing Mold Rubber. Basically.... it's a plate or slab of a non-stick surface on which you create patterns and textures using paints, mists, inks, and other colorants that are then transferred or "Mono-printed" to a sheet of paper. Today, I've followed Susan's example but made my plate 12 1/4" x 12 1/4" to accommodate patterned paper for scrapbooking. I used the plate to help create the background on this layout here :


(Please click to enlarge and see detail!)

Please be aware, the paper on the bottom did start patterned. It's a sheet of paper from 7 Dots Studio. I just enhanced it and made it my own by printing on top. I've used gesso and glimmer mist on the plate.

You can view the background process in the following video:


And here is a close up of the area where the awesome
rubber plate made its appearance!!

Other supplies include: Viva Las VegaStamps! (Coffee Ring Stamp,) UmWowStudio (Circle Confetti Stencil, Chipboard Butterfly, Heart Confetti,) May Arts, Prima, Gauche Alchemy, adhesive and thread.

I'm loving working on a plate, then to paper, rather than directly on paper, because if I mess up (and I tend to) I can just wipe the rubber plate off. If I had been working directly on paper and ended up being not happy, I'd have to trash it and start over.

Wanna see what other things I end up doing
with my GIANT Rubber Plate?
Visit me back here next month --
you never know what might pop up!

• • • • • • • • • •

Join me on my own blog for more details on this layout,
and to see more of my work!
DeeDee

• • • • • • • • • •


CLICK HERE for Details how you can enter to WIN!

Thursday, January 9

My Anchor - 12x12 Layout by DeeDee Catron

Hiii ACP Fans!! How are you today?? 

DeeDee here bringing you a bit of inspiration on using our favorite molding and casting supplies. If you've been following the ACP blog long, you'll know that I adore layouts, cards and tags, and my favorite embellishments tend to be vintage found bits. Well today I'm using a super vintage styled anchor from my stash o' goodness.


Anytime I'm in the thrift store, or at a garage sale or even just walking down the street and see something (old jewelry, buttons, frames) for a $1, 25 cents or for FREE if it's on the street, I pick it up! If I really love it, I clean it up a bit and mold it with my Amazing Mold Putty, like this anchor! The original is always great to use in projects, but when I'm just head over heels for something and will want to use it a million times, I can thanks to Amazing Mold Putty. It's just a quick equal part mixture worked together in your hands. Cover your piece in it and allow it to cure. Then it's ready to be cast in any material you want; sculpy, paper clay, wax, soap ... or ... like in this piece the Amazing Casting Resin.


Amazing Casting Resin cures in under 10 minutes (closer to 5) and cures a super brilliant stark white color. Which  makes it great for alteration, either afterwards with paints and inks, or during cure time with dyes and powders. I achieved the finish on my anchor simply by mixing equal parts of the Amazing Casting Resin with a little drop of African American Alumilite Dye. Before I poured the resin into my mold, I dusted the mold with a little bit of Silver Alumilite Metallic Powder. By dusting the mold instead of mixing the powder into the resin I got a more old/rustic feel.

Other Products:

  • Viva Las VegaStamps! Rubber Stamps (Directional Circle, Whimsical Cloud)
  • UmWowStudio (Star Confetti, Chevron Confetti)
  • Tattered Angels Glimmer Mist (Charcoal)
  • Glitz Design paper
  • Ranger Archival Ink (Black)
  • Prima Bark Stars
  • Tim Holtz Tissue Tape
  • black pen, spray adhesive, adhesive, thread

Have you found any junk objects that
would look great on a layout?

Join me on my own blog to read more 
about the process of the entire layout! - DeeDee

• • • • • • • • • • • • • •


Don't forget!!! The annual Winter CHA starts in 2 days {January 11th}... which will be the official introduction of our newest addition, Amazing Mold Rubber. Several of our Creative Team will be on-site demonstrating throughout the convention – stay tuned for some sneak peeks. If you or your LSS are attending... please come and drop by the Amazing Crafting Products / Alumilite Corp. Booth #408.

• • • • • • • • • • • • • •

Don't forget to subscribe to our blog on the right side bar:
Twitter at AmazingCrafting | Facebook at AmazingMoldPutty | YouTube at AmazingMoldPutty

Friday, October 4

Split Splat! Inspiration using AMAZING Clear Cast Resin by DeeDee Catron

Hi Folks! DeeDee here today with a 12x12 layout! 

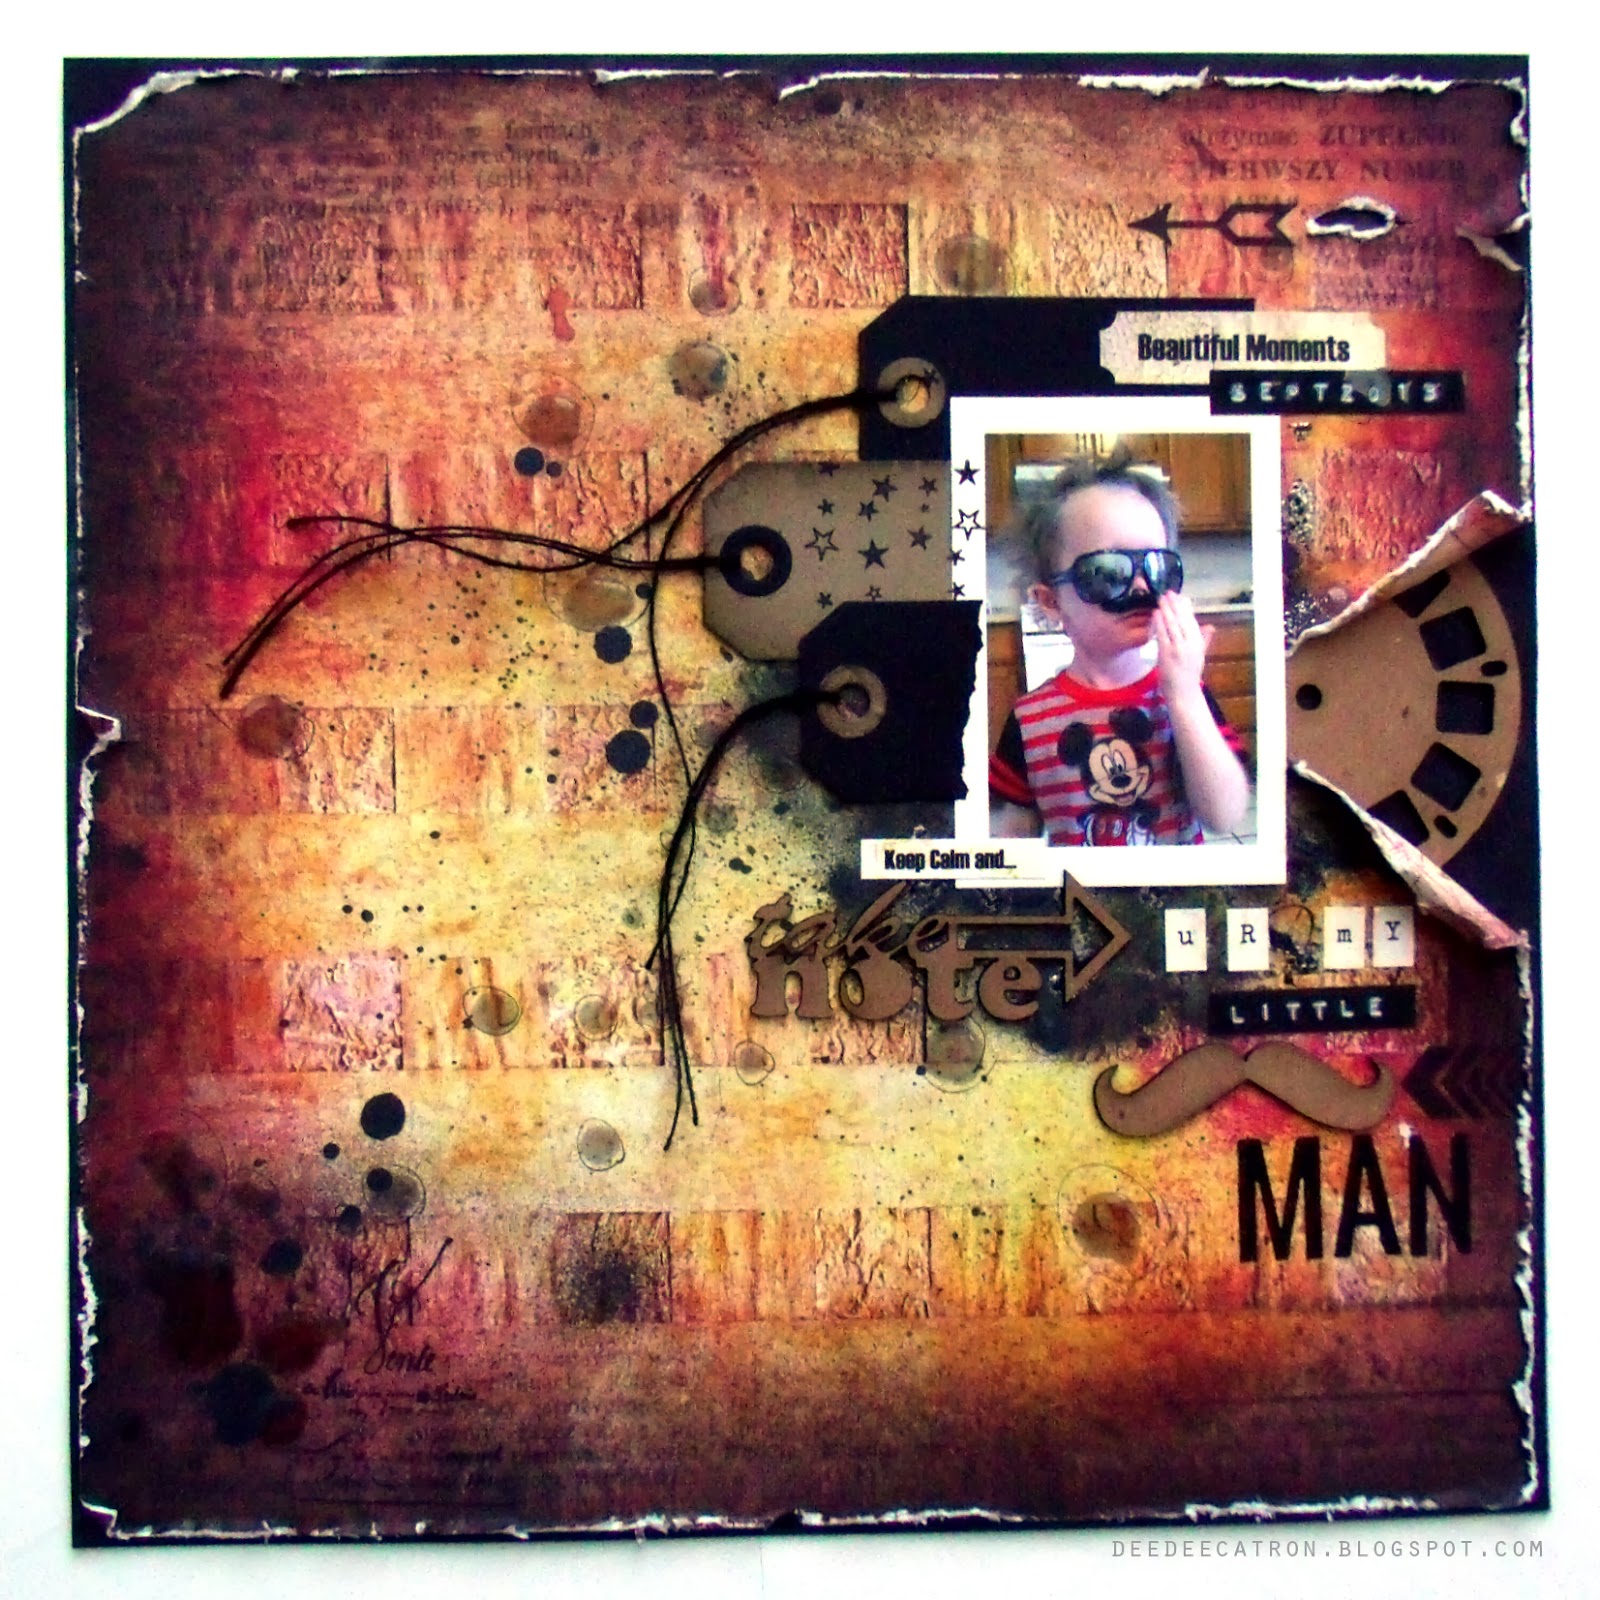
A little bit of background ===> I have a 2 1/2 year old who is HILARIOUS. Gabe does and says all sorts of things, picks up the most random sayings and is just seriously totally awesomely rad. The other day he happened to have a fake mustache AND his new sunglasses in his hands at the same time, and to him it only made sense he should wear them together.

Another little tidbit ===> Fearless Amazing Crafting Products leader Susan was working on a project and said "Some people splatter ink... I splatter diamond glaze", and a seed was planted in my brain. I was going to splatter AMAZING CLEAR CAST RESIN on a layout!

And forth came... THIS:


I should point out that the Amazing Clear Cast Resin DID soak into the paper a bit, and leave a ring around the drop that sort of resembles grease... and at first I WAS a little upset. BUT I really wanted to make it work and in the end decided a grungy feel was best to try and achieve around it. And. Oh.MY.WOOOOOOOOORD. The resin is like the perfect little something different on my layout that just makes the whole thing AMAZING. I mixed together equal parts A and B of the Amazing Clear Cast Resin, making sure it was completely mixed with no swirls or variations in the cup. Then using a stir stick I splattered and dropped Amazing Clear Cast Resin around the paper. It sat for 24 hours in my cupboard where no dust could get in it while it cured! Then it was ready to use. I also splattered a bit of glimmer mist and drew some circles around each blob. 

And for the FULL reveal:


AHHHHHHHH. Every time I see it I get this HUGE grin on my face. See more details on my brand new blog for this layout! ~ DeeDee

What sorts of things might you splatter
Where else would little glossy blobs be uber cool? 
...........................................

ALSO : Susan is looking for your favorite projects
from past Amazing Crafting Products posts!
Share to get a prize ===> Share Here!
...........................................

Don't miss a single post!
Please subscribe to our blog via email on the right side bar:
Twitter at @AmazingCrafting | Facebook at AmazingMoldPutty | YouTube at AmazingMoldPutty

Monday, August 26

A Light Bulb Moment... AMAZING Mold Rubber Inspiration by DeeDee Catron

Hello folks! DeeDee here today with some inspiration using the brand new AMAZING MOLD RUBBER!

I have to admit, up until this stuff came out I avoided molding anything that I would want to have a crystal clear finish. The Amazing Mold Putty just wasn't giving me the finished surfaces I wanted for those types of things. Then... Alumilite introduced AMAZING MOLD RUBBER. A 2 part LIQUID silicone that creates the most amazing smooth molds, and in return... superbly smooth casts! 

Insert my desire to mold LIGHT BULBS! 


I've molded a few different light bulbs and am sharing a medium sized one today. This picture really shows the glossiness that can be achieved from using the Amazing Mold Rubber. I've cast it in both the Amazing Casting Resin and the Amazing Clear Cast Resin. It's so glossy and smooth, just like the original bulb. 

Here's a shot of the bulb in use on a brand new layout:


It's been glued down and splatted with Tattered Angels Glimmer Mist. I invite you to jump over to my own blog and see the whole layout including supplies. The bulb really sets the layout apart from others and is the perfect embellishment!

What super smooth glossy things can you think of
to mold with the brand new Amazing Mold Rubber?

Jewelry? Heirlooms? Metals? Plastics? GLASS? What might you mold and recast? Share here with me! And don't forget to stop by my blog to see the finished layout. ~ DeeDee♥

.................................

Don't miss a single post!
Please subscribe to our blog via Newtorked Blogs,
bloglovin' or email on the right side bar:
Twitter at @AmazingCrafting | Facebook at AmazingMoldPutty | YouTube at AmazingMoldPutty

Tuesday, June 25

Just a little SPLASH... a 12x12 by DeeDee Catron

Hi Everyone! DeeDee here today.... Do you remember back when Sandra used her scraps to inspire drawings for some characters??? Well I took a little inspiration from Sandra for today's post!


--click the photo to make it larger and see all the layering details!--

I've created a 12x12 layout using some May Arts ribbon, Viva Las VegaStamps! rubber stamps, Glimmer Mist, UmWowStudio Chipboard and Flair, aaaaaaaaaaaand... Amazing Casting Resin!

The inspiration from Sandra comes from using scraps and leftovers! After I poured a few molds I had a bit of resin left in my cup (It was already starting to cure, it's QUICK!) so much like when you pour batter into a hot pan for funnel cake, I poured the left over resin over my teflon coated kraft mat. 


I allowed it to sit for a while... 


... and once it was cured I could peel it off the kraft mat! 


I love them.. I've now got a pile of 3D scribbly embellishments for anything. You can see just like other embellishments, inks and mists will lay over the top of these. The resin is a super high gloss white.


I hope you'll visit me on my own blog then to see how well the resin can work with other embellishments and paper crafting goods to create a beautiful layout! ~ DeeDee

.................................
__________________________________________

Use this COUPON to shop at the Amazing Mold Putty
website HERE and receive 25% OFF your purchase.
Please use coupon code " summerhaus " {no quotations}.
Coupon expires June 30, 2013.
__________________________________________
.................................

Want to SOCIALize? Please follow Amazing Crafting Products on
Twitter @AmazingCrafting and on Pinterest HERE -or- join us on our Facebook page.

Friday, April 19

AMAZING Inspiration from DeeDee Catron...

Hello everyone!! DeeDee here today, back in a familiar place and super stoked to share my molded goodies with you again ;) --- ok ok not THOSE goodies, besides.. they're all real! But my molded ITEMS :D

One of my favorite things is finding vintage figurines and replicas to mold and cast for use during my crafting. To date my favorite FOUND object to mold has been a super old nautical themed frame. It came complete with pier pieces, two pelicans, a net, shells, an anchor and more! You bet your sweet self I molded each piece separately and again in combinations with each other. Now when I'm working on a nautical themed piece I always get out my molds to see if I can work them in! Here are THREE different projects I've used my lovely pelicans on!

(All three were molded with Amazing Mold Putty and cast in Amazing Casting Resin which dries white!)

The first is a WOODEN SPOON that I altered for the lovely Susan M. Brown - she held a spoon altering blog hop and it was SO FUN.


The shells on this are actual shells from the beach, accompanied by May Arts ribbon, cheese cloth, and some Tattered Angels glimmer glaze.

The 2nd project is a LAYOUT that was featured in the SPRING 2013 issue of Somerset Memories! Here's a corner shot of the resin piece :)


Along with the resin bits I've used half pearls, cheese cloth, Tattered Angels glimmer glaze, MME paper, and Viva Las VegaStamps! images.

And finally here is an altered tray:


This tray was featured on the CropChocolate blog last month, and is currently featured for the "April Showers" at Anything But A Card Challenge this week! It has Teresa Collins papers, tape and enamel dots, Thickers, Viva Las VegaStamps! stamps, cheese cloth, ranger ink and more.

What are some of your favorite vintage finds to mold?? How many times have you used them? Over and Over?! that's ME! :) :)

Visit me at my blog for more molding goodness, details on some of these pieces, and some fabulous inspiration!

Saturday, March 3

That Is Not a Phone


I was looking through my attic and found an antique phone, that actually still works (well sort of!) I took it downstairs to let my nephew try it out. He of course had no idea what that silly thing was, he certainly didn't think it was a phone! It also gave me the perfect opportunity for a cool layout.

I made a mold of the telephone dial using Amazing Mold Putty and cast it with the Amazing Casting Resin. I painted it using Creative Inspirations Paints. What was really cool, was that I had a Unity Stamp set that had the telephone numbers, that fit perfectly under my dial. Talk about serendipity!

So don't be afraid to come up with your own "out of the box" embellishments. Who knew a telephone dial would grace the pages of a layout?! This is my last post as a DT member and I must say this has been a really fun product to work with, and I've enjoyed my time on the team. I wish everyone who is trying out for the new team the best of luck!

Friday, February 3

Ready, Set, Spring


I have been so spoiled this winter...as I'm writing this post the sun is shining and it's been in the 60's this week. I know there is probably some wintery weather still heading my way, but I'm happy for all of the pretty days! What better time than now to share a Spring layout with you! I used so many fun techniques on this piece to really build some interesting layers.

Do you love this little embellishment? I had a vintage celluloid charm that's been in my jewelry drawer for ever. I used Amazing Mold Putty to make a mold of it - and it was time to cast away! I poured it up using the Amazing Clear Cast and after it set, I painted it with Creative Inspirations Paint (beige). Now I can make these little trinkets over and over again.

This Dusty Attic Chipboard chair was covered heavily with Wow! Embossing Powders Ultra High Copper. The Ultra-high powders create a ton of texture. Next, I used the Wow! Brocade stamp set to stamp over the copper and embossed in the Suzy West Presidio Purple and Tea Garden Green. I love how you can see the hint of pattern, like worn antique upholstery would look.

I used my Cricut to cut the paper doily and random stamped over the cut, again using the Brocade stamp. The Presidio Purple was used over the green designer paper to create a custom patterned paper. I also added some of the Copper powder around the edges of the layout.

Spring makes you take notice of all of the little things around you, and I hope that I have inspired you to add these extra touches to your layouts.
Related Posts Plugin for WordPress, Blogger...