Showing posts with label Viva Las Vegastamps. Show all posts

Thursday, March 22

#MixedMedia Easter EGG-spiration... by Michele Kosciolek

Hello fellow creatives! Michele here – with Easter right around the corner I have a little EGG-spiration for you today!!

I've decoupaged some craft eggs with tissue paper stamped with Viva Las VegaStamps!, then sprayed with Distress Sprays. Now, I have had these eggs for quite some time and have wanted to decorate them for Easter for just as long... I am so glad I finally did and took things one AWESOME step further!

I gave these eggs a coating of Amazing Clear Cast Resin – OMG – that was just what it needed to make these eggs POP!

Here they are!!


I decided to turn these into hanging eggs.


This one is hanging on May Arts silk ribbon
with a couple of hand blown glass beads.


This one is hanging on copper wire with
a couple of handmade Tibetan glass beads.


I love how these eggs shine and already have
them hanging with my Easter decorations!

How are you decorating for Easter??

Thanks for sharing part of you day with us!!!
Until next time... get creating!! Michele

For more projects and inspiration please visit my blog "Stuff by Belle"
or follow on Facebook: https://www.facebook.com/michele.kosciolek

• • • • • • • • • • • • 


Don't forget to subscribe to our blog on the right side bar:
Twitter at AmazingCasting | Facebook at AmazingMoldPutty | YouTube at AmazingMoldPutty

Thursday, September 25

Just a #Cre8time Dab of AMAZING...
with DeeDee Catron

Hiya resin friends :)

DeeDee here today to share a little inspiration with you. Recently I've been joining in on some ATC swaps to hone some of my skills on a smaller scale. Small is not easy for me, and I'm finding this learning curve to be quite enjoyable.

It's been particularly fun bringing in some of my favorite companies that almost require a big presence, like resin and molding supplies from Amazing Crafting Products


Here is a set of ATCs I recently finished where the theme was as open as "buttons." If you've been following our blog long, you'll know that I love molding and casting vintage findings, more often than not detailed buttons. So if your mind went THERE, too bad! The buttons on these ATCs are actually chipboard. The resin comes in on the leaves! 


This is part of the learning process for me, and maybe it is for you, too, but I don't always have to have a BIG, GINORMOUS, IN YOUR FACE resin embellishment. Instead, on this ATC trio, I dipped my leaves in the Amazing Clear Cast Resin and then sprinkled them with glitter. I set them to the side, allowed them to cure, and then I had a glitzy little glam of an embellishment.


Other Supplies : Viva Las VegaStamps!, UmWowStudio, May Arts Ribbon, Ranger Ink, Prima Marketing, ImagineCRAFTS.

What might you have
that could use a little sparkle?
Feel free to visit me on my own blog where I'll have more details
on creating these ATCs.

 • • • • • • • • • • • • • •

Don't forget to subscribe to our blog on the right side bar:
Twitter at AmazingCrafting | Facebook at AmazingMoldPutty | YouTube at AmazingMoldPutty

Friday, September 12

AMAZING Casting Resin Lion Head... HOWTO by DeeDee Catron

hi hi HI!! :)

I'm excited to be back on the Amazing Crafting Products blog. Though my small break was needed, I'm ready to be back and start inspiring again.


You may have seen this tag around recently by me. It was made for a blog hop a week or so ago, and the lion head is Amazing Casting Resin! WELL >>> there happened to be a little bit of buzz about him, and I took the opportunity to share a how-to with everyone :) .

For the tutorial and a new tag, I opted to make my lion a bit of a grungy metal dude and am super excited to share my video with you, BUT first let me show you the tag:


Now onto the video and then some details :) :

If you have trouble viewing the video please CLICK HERE to view.


The top is made of some UmWowStudio gears distressed with ink, moss, Prima Marketing flowers, goggles, nest, leaves and wings, and my Lion Casting. It's all been layered up and adhered down with a heavy thick glue.


The tag base is paper from 7 Dots Studio cut with a Sizzix #8 die. It's been colored with Lindy's Stamp Gang magicals and stamped with a VLVS! rubber stamp. Two final pieces of embellishment consist of a miniature door handle and my message which reads "We All Stem From Nature." It's sort of a stab at the Steampunk genre and reminding ourselves that regardless of how many gears, how much metal, how many rivets... we're all just animals :)

Thanks for visiting me here today.
. . . . . . . . . . . . . . . .

Don't miss a single post!
Please subscribe to our blog on the right side bar:
Twitter at @AmazingCrafting | Facebook at AmazingMoldPutty | YouTube at AmazingMoldPutty

Wednesday, August 27

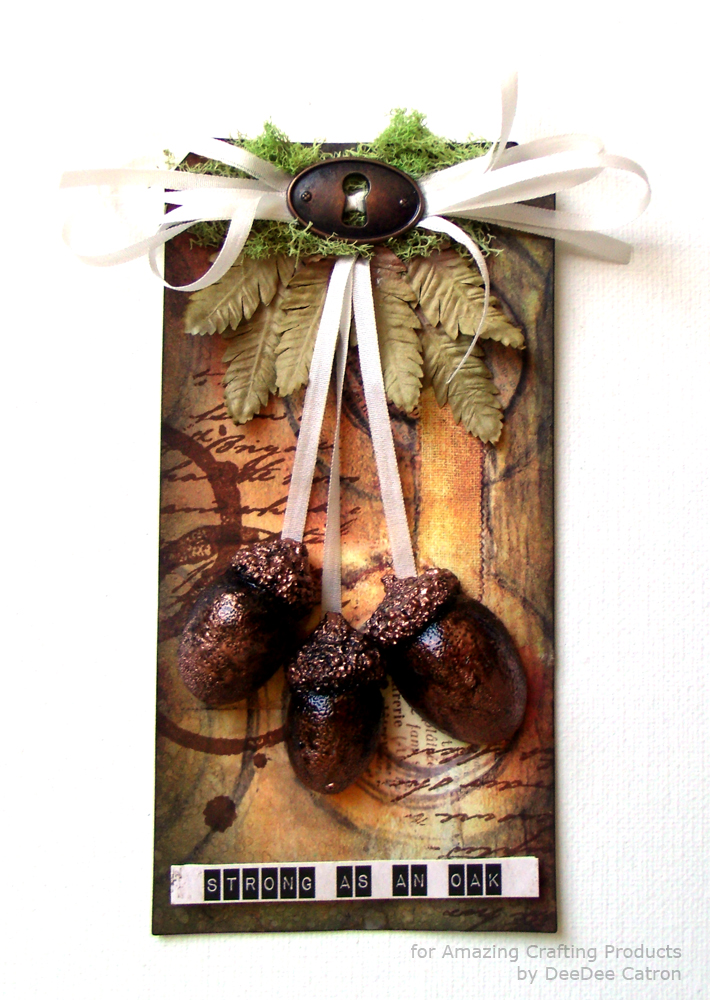
A #Cre8time Gathering for an AMAZING Fall Harvest {How To by DeeDee Catron}

Hi hi hi friends! DeeDee here today, it's been a while but I'm excited to be back on the Amazing Crafting Products blog sharing some of my works with you. 


Today I'm doing a start to finish photo tutorial in a super FALL HARVEST theme. I'm so pumped for September right around the corner, and can't wait for the weather here in Vegas to relax just a little bit more. Let's get started shall we? 


1) Start with a tag base. My tag is a sheet of 7 Dots Studio paper by 
Finnabair cut using a Sizzix / Tim Holtz die.


 2) Distress edges with Walnut Stain Distress Ink and water.


3) Mix equal parts of Amazing Mold Putty parts "A" and "B".


4) Form Amazing Mold Putty around acorns. 

TIP: I like to have a nice flat back of my resin pieces to secure to the paper
or project that I'm working on. SO I only mold half way around the piece.


5) Mix equal parts of Amazing Casting Resin and pour acorns.
Allow to cure, demold.


6) Build up base of tag with stamps, ribbons, 
flowers, and embellishments.


7) I felt like my acorns needed some texture and color, so I embossed
them with some WOW copper embossing powder.

I love altering the Amazing Casting Resin AFTER it's cured (as opposed to before),
because I don't need to worry about altering my mold or changing the original piece.


8) Distress with black acrylic paint.


9) Finish by layering the acorns up and adhering a sentiment.

There really are .. a TON of ways to finish your resin pieces;
glass beads, adhesives, powders, flocking, inks, mists, paints, more resin!
What have you always wanted to try? 


. . . . . . . . . . . . . . . .

Don't miss a single post!
Please subscribe to our blog on the right side bar:
Twitter at @AmazingCrafting | Facebook at AmazingMoldPutty | YouTube at AmazingMoldPutty

Monday, July 7

Painting Everything Under the #Cre8time Sun... Mold Rubber Monday with Susan M. Brown {sbartist}


Welcome to another Mold Rubber Monday! Susan here to share another use of Amazing Mold Rubber with my favorite new friends... Faber-Castell Gelatos®.

Amazing Mold Rubber is now available MICHAELS!!! It's also available in Hobby Lobby Stores, other retail locations and also at the moldputty.com website – so please feel free to search our archives and get inspired and excited about mold-making and casting... and MORE! 


Amazing Mold Rubber is an easy to use, high strength liquid silicone mold making rubber that is strong, soft and flexible - great for undercut parts and cures in approx. four hours. Amazing Mold Rubber is a two-part liquid rubber used to make extremely elastic molds to produce quick and exact reproductions of your original. Replicas can then be cast in Amazing Casting ResinAmazing Clear Cast Resin for plastic parts - or use other materials such as plaster, wax, clay or polyester... and that's just the beginning to all the fabulous uses just waiting to be discovered!

To view mixing and preparation of Amazing Mold Rubber and how I created my AMAZING No-Gelatin Rubber Plate CLICK HERE! To view a second video which is a test run on my faux gelatin plate... and my FIRST TRY at Gellin' – CLICK HERE.

Now with the business out of the way...
how about some creative magic??!

I joined a summer themed tag swap at Viva Las VegaStamps! and I wanted to have a painterly background to showcase my stamped images. Faber-Castell Gelatos® are my current favorite go with me everywhere tool and this was a perfect occasion to do a little Cre8time experimentation with monoprinting on my AMAZING No-Gelatin Rubber Plate.


Using an assortment of yellow, green and blue Gelatos®, I colored directly to my AMAZING No-Gelatin Rubber Plate. I added a few spritzes of water and then pressed a natural color cardstock onto the top, rubbed and pulled off the monoprint.


The yellow is pretty strong and still has some color left after the first print. I added a little more blue and green, spritzed again and repeated to create a half dozen prints with similar color... each with it's own painterly personality.


Here's what two of my collection of Gelatos® monoprints looked like before stamping.


And the completed tag after stamped and inky goodness!
Total summer fun!!!


Now it's time for project cleanup {boo-hoo}. Despite my best efforts, the Gelatos stained my AMAZING No-Gelatin Rubber Plate and wouldn't wash off very easily {they do have a bit of a waxy composition to them}. No worries! I have a crafty fix-it... pour resin on it and peel it off! I rubbed a sheet of blank cardstock to make sure it was completely DRY and FREE of water/moisture before proceeding with resin.

My apologies I didn't get a photo of the resin mixing/pouring step {CLICK HERE for mixing/preparation of Amazing Casting Resin}. I prepared a small batch of Amazing Casting Resin and poured directly on top of Gelatos – spreading around with stir stick evenly to edges. For added stability and to help speed up curing of thin layer of Amazing Casting Resin, I gently pressed a crumpled sheet of deli paper into the liquid resin – careful not to press so hard to squeeze the resin out off the edges of the rubber plate. Just enough to get a bond of resin to paper.


When cured after about 20 minutes, I gently peeled the resin back from the rubber plate which completely removes all of the gelatos. It's so AMAZING!


Side-by-side the clean rubber plate and my paper-backed resin pull.


My plate is clean now and I also have a wonderful painted resin base for mixed-media arting.

How would you paint using Gelatos
and Amazing Mold Rubber???

Please leave a comment below to share your ideas -or- please, ask us questions! If you would like to see more of my creations, please visit my blog sbartist : painting in the dark by clicking here -or- check out more videos on my YouTube channel here. ~ Susan

Thanks for stopping by and have a creative evening!
...........................................

Want to Socialize with Amazing Crafting Products?
Twitter at @AmazingCrafting | Facebook at AmazingMoldPutty | YouTube at AmazingMoldPutty

Wednesday, May 21

Spending #Cre8time TRAVELING amongst the Stars... AMAZING Inspiration by Susan M. Brown

Hello Amazing Crafters! Susan with some WHOvian inspiration today. Remember a while back I created a pendant from a rubber stamp using Amazing Mold Putty and Amazing Casting Resin??? Today, I am sharing another mold that I've created to show the AMAZING detail captured by Amazing Mold Rubber... except this is a FANDOM favorite – the Blue Police Box from Doctor Who.

**PLEASE NOTE** I am the illustrator of this stamp and have obtained permission from the manufacturer, Viva Las VegaStamps! in order to do this {as I did with the previous molded stamp}.  Before doing a project such as this you need to check with the companies ANGEL POLICY to make sure you aren't in violation.


This mold I created along with several others prepared when mixing an entire container of Amazing Mold Rubber {please CLICK HERE to view mixing/preparation}. When mold was cured, I painted a variety of blue, gold and pearl Alumidust directly to the mold using a fine paintbrush, and poured a layer of Amazing Clear Cast Resin. I could have used this "AS IS" but I wanted it to have the glowing bright blue color of a proper vessel for time travel.
  

This is easily remedied! I placed resin piece back into mold and I prepared a small batch of Amazing Clear Cast Resin by mixing equal parts of "A" and "B" {CLICK HERE to view preparation}. To that I added a couple dabs of Blue Alumidust using a recycled coffee stir stick from Starbucks {I just picked a bit up on the end of the stick about 3 times}.


I stirred completely, then poured on top of the cured resin piece.
I used the stick to spread evenly and fill the remaining space in the mold.


BAM! After curing overnight – my Blue Police Box is truly GLOWING! I trimmed off the flashing with scissors and filed the edges with an emory board. Now I have a companion embellishment to adorn my "Ode to the Raggety Man {Doctor 11}" Mini Book. Please CLICK HERE to jump over to my blog to see the "Companion" Doctor WHO Mini Book.


A glowing BLUE BOX for my Time Traveler!

If you would like to see more of my creations, please visit my blog
sbartist : painting in the dark by clicking here -or- by visiting
my column "thoughtful abstractions" at Unruly PaperArts ~ Susan

I hope you have a creative day - thanks for visiting!
See you tomorrow with more Amazing Crafting Products inspiration.

• • • • • • • • • • • • • •

Don't forget to subscribe to our blog on the right side bar:
Twitter at AmazingCrafting | Facebook at AmazingMoldPutty | YouTube at AmazingMoldPutty

Friday, April 4

It's an AMAZING Time for #Cre8time!!! Altered Clock Tutorial by DeeDee Catron

Hey folks! DeeDee here today bringing you a How-To during our awesome partnership with Frog Dog Studio. I was really excited to get my kit and pull out all things to play... so let's jump right in!


I started by gathering supplies.. my April Frog Dog Studio Mixed Media Kit and the April Add-On Kit that includes Amazing Casting Resin, Amazing Mold Putty, Mixing Cups, and Stir Sticks. I also snuck in some products from a previous Frog Dog Studio kit including a blank Tim Holtz clock and some rusting powder {Dusty Attic Rusting Powder is still available at Frog Dog Studio store}.


I took a leaf from Susan's book and molded some hardware which allowed me to color them as I chose and not add much weight to my piece. The screw heads were molded with Amazing Mold Putty, cast in Amazing Casting Resin and dusted with Silver Metallic Powder. They were then glued to the top bells of the clock.


I layered the clock with gesso, crackle paint, distress stain,
rusting powder and a  mix of distress stain and gel medium.


The final result looks like this. Now I have an old rusty clock to play with!


I knew I wanted to fill the clock with something a little more soft and feminine, so I  gathered some supplies to make flowers. I die-cut the Canvas Corp. Mini Canvas Circles from the April Kit.


And painted the tips with the iZink gold (also from kit).


I wanted a bit of  BAM for the flowers, so fished out an older floral type mold and filled 'er up with equal parts "A" and "B" of Amazing Casting Resin.


I allowed it to cure, and adhered it to the middle of my flower – 
repeating to make three of these.


I compiled a few premade flowers on the inside of my clock...
a few I layered up, and the three I made myself.


As one more final bit o' goodness, I watered down some of the iZink and washed over a couple scrap pieces of resist ephemera from Heidi Swapp that I had in my stash.


Here's my final piece which ended up as a home for this sweet girl from Viva Las VegaStamps!.


A closeup of the handmade flower and Amazing Casting Resin center.
 

Here you can see the molded screw heads really well.

Thank so much for visiting me here at the Amazing Crafting Products Blog. I hope you'll keep visiting (well, really forever) but also because there are some amazing things coming up with this Frog Dog Studio and Amazing Crafting Products partnership!

Hasta casting and molding friends - DeeDee

• • • • • • • • • •

Don't forget to subscribe to our blog on the right side bar:
Twitter at AmazingCrafting | Facebook at AmazingMoldPutty | YouTube at AmazingMoldPutty


Related Posts Plugin for WordPress, Blogger...