Today is September 8th... and it's Cre8time! We had a little break yesterday so that I, Susan could bring you a special project to inspire you to take a little CRE8TIME and make something fun! I have a need to make something everyday, whether it be doodling in my art journal, stamping, creating ATCs or molding something with my Amazing Mold Putty. The ideas just keep coming... and now with the fall and holiday seasons approaching - I am inspired to create even more.
What is CRE8TIME??? Cre8time is a movement devoted to helping everyone reclaim their creativity and a place to learn and share projects, too.

I got up this morning, set aside some Cre8time and decided on making some jewelry. So today I am sharing a quick and easy jewelry piece I created using Amazing Crafting Products! I wanted to make a new ring utilizing a couple molds and cast resin pieces I have leftover from previous resin play. I'm trying an experiment with the ring, so I also I grabbed a ready-made Darice ribbon choker and I'm ready to go. I have allergies to many types of metals so I am unable to wear much of the jewelry available... especially rings. So I am so thrilled to have created a ring mold using Amazing Mold Rubber and combined with my Amazing Crafting Products, I can make resin rings out of anything my heart desires.

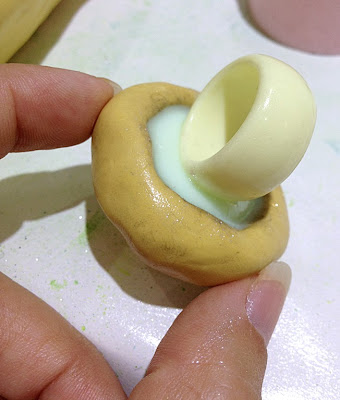
I poured and mixed equal parts of "A" and "B" of Amazing Casting Resin and added two drops of the new Fluorescent (Flo) Green Dye to the 2 ounces of resin I mixed. I poured this mixture into my vintage drawer pull mold, a ring mold made from Amazing Mold Rubber and two other molds to use up the leftover resin mixture. I'm going for a pale jade coloring when the Amazing Casting Resin reaches the flash point and changes from clear to opaque.
I had a resin ring from a previous pour ready to go. I gently held this into the wet resin to fuse the ring to the new poured cast handle. The resin cures very quickly so I only had to hold this about a minute or two until the curing completed. You need to make sure to sand and clean the resin surface that will be fused to the new casting. This saves a step in having to glue or wire the item to the ring form.
I waited about 15 minutes before removing from mold to wait for resin to completely harden. Voilá! I now have a ring made from a vintage drawer pull in a lovely pale jade color. The gold edging resulted from residue of Alumilite Gold Metallic Powder in the mold from a previous resin pour. I really love how this looks, but I've added a little color by spraying with purple and iridescent metallic mists, then rubbing the high points with silver leaf Rub n' Buff.
If you would like to see more of my creations,
please visit my blog sbartist : painting in the dark by clicking here.
Thanks for stopping by and have a fantastic day!
.................................
Don't miss a single post!
Please subscribe to our blog via email on the right side bar:
Twitter at @AmazingCrafting | Facebook at AmazingMoldPutty | YouTube at AmazingMoldPutty


oh I love big rings, this is so pretty!
ReplyDeleteThe vintage drawer pull mold turned into a ring is awesome idea. :)
ReplyDelete